Create a Meeting in Outlook on the Web- Tutorial
Create a Meeting in Outlook on the Web: Instructions
This video lesson, titled “Creating a Meeting Request,” shows how to create a meeting in Outlook on the Web. This video lesson is from our complete Outlook on the Web training, titled “Mastering Outlook on the Web Made Easy.”
Create a Meeting in Outlook on the Web: Overview
You can create a meeting in Outlook on the Web within the Calendar App. A meeting is simply an appointment that other people are invited to attend. You can create a meeting in Outlook on the Web and invite attendees by sending them a meeting request email.
On the Calendar view page, click “+ New” to start a new calendar event. Then, when the event creation pane opens, enter a title for the “Event” on the provided line. Then enter the “Location” of the meeting on the provided line. When entering a “Location,” you can click “Search in Bing” in the small popup box. Doing this then matches your location to a map point.
If your administrator has enabled “rooms” in your system, you can add a room in your office for the meeting. To do this, click the “Add room” button and choose a room from the list.
Then choose your “Attendees” for the meeting. To do this, start typing the “Attendees” into the provided line. Alternatively, click the “+” icon at the end of the “Attendees” line select attendees from your contact list.
After selecting the meeting attendees, then set the date and time for the meeting. Use the first “Start” dropdown to select the date for the meeting. Then use the second dropdown, under “Start,” to select the meeting start time. Then set the “Duration” for the meeting by choosing a time from the dropdown.
To set your availability status during the meeting, select an option from the “Show as” dropdown. Then choose either “Free,” “Working elsewhere,” “Tentative,” “Busy” and “Away” from the dropdown menu. The default value is “Busy.”
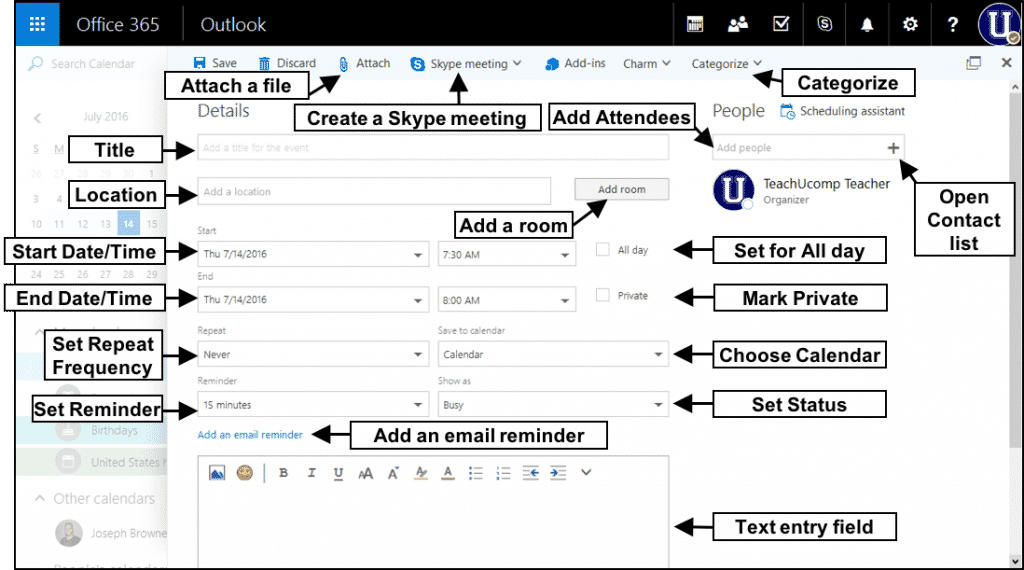
Create a Meeting in Outlook on the Web- Tutorial: A picture of a meeting request within Outlook on the Web.
To set a meeting reminder, select an option from the “Reminder” dropdown. The options range from “0 minutes” to “2 weeks” within this dropdown. The default value is “15 minutes.”
You now want to choose which calendar displays this meeting. Make a selection from the “Calendar” dropdown. This dropdown contains all the calendars that are available. If you only have one calendar, this option is not selectable.
To create a recurring meeting, select a recurrence schedule from the “Repeat” dropdown list. There are many options from which to choose.
When you create a meeting in Outlook on the Web, do not check the “Mark as private” checkbox. Checking this checkbox will not share the meeting date and time. The invited attendees will only see that there is something scheduled, but will not get meeting information.
To create an online meeting, click the “Online meeting settings” link and then follow the onscreen instructions. You only want to utilize this function if using Skype for Business through Office 365. An “Online meeting,” is a conference call using Skype for Business. This allows many participants to meet online without having to travel to an office location.
The “Request responses” checkbox is selected by default. This notifies you which individuals have accepted or declined the meeting.
Enter the body of the meeting request in the large text box provided. After you create a meeting in Outlook on the Web, click “Send” to send your meeting requests to the attendees.
Create a Meeting in Outlook on the Web: Instructions
- To create a meeting in Outlook on the Web, click “+ New” in the Calendar view page.
- Then enter a title in the “Event” line.
- Then enter the location in the “Location” line.
- Optionally, click “Search in Bing” when adding a location to add a map point.
- To add a room, if supported by your organization, click “Add room” and then choose a room from the list.
- To choose the meeting attendees, enter names or email addresses into the “Attendees” line.
- When entering attendees, any matches in your Contact list appear under the line.
- When they appear, you can click a name to add them to the list.
- Alternatively, to choose meeting attendees, click the “+” at the end of the “Attendees” line to open your Contact list.
- Then click the “+” next to a name to add them to the “Attendees” list.
- Then click “OK” to return to the event creation pane and add the selected contacts.
- Choose a “Start” date and time from the dropdowns shown.
- Then choose the “Duration” for the meeting from that dropdown.
- To set your availability status during the meeting, select an option from the “Show as” dropdown.
- To set a meeting reminder, select an option from the “Reminder” dropdown.
- If using multiple calendars, select the calendar within which you want to create the meeting from the “Calendar” dropdown.
- To create a recurring meeting, select a recurrence schedule from the “Repeat” dropdown list.
- DO NOT check the “Mark as private” checkbox!
- To create an online meeting, click the “Online meeting settings” link and follow the onscreen instructions.
- Leave the “Request responses” checkbox checked to receive notifications when an attendee accepts or declines the meeting request.
- Enter a description or meeting goals for the meeting in the large text box provided.
- Click “Send” to send the meeting requests and create a meeting in Outlook on the Web.
