Create Other Charge Items in QuickBooks Desktop Pro- Instructions
Create Other Charge Items in QuickBooks Desktop Pro: Video
This video lesson, titled “How to Create Other Charges in Intuit QuickBooks Desktop Pro 2024,” shows how to create Other Charge items in QuickBooks Desktop Pro. This video is from our complete QuickBooks tutorial, titled “Mastering QuickBooks Desktop Pro Made Easy v.2024.”
Create Other Charge Items in QuickBooks Desktop Pro: Overview
You create Other Charge items in QuickBooks Desktop Pro to collect miscellaneous amounts in sales forms. For example, you can use them to collect freight charges or photocopying charges. Other examples of their use include collecting membership dues or assessing other fees in a sales form.
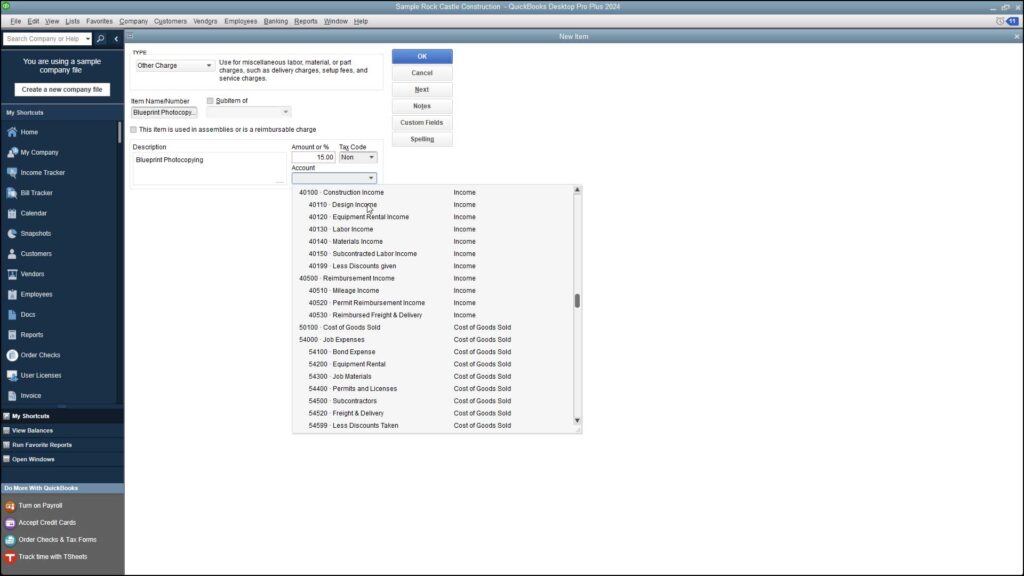
To create Other Charge items in QuickBooks Desktop Pro, select “Lists| Item List” from the Menu Bar to open the Item List. Then click the “Item” button in the lower-left corner of the list window. Then select the “New” command. In the “New Item” window, select “Other Charge” from the “Type” drop-down. Then enter a name for the charge into the “Item Name/Number” box.
Optionally, to make this charge a subitem of another charge, check the “Subitem of” checkbox. Then select the main charge item under which to categorize the current item from the adjacent drop-down.
Enter a description of the charge to show in invoices and sales receipts into the “Description” field. Enter the amount or percentage for the “Other Charge” item into the “Amount or %” field. Then select the “Tax Code” for the item. Then select the income account to which to attribute the charge’s income from the “Account” drop-down.
To create reimbursable charges, check the “This item is used in assemblies or is a reimbursable charge” check box. Doing this then changes the fields available. If checked, this changes the fields to resemble the ones used when creating “Inventory Part” items. Then enter the purchasing information for the charge into the fields in the “Purchase Information” section. Then enter the sales information for the charge into the “Sales Information” fields. This lets you use the charge in both purchase and sales transactions.
After creating the “Other Charge” item, click the “OK” button to save it into the Item List.
Create Other Charge Items in QuickBooks Desktop Pro: Instructions
- To create Other Charge items in QuickBooks Desktop Pro, select “Lists| Item List” from the Menu Bar.
- In the “Item List” window, then click the “Item” button in the lower-left corner.
- Then select the “New” command from the menu that appears.
- In the “New Item” window, select “Other Charge” from the “Type” drop-down.
- Enter a name for the charge into the “Item Name/Number” field.
- Optionally, to make this charge a subitem of another charge, check the “Subitem of” checkbox.
- Then select the main charge item under which to categorize the current item from the drop-down.
- Enter a description of the charge to show in invoices and sales receipts into the “Description” field.
- Enter the amount or percentage for the “Other Charge” item into the “Amount or %” field.
- Then select the “Tax Code” for the other charge.
- Then select the income account to which you attribute income from the charge by using the “Account” drop-down.
- To create reimbursable charges, check the “This item is used in assemblies or is a reimbursable charge” checkbox.
- Then enter the purchasing information for the charge into the fields in the “Purchase Information” section.
- Then enter the sales information for the charge into the “Sales Information” fields.
- To save the item into the Item List after creating it, click the “OK” button.