Create Payment Items in QuickBooks Desktop Pro – Instructions
Create Payment Items in QuickBooks Desktop Pro: Video
This video lesson, titled “How to Create Payment Items in Intuit QuickBooks Desktop Pro 2024,” shows how to create payment items in QuickBooks Desktop Pro. This video lesson is from our complete QuickBooks tutorial, titled “Mastering QuickBooks Desktop Pro Made Easy v.2024.”
Overview of How to Create Payment Items in QuickBooks Desktop Pro:
You can create payment items in QuickBooks Desktop Pro within the Item List. Payment items subtract the customer payment amount from the total invoice amount shown when creating an invoice. Payment items receive and apply a partial payment to an invoice at, or before, the time you create the invoice. Note that this is not what is used when receiving full payment at the time of sale. In that case, you simply fill out a “Sales Receipt.”
When you create payment items in QuickBooks Desktop Pro, you should create one for each unique payment type you accept. For example, if you accept cash, checks or VISA cards, you can create “Cash,” “Check,” and “VISA” payment items. When you use a payment item, it actually receives funds from the customer. Therefore, when you create this item type, you must also select whether the amount received when you use this item in an invoice is directly deposited to a specific account or placed into the “Undeposited Funds” account to deposit later.
To create payment items in QuickBooks Desktop Pro, open the Item List. Then click the “Item” button in the lower left corner of the “Item List” window. Then select the “New” command from the pop-up menu that appears. In the “New Item” window, you then select “Payment” from the “Type” drop-down.
Next, click into the “Item Name/Number” text box and enter a name for the payment item. Then enter the description for the item to show in the invoice when you use this item into the “Description” field. Then use the “Payment Method” drop-down to select the method of payment associated with this particular payment item.
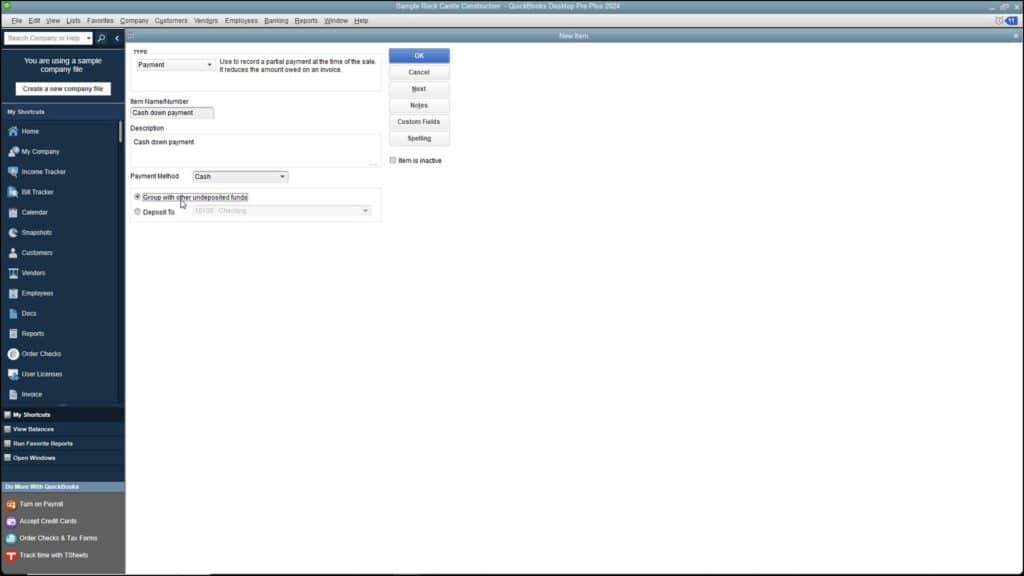
A picture of the “New Item” window when you create payment items in QuickBooks Desktop Pro.
You must then decide where to place the money received when you use this item in an invoice by either selecting the “Group with other undeposited funds” option button or the “Deposit To” option button. If you select the “Deposit To” option button, select the account to directly deposit the amount into from the adjacent drop-down. After creating the “Payment” item, then click the “OK” button to save the item into the “Item List.”
Instructions on How to Create Payment Items in QuickBooks Desktop Pro:
- To create Payment items in QuickBooks Desktop Pro, select “Lists| Item list” from the Menu Bar to open the “Item List” window.
- Then click the “Item” button in the lower left corner of the list window and select the “New” command.
- In the “New Item” window, then select “Payment” from the “Type” drop-down.
- Then click into the “Item Name/Number” text box and enter a name for the payment item.
- Then enter the description to show in an invoice when you use this item into the “Description” field.
- Use the “Payment Method” drop-down to select the method of payment associated with this particular payment item.
- Then decide where to place the money received when you use this item in an invoice by either selecting the “Group with other undeposited funds” option button or the “Deposit To” option button.
- If you select the “Deposit To” option button, then select the account to directly deposit the amount into from the adjacent drop-down.
- To save the item into the “Item List,” then click the “OK” button.