Create Tables in Access – Instructions
How to Create Tables in Access: Video Lesson
This video lesson, titled “Creating Relational Database Tables,” shows how to create tables in Access. This video lesson is from our complete Access tutorial, named “Mastering Access Made Easy v.2019 and 365.”
Overview of How to Create Tables in Access
This lesson shows you how to create tables in Access. A table is an organized structure that holds information. It consists of fields of information into which you enter the records of the table. A field is a single column within a table, consisting of one category of information. A record is a collection of related fields that describe a single item, contained in a row within a table.
Creating a Table in Table Design View in Access
One way to create tables in Access is by creating the tables in table design view. To create tables in Access in design view, click the “Create” tab in the Ribbon. Then click the “Table Design” button in the “Tables” button group. Doing this then shows the new table in the tabbed documents area.
In table design view, you will not see the actual data stored in your table. You will only see a representation of the structure of the table. This gives you more control over the properties of the fields versus using datasheet view to create a table.
This window is divided into two panes. First, there is the design grid at the top, where you enter field names and data types. Then there is the “Field Properties” pane beneath it. In the design grid at the top of the table design view, there is a small box at the far-left end of each field. This is the row selector button. You can click this small square to select the entire row. You need to do this frequently in Access, so note the location of this object now.
Adding Field Names in Table Design View in Access
In table design view in Access, type the name of the first new table field into the top row in the “Field Name” column. Field names must be unique within a table, and should be brief, yet descriptive. You should also consider not placing spaces within the field names. If you want, you can adopt a convention such as capitalizing the first letter of each word in a field name or using the underscore character instead of a literal space between words in a field name.
Also, the order of fields you type into this column is the order they appear from left to right in the datasheet view. Datasheet view is the view that lets you enter and see the table’s actual data values.
Assigning Data Types in Table Design View in Access
Then press the “Tab” key on your keyboard to move to the “Data Type” column to the right or click into this column. Next, click the drop-down arrow in the “Data Type” column and select the field’s data type from the choices in the drop-down menu that then appears. Review the following data types you can assign to fields in Access tables.
Field Data Types in Access 2019 and 365
| Data Type Name: | Data Type Description: |
| Short Text | Contains up to 255 characters of text, or a combination of text, numbers, and other info. |
| Long Text | A longer type of text field. It can store up to about 1 GB of text, but controls used to display its values can only show the first 64,000 characters. |
| Number | Can contain only numeric data on which to perform calculations, NOT phone numbers or zip codes. As you do not perform calculations with these numbers, they are text fields. Can be either 1, 2, 4, 8, or 16 bytes in size, depending on the related “Field Size” setting. |
| Large Number | An 8-byte numeric value which is compatible with the SQL_BIGINT data type in ODBC and which is used for efficiently calculating large numbers that aren’t currency. |
| Date/Time | Contains an 8-byte date or time code. Useful for Date/Time calculations. |
| Date/Time Extended | A 42-byte date or time code similar to the Date/Time data type, but with a larger date range, higher fractional precision, and compatibility with the “datetime2” data type in SQL Server. |
| Currency | An 8-byte number data type in function, but formatted as currency, with 4 decimal places of precision. Uses fixed point calculation, which is faster than the Number data type’s floating point calculation. |
| AutoNumber | Assigns a unique 4-byte numeric ID to all records entered in the table. Useful as a primary key field. If used for Replication ID, then it instead contains 16 bytes. |
| Yes/No | Stores Boolean (logical) data, like “Yes/No,” “True/False,” “On/Off,” “-1/0.” Used when only two possible values in a field can exist. |
| OLE Object | Connects to objects in Windows-based applications. You can use OLE Object data types for ActiveX objects, pictures, calendars, and other types of files. |
| Hyperlink | Contains a hyperlink to an address or file on the Internet, intranet, or LAN. |
| Attachment | Allows you to attach any type of supported file, such as images, or spreadsheets, for example. Provides greater attachment flexibility than the OLE Object field and also uses storage space more efficiently than OLE fields. |
| Calculated | Allows you to create a calculated field, which contains a value that is derived by performing a function on other table fields using an expression that you create. |
| Lookup Wizard… | Not an actual data type. Selecting this instead helps you set up a lookup field, which contains values from another table, query, or values you enter by hand, which then validate this field’s values. Useful for combo boxes and list boxes in forms. |
Entering Field Descriptions in Design View
Optionally, then press “Tab” on your keyboard to move to the “Description” column or simply click into this column. You can then type a description of the data that will be stored in this field, if needed. Then press “Tab” on your keyboard to move down to the next row or click into the “Field Name” column in the next row.
Then repeat this process of typing a field name, selecting its data type, and entering an optional description, until you finish adding all the fields to the table.
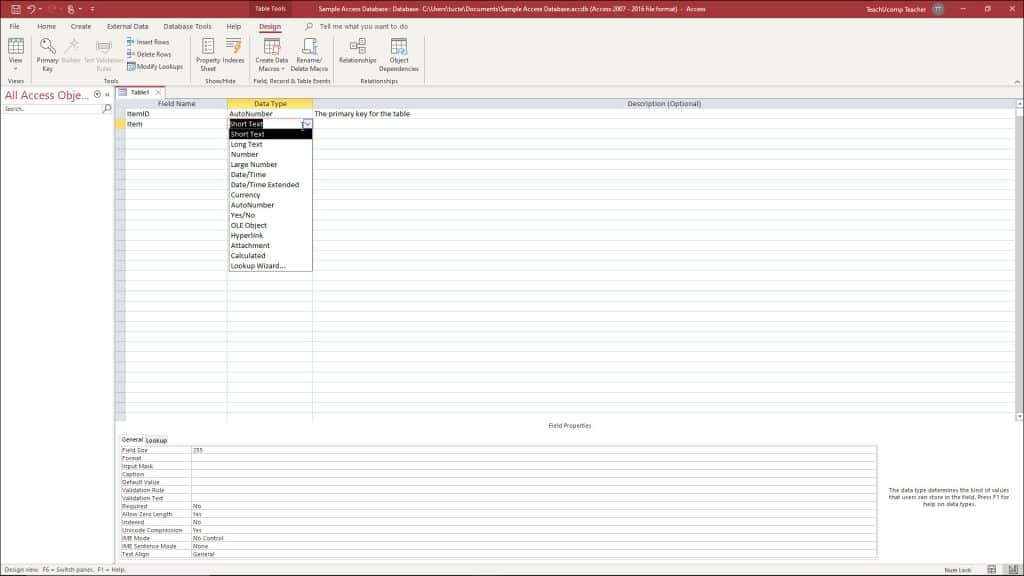
A picture of a user creating a new table in table design view in Access.
Below the design grid is the “Field Properties” section where you can set the properties of the currently selected field in the table. In this area, the properties of the currently selected field appear on the “General” and “Lookup” tabs. You can edit or set the field’s properties here by changing the values, as needed. Later lessons in our course examine some of the properties you can change for selected fields. For now, simply familiarize yourself with where the field properties appear.
Setting a Primary Key in Design View
When finished, you simply need to set the primary key for the table and then save it. The primary key field is the field that uniquely identified each table record. Often, this field exists naturally in the data. If not, you can add an “AutoNumber” field to a table to create a primary key field.
To mark a field as a primary key field in table design view, click the row selector at the left end of the row that contains the field to set as the primary key for the table. Then click the “Design” tab within the “Table Tools” contextual tab in the Ribbon. Then click the “Primary Key” button in “Tools” group.
Saving a Table in Design View
To save the table when you are finished, click the “Save” button in the Quick Access toolbar. Then type a name for the new table into the dialog box that appears. Then click the “OK” button.
Instructions on How to Create Tables in Access
- To create a new table in Access in table design view, click the “Table Design” button in the “Tables” button group on the “Create” tab of the Ribbon.
- A new table then appears in table design view in the tabbed documents area.
- To enter a field’s name, type the name of the new table field into the next available row of the “Field Name” column in the design grid at the top of the window.
- Then press “Tab” on your keyboard to move to the “Data Type” column to the right or click into it.
- To set the field’s data type, then click the drop-down arrow in the “Data Type” column and select the field’s data type from the choices that appear.
- To enter an optional field description, press “Tab” on your keyboard to move to the “Description” column to the right or click into the column.
- Then type a description in this field.
- Then press “Tab” on your keyboard to move down to “Field Name” column in the next row or click into this field in the next row.
- To continue adding fields, repeat steps 3 through 8 for the following rows until you create all the table’s fields.
- To assign the table a primary key field, click the row selector at the left end of the row that contains the field to set as the “primary key” for the table.
- Then click the “Primary Key” button in “Tools” button group on the “Design” tab of the “Table Tools” contextual tab in the Ribbon.
- To save the table, click the “Save” button in the Quick Access toolbar.
- Then type a table name into the dialog box that appears and click its “OK” button.