Enter Vendor Credits in QuickBooks Desktop Pro- Instructions
Enter Vendor Credits in QuickBooks Desktop Pro: Video
This video lesson, titled “How to Enter a Vendor Credit in Intuit QuickBooks Desktop Pro 2024,” shows how to enter vendor credits in QuickBooks Desktop Pro. This video lesson is from our complete QuickBooks tutorial, titled “Mastering QuickBooks Desktop Pro Made Easy v.2024.”
Overview:
You can easily enter vendor credits in QuickBooks Desktop Pro to later use them against the next bill you receive. To enter vendor credits in QuickBooks Desktop Pro, select “Vendors| Enter Bills” from the Menu Bar.
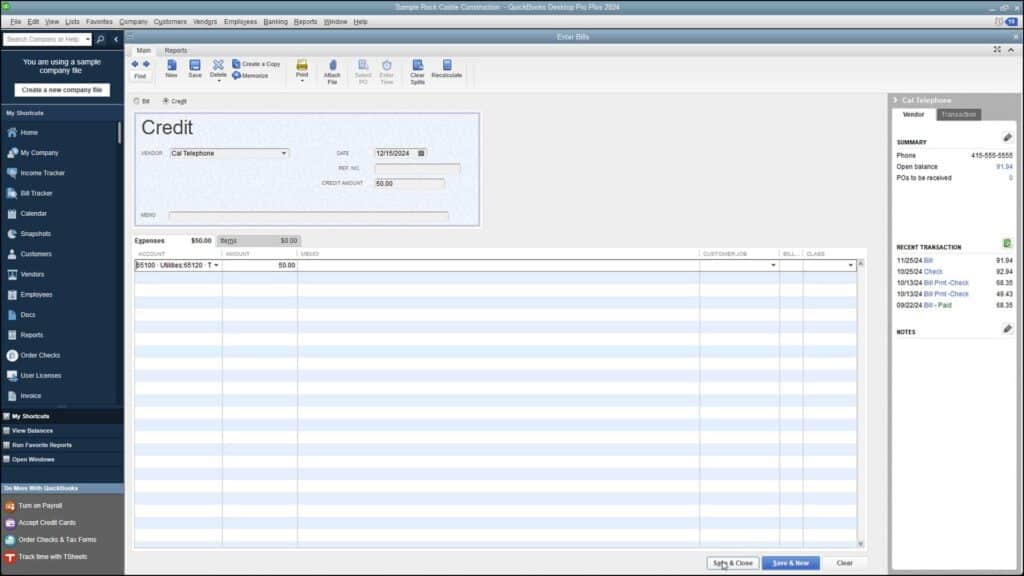
Doing this then opens the “Enter Bills” window. Select the option button for “Credit” at the top of the “Enter Bills” window. The word “Credit” should then appear at the top of the form.
Then select the name of the vendor who issued the credit from the “Vendor” drop-down. Then enter the date you received the credit from the “Date” calendar selector. If there is a number associated with the credit, enter that number into the “Ref. No.” field.
Then enter the amount of the credit into the “Credit Amount” field. Select the accounts or items for the credit on the “Expenses” or “Items” tabs, as appropriate. Then click the “Save & Close” button to save the credit for later use. The credit then appears when you go to pay the next bill from that vendor through the “Pay Bills” window.
Instructions on How to Enter Vendor Credits in QuickBooks Desktop Pro:
- To enter vendor credits in QuickBooks Desktop Pro, select “Vendors| Enter Bills” from the Menu Bar.
- In the “Enter Bills” window, select the option button for “Credit” at the top of the window.
- Then ensure the word “Credit” appears at the top of the form.
- Then select the name of the vendor who issued the credit from the “Vendor” drop-down.
- Enter the date you received the credit from the “Date” calendar selector.
- Enter any associated credit number into the “Ref. No.” field.
- Then enter the amount of the credit into the “Credit Amount” field.
- Then select the affected accounts or items on the “Expenses” or “Items” tabs at the bottom of the window.
- Finally, click the “Save & Close” button to save the credit for later use.