Flagging Messages in Outlook- Instructions
Flagging Messages in Outlook: Video Lesson
This video lesson, titled “Message Flags,” shows you many ways of flagging messages in Outlook. This video is from our complete Outlook tutorial, titled “Mastering Outlook Made Easy v.2019 and 365.”
Flagging Messages in Outlook: Overview
Flagging messages in Outlook creates “To-Do” items that remind you to follow up on the messages. Once you complete a flagged task, you can mark it as completed to clear the flag. When flagging messages in Outlook, Outlook places little flags next to messages that require some type of follow-up. You can also specify an action required to complete the follow-up. You can flag both messages you send and receive.
How to Flag Received Email in Outlook
To flag a received message for follow-up, open the Inbox folder and select the message to flag for follow-up. Then click the “Follow Up” button in the “Tags” button group on the “Home” tab of the Ribbon. In the drop-down menu that appears, then select the type of flag to apply.
Alternatively, to use quick-clicks in the Inbox to flag a message, hold your mouse pointer over a message in the Inbox. A small icon of a flag then appears in the upper-right corner of the message window. Click the flag icon to flag the message. For more advanced flagging options, right-click the flag icon to choose when to set the flag for follow up from a drop-down menu of choices.
How to Flag Email You Send in Outlook
To flag a message you are sending, create the mail message. Then click the “Follow Up” button in the “Tags” button group on the “Message” tab of the Ribbon in the message window. Then select the “Custom…” command from the drop-down menu to open the “Custom” dialog box.
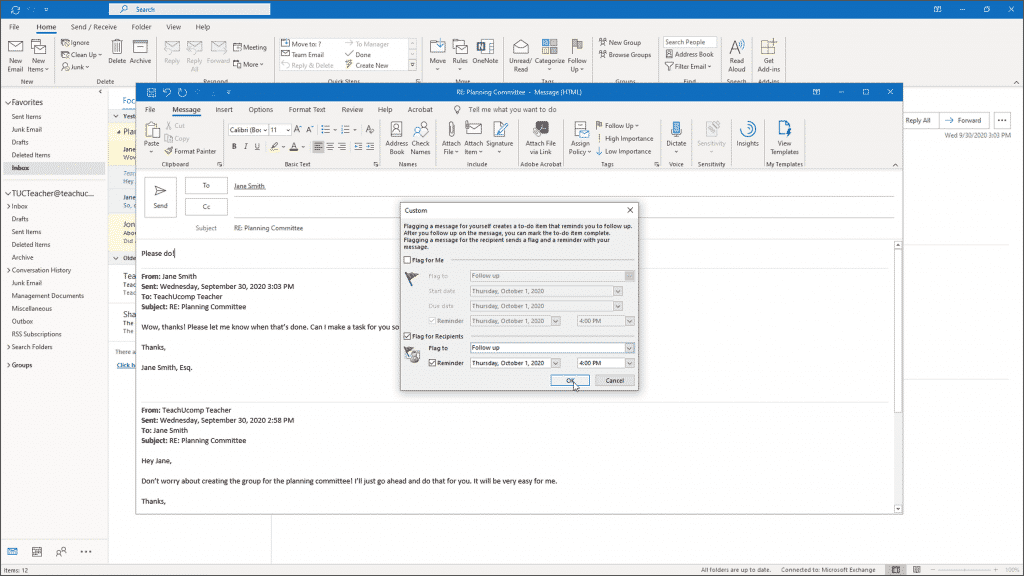
Flagging Messages in Outlook – Instructions: A picture of a user creating a custom message flag in Outlook.
In this dialog box, to flag the message for yourself, check the “Flag for Me” checkbox. Then click the drop-down arrow next to the “Flag to:” field to select a type of follow-up for this message. To set a start date and a due date for the flag, click the drop-down to the right of the “Start date:” and “Due date:” fields. Then select the desired dates from the calendar drop-downs. To also create a reminder for yourself, check the “Reminder:” checkbox. Then select the desired time at which you want the reminder to appear in Outlook.
To flag this message for the recipient, check the “Flag for Recipients” checkbox. Then use the “Flag to:” drop-down and “Reminder” checkbox to flag and set a reminder for the recipients of the message. Click “OK” when finished to set the flag for the message and return to the Inbox.
How to Mark Flags as Completed in Outlook
Later, to indicate you followed up with the message, you can mark the flag as completed in Outlook. To mark a flag as completed in Outlook, click the icon of the flag at the right end of the flagged message in your Inbox to turn it into a checkmark. Doing this also removes it from your “To-Do” list.
Flagging Messages in Outlook: Instructions
Instructions on How to Flag Received Email in Outlook
- To flag a received message for follow-up in Outlook, open the Inbox folder and select the message to flag.
- Then click the “Follow Up” button in the “Tags” button group on the “Home” tab of the Ribbon.
- In the drop-down menu that appears, then select the type of flag to apply.
- Alternatively, to use quick-clicks in the Inbox to flag a message, hold your mouse pointer over a message in the Inbox.
- A small icon of a flag then appears in the upper-right corner of the message window.
- Click the flag icon to flag the message.
- Alternatively, to set advanced flagging options, right-click the flag icon to choose when to set the flag for follow up from a drop-down menu of choices.
Instructions on How to Flag Email You Send in Outlook
- To flag a message you are sending in Outlook, create the mail message.
- Then click the “Follow Up” button in the “Tags” button group on the “Message” tab of the Ribbon in the message window.
- Then select the “Custom…” command from the drop-down menu to open the “Custom” dialog box.
- In this dialog box, to flag the message for yourself, check the “Flag for Me” checkbox.
- Then click the drop-down arrow next to the “Flag to:” field to select a type of follow-up for this message.
- To set a start date and a due date for the flag, click the drop-down to the right of the “Start date:” and “Due date:” fields.
- Then select the desired dates from the calendar drop-downs.
- To also create a reminder for yourself, check the “Reminder:” checkbox.
- Then select the desired time at which you want the reminder to appear in Outlook.
- To flag this message for the recipient, check the “Flag for Recipients” checkbox.
- Then use the “Flag to:” drop-down and “Reminder” checkbox to flag and set a reminder for the recipients of the message.
- Click “OK” when finished to set the flag for the message and return to the Inbox.
Instructions on How to Mark Flags as Completed in Outlook
- To later mark the flag as completed in Outlook, click the icon of the flag at the right end of the flagged message in your Inbox to turn it into a checkmark and also remove it from your “To-Do” list.