Format Tables in Word – Instructions
Format Tables in Word: Video Lesson
This video lesson, titled “Formatting Tables,” shows how to format tables in Word. This video lesson on formatting Word tables is from our complete Word tutorial, titled “Mastering Word Made Easy v.2019 and 365.”
Format Tables in Word: Overview
You can format tables in Word to clarify the data and also enhance the appearance of the information. Word has many pre-created table formats you can apply to your tables. In addition to these table styles, you can also select individual elements of the table and then apply your own custom formatting, if desired.
How to Format Tables in Word by Using Table Styles
To format tables in Word by applying a table style, start by clicking into the table to format. Next, click the “Table Design” contextual tab in the Ribbon. Note that if you are using Word 2016 or earlier, this tab is instead named the “Design” tab of the “Table Tools” contextual tab in the Ribbon. The table styles appear in a list in the “Table Styles” button group. Use the arrow buttons to the right to scroll through the list and click a style to apply it to the table. You can click the “More” button below the arrow buttons to fully expand the list, if desired.
To modify the styles in the “Table Styles” list, check or uncheck the checkboxes in the “Table Style Options” button group to decide which elements of the table styles to apply or remove before clicking the style to apply it. For example, to apply a “Total Row” to your table, check that option in the “Table Style Options” button group.
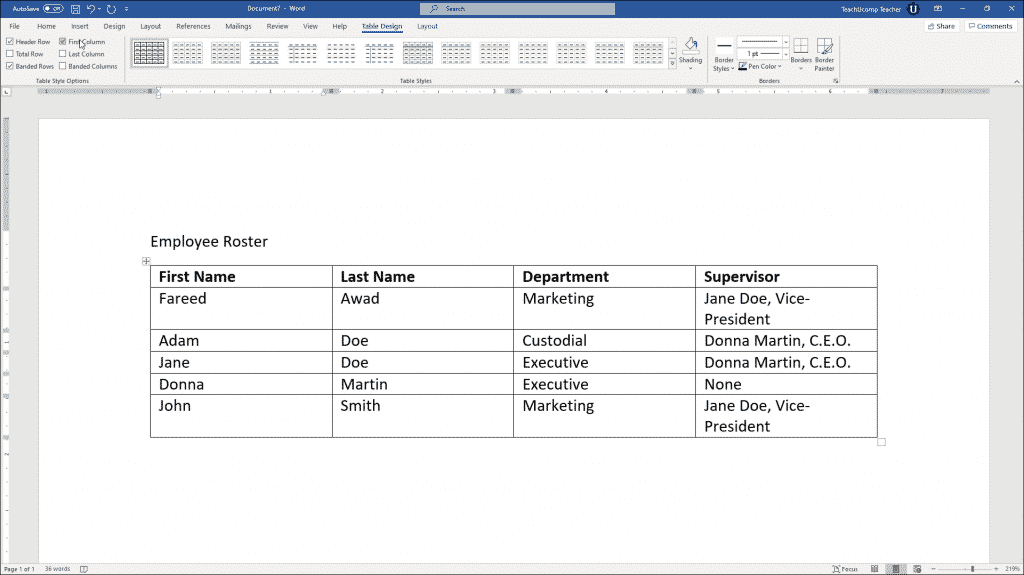
Format Tables in Word – Instructions: A picture of a user selecting table style options on the “Table Design” contextual tab of the Ribbon in Word for Microsoft 365.
How to Format Tables in Word by Applying Custom Formatting
How to Select Table Elements and Apply Cell Shading in Word Tables
Alternatively, to apply custom formatting modifications to a selected table element, like a selected cell, column, or row, select the table element to format. To change the shading, or fill color, of the selected cells, click the “Shading” drop-down button in the “Table Styles” button group and then select a background color from its drop-down menu.
How to Apply and Remove Cell Borders in Word Tables
To apply or remove borders to or from the selected cells, click the “Borders” drop-down button in the “Borders” button group on the “Table Design” contextual tab in the Ribbon. In this button’s drop-down menu, any highlighted border buttons are applied to the selected cells. Non-highlighted border buttons are not applied. Click any border button shown in the drop-down menu to apply or remove it.
How to Create, Apply, and Remove Custom Border Styles in Word Tables
To apply or remove a preset custom border style, click the “Border Styles” drop-down button in the “Borders” button group and then click the style to apply from the drop-down menu that appears. Alternatively, to create a custom border style, use the “Line Style,” “Line Weight,” and “Pen Color” drop-downs to select the border’s style, thickness, and color. Selecting any of these buttons also enables the “Border Painter” button.
To apply the custom border when the “Border Painter” button is enabled, click the table border in the document to which to apply the selected border style. Alternatively, you can also click the “Borders” drop-down button again and then select to which borders to apply the current border style for the currently selected cells from the drop-down menu that appears. If needed, to disable the “Border Styles” button to restore your normal mouse pointer cursor, click the “Border Painter” button or press the “Esc” key on your keyboard to turn it off.
Format Tables in Word: Instructions
Instructions on How to Format Tables in Word by Using Table Styles
- To format tables in Word by applying a table style, click into the table to format.
- Then click the “Table Design” contextual tab in the Ribbon. Note that if you are using Word 2016 or earlier, this tab is instead named the “Design” tab of the “Table Tools” contextual tab in the Ribbon.
- The preset table styles appear in a list in the “Table Styles” button group.
- To apply a preset style to the table, use the arrow buttons to the right of the list to scroll through the list and then click a style.
- To fully expand the list, if desired, click the “More” button below the arrow buttons.
- If you want to modify the styles in the “Table Styles” list, check or uncheck the checkboxes in the “Table Style Options” button group to decide what elements of the table styles to apply or remove before clicking the style to apply it.
Instructions on How to Format Tables in Word by Applying Custom Formatting
Instructions on How to Select Table Elements and Apply Cell Shading in Word Tables
- Alternatively, to apply custom formatting modifications to a selected table element, like a selected cell, column, or row, select the table element to format.
- To change the shading, or fill color, of the selected cells, click the “Shading” drop-down button in the “Table Styles” button group and then select a background color from its drop-down menu.
Instructions on How to Apply and Remove Cell Borders in Word Tables
- To apply or remove borders to or from the selected cells, click the “Borders” drop-down button in the “Borders” button group on the “Table Design” contextual tab in the Ribbon.
- In this button’s drop-down menu, any highlighted border buttons are applied to the selected cells.
- Non-highlighted border buttons are not applied.
- Click any border button shown in the drop-down menu to apply or remove it.
Instructions on How to Create, Apply, and Remove Custom Border Styles in Word Tables
- To apply or remove a preset custom border style, click the “Border Styles” drop-down button in the “Borders” button group and then click the style to apply from the drop-down menu that appears.
- Alternatively, to create a custom border style, use the “Line Style,” “Line Weight,” and “Pen Color” drop-downs to select the border’s style, thickness, and color.
- Selecting any of these buttons also enables the “Border Painter” button.
- To apply the custom border when the “Border Painter” button is enabled, click the table border in the document to which to apply the selected border style.
- Alternatively, you can also click the “Borders” drop-down button again and then select to which borders to apply the current border style for the currently selected cells from the drop-down menu that appears.
- If needed, to disable the “Border Styles” button to restore your normal mouse pointer cursor, click the “Border Painter” button or press the “Esc” key on your keyboard to turn it off.

