Record the Screen in PowerPoint – Instructions
How to Record the Screen in PowerPoint: Video
This video lesson, titled “Screen Recording,” shows you how to record the screen in PowerPoint and add it to a slide. This video lesson on how to insert a screen recording in PowerPoint is from our complete PowerPoint tutorial, titled “Mastering PowerPoint Made Easy v.2019 and 365.”
Overview of How to Record the Screen in PowerPoint
Things to Know Before You Create a Screen Recording in PowerPoint
You can record the screen in PowerPoint and add it to a presentation slide by using the “Screen Recording” command. You can record the video with or without audio, as desired. This helps you add a demonstration of a specific program to your presentation. To record audio with your screen recording, you must have a microphone, audio card, and speakers on your computer. The speakers let you hear what you recorded.
If you are trying to record system audio when creating a screen recording in PowerPoint, it is important to know that PowerPoint uses the default sound input device set by Windows for its audio recording. This is normally your microphone. However, some devices let you enable and select “Stereo Mix” as the sound input in Windows to record the system audio. If that is unavailable on your device and you need to record system audio, you may want to create the screen recording using a different video capture software, instead. You can then insert the video you create into PowerPoint.
How to Create a Screen Recording in PowerPoint
To insert a screen recording into a PowerPoint slide, click the “Insert” tab in the Ribbon. Then click the “Screen Recording” button in the “Media” button group. A popup box then appears at the top of the screen.
To select the screen area to record, click the “Select Area” button in the popup box. Your cursor then turns into a “crosshairs” icon. Then click and drag from the upper-left corner of the area to record down and to the right and release the mouse button when in the lower-right corner of the area to record. A dashed, red rectangle then outlines the screen area to record. Anything appearing inside the outline is recorded.
The “Audio” and “Record Pointer” buttons in the popup box are automatically selected, by default. To turn either off before you start recording, if desired, click the desired button to turn it off. Then open the program, video, or whatever content you want to record and ensure the content appears within the red recording rectangle.
To begin recording, click the “Record” button in the popup box. A three-count countdown appears before the recording starts. To stop recording in PowerPoint after you finish, click the large square button in the popup box. Alternatively, to stop recording in PowerPoint, press the “Windows logo key” + “Shift” + “Q” keys on your keyboard.
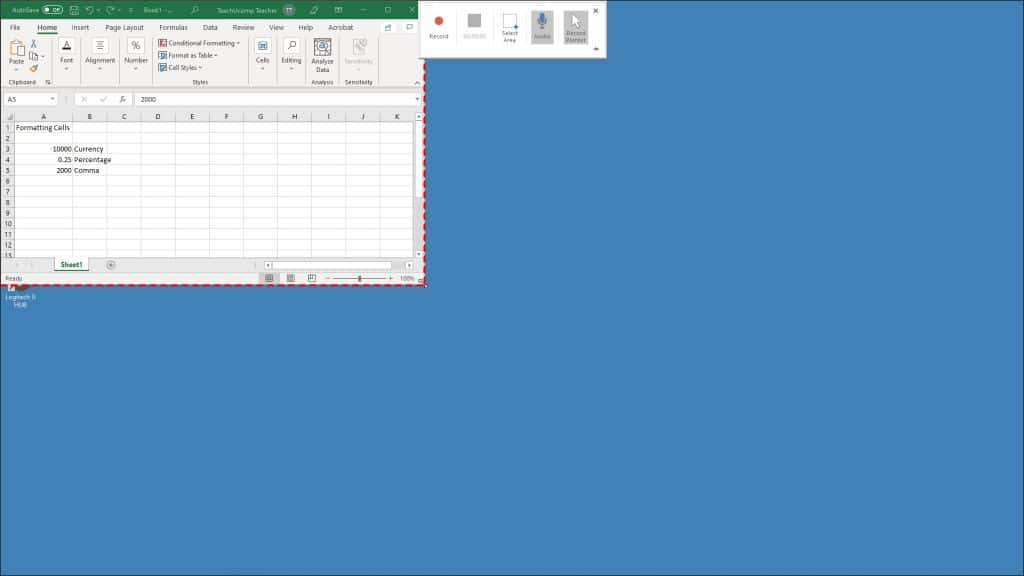
A picture that shows how to record the screen in PowerPoint to create a screen recording to add to a slide.
Your screen recording is then inserted into the current slide as a new slide object. To save your screen recording as an external file, if desired, right-click the screen recording object. Then choose the “Save Media as…” command to open a “Save Media As” dialog box. Use this dialog box to navigate into the folder into which to save the file. Then type a name for the file into the “Name:” field. Then click the “Save” button to save the screen recording.
After inserting a screen recording, you can then manipulate the screen recording object, as needed. A screen recording has the same playback, editing, and formatting options as any other video file you insert into a presentation from your computer.
Instructions on How to Insert a Screen Recording in PowerPoint:
- To record audio with your screen recording, you must have a microphone, audio card, and speakers on your computer. The speakers let you hear what you recorded.
- To insert a screen recording into a PowerPoint slide, click the “Insert” tab in the Ribbon.
- Then click the “Screen Recording” button in the “Media” button group.
- A popup box then appears at the top of the screen.
- To select the screen area to record, click the “Select Area” button in the popup box.
- Your cursor then turns into a “crosshairs” icon.
- Then click and drag from the upper-left corner of the area to record down and to the right and release the mouse button when in the lower-right corner of the area to record.
- A dashed, red rectangle then outlines the screen area to record. Anything appearing inside the outline is recorded.
- The “Audio” and “Record Pointer” buttons in the popup box are automatically selected, by default.
- To turn either off before you start recording, if desired, click the desired button to turn it off.
- Then open the program, video, or other content to record and ensure it appears within the red recording rectangle.
- To begin recording, click the “Record” button in the popup box.
- A three-count countdown appears before recording starts.
- To stop recording in PowerPoint after you finish, click the large square button in the popup box.
- Alternatively, to stop recording in PowerPoint, press the “Windows logo key” + “Shift” + “Q” keys on your keyboard.
- Your screen recording is then inserted into the current slide as a new slide object.
Instructions on How to Save a Screen Recording in PowerPoint as a Video File:
- To save your screen recording in PowerPoint as an external file, if desired, right-click the screen recording object.
- Then choose the “Save Media as…” command to open a “Save Media As” dialog box.
- Use this dialog box to navigate into the folder into which to save the file.
- Then type a name for the file into the “Name:” field.
- Then click the “Save” button to save the screen recording.