SmartArt in PowerPoint- Instructions and Video Lesson
How to Use SmartArt in PowerPoint: Video
This video lesson, titled “Inserting and Manipulating SmartArt,” shows how to use SmartArt in PowerPoint. This video lesson is from our complete PowerPoint tutorial, titled “Mastering PowerPoint Made Easy v.2019 and 365.”
Overview of SmartArt in PowerPoint:
What Is SmartArt in PowerPoint?
SmartArt in PowerPoint lets you easily add charts and other types of diagrams to presentation slides. With SmartArt in PowerPoint, you don’t need to individually create all the shapes and connectors between boxes in a flowchart or diagram.
How to Insert SmartArt in PowerPoint:
To insert SmartArt in PowerPoint, click the “Insert” tab of the Ribbon. Then click the “SmartArt” button in the “Illustrations” button group. Alternatively, click the “Insert a SmartArt Graphic” button inside any content placeholder within a slide. Either way, the “Choose a SmartArt Graphic” dialog box appears. This dialog box lets you select which type of SmartArt graphic to insert into the presentation slide.
Select a SmartArt category from the listing at the left side of the dialog box. Doing this then shows its SmartArt graphics in a list in the pane to its right. Click a SmartArt graphic in this list to read its name and how to use it in the far-right pane. After selecting the SmartArt graphic to insert, click the “OK” button to insert it into your presentation slide.
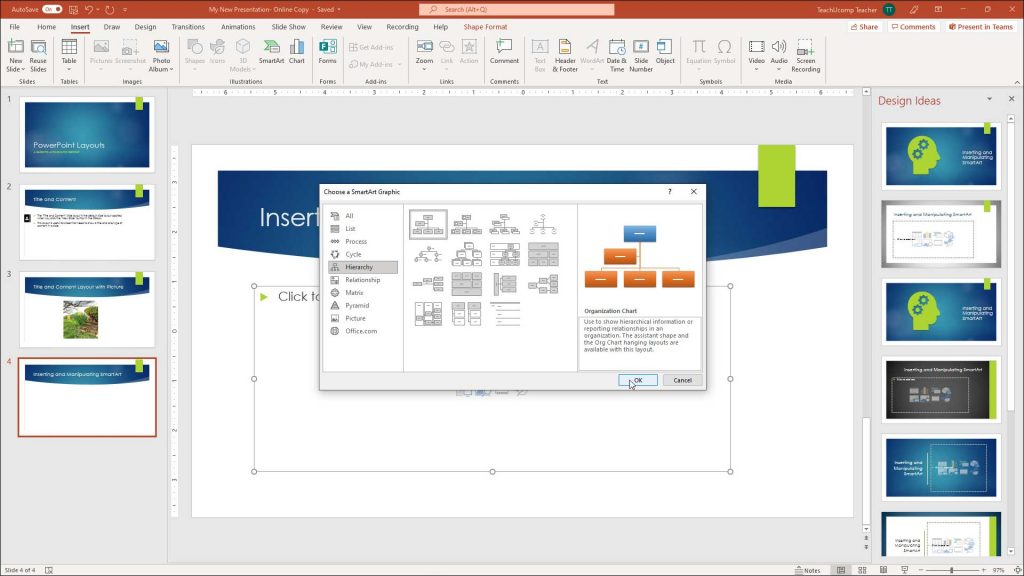
A picture of a user inserting SmartArt in PowerPoint.
How to Add Text to SmartArt in PowerPoint:
To enter text into the shapes in SmartArt in PowerPoint, click the individual shapes within the SmartArt graphic and type the text. Alternatively, type the text into the “Type your text here” pane that appears at the left side of your SmartArt graphic. To show this pane, if needed, click the arrow button on the left border of the SmartArt graphic. Clicking this arrow button both shows and hides the “Type your text here” pane.
How to Edit SmartArt in PowerPoint:
After selecting a SmartArt graphic in PowerPoint, two new “SmartArt Design” and “Format” contextual tabs appear in the Ribbon. You use the buttons and commands on these two contextual tabs to set the layout and appearance of the selected SmartArt.
Note that there are multiple, individually selectable shapes contained within a single piece of SmartArt. You can click the various shapes to select them and enter text or click and drag them to resize and reposition them within the larger SmartArt graphic, as desired.
Moving and Resizing SmartArt in PowerPoint:
To move the entire SmartArt graphic in PowerPoint without disturbing the placement of the elements inside it, click and drag the large, outer border of the SmartArt graphic where there are no resizing handles and then release it in a new position. To resize SmartArt in PowerPoint, hover your mouse pointer over a resizing handle on its border until the mouse pointer turns into a double-pointed arrow, click and drag to resize it, and then release the mouse button when it is the desired size.
How to Delete SmartArt in PowerPoint:
To delete the entire SmartArt graphic in PowerPoint, click its border to select it. Then press the “Delete” or “Del” key on your keyboard to delete the entire graphic.
Instructions on How to Use SmartArt in PowerPoint:
Instructions on How to Insert SmartArt in PowerPoint:
- To insert SmartArt in PowerPoint, click the “Insert” tab of the Ribbon.
- Then click the “SmartArt” button in the “Illustrations” button group.
- Alternatively, click the “Insert a SmartArt Graphic” button inside any content placeholder within a slide.
- Doing either action then opens the “Choose a SmartArt Graphic” dialog box.
- To select which type of SmartArt graphic to insert from the “Choose a SmartArt Graphic” dialog box, select a SmartArt category from the listing at the left side of the dialog box.
- Doing this then shows its SmartArt graphics in a list in the pane to its right.
- Then click a graphic in this list to read its name and how to use it in the far-right pane in the dialog box.
- Then click the “OK” button to insert the selected SmartArt graphic into the presentation slide.
Instructions on How to Add Text to SmartArt in PowerPoint:
- To enter text into a SmartArt shape, click the individual shapes in the SmartArt graphic and type the text for the selected shape.
- Alternatively, type the text into the “Type your text here” pane that appears at the left side of your SmartArt graphic.
- To show this pane, if needed, click the arrow button on the left border of the SmartArt graphic.
- Clicking this arrow button both shows and hides the “Type your text here” pane.
Instructions on How to Edit SmartArt:
- To show the “SmartArt Design” and “Format” contextual tabs in the Ribbon, select the SmartArt graphic.
- To set the layout and appearance of the selected SmartArt, use buttons and commands within these two tabs.
- If you want to resize and reposition the shapes within the larger SmartArt graphic, click and drag them.
Instructions on How to Move and Resize SmartArt in PowerPoint:
- To move the entire SmartArt graphic in PowerPoint without disturbing the placement of the shapes inside it, click and drag the large, outer border of the SmartArt graphic where there are no resizing handles and then release it in a new position.
- To resize SmartArt in PowerPoint, hover your mouse pointer over a resizing handle on its border until the mouse pointer turns into a double-pointed arrow, click and drag to resize it, and then release the mouse button when it is the desired size.
Instructions on How to Delete SmartArt in PowerPoint:
- To delete the entire SmartArt graphic in PowerPoint, click its border to select it.
- Then press the “Delete” or “Del” key on your keyboard.