Accept or Reject Changes to a Shared Workbook in Excel – Instructions
Accept or Reject Changes to a Shared Workbook in Excel: Video
This video lesson, titled “Reviewing Changes,” shows you how to accept or reject changes to a shared workbook in Excel after highlighting the changes made if you are using the traditional “Shared Workbooks” feature. This video lesson is from our complete Excel tutorial, titled “Mastering Excel Made Easy v.2019 and 365.”
Overview of How to Accept or Reject Changes to a Shared Workbook in Excel
If using the traditional “Shared Workbooks” feature in Excel, you can then either accept or reject changes to a shared workbook in Excel after highlighting the changes made. To accept or reject changes to a shared workbook in Excel, click the “Track Changes” button in the “Changes” button group on the “Review” tab of the Ribbon. Then click the “Accept/Reject Changes” command in the button’s drop-down menu to open the “Select Changes to Accept or Reject” dialog box.
In this dialog box, use the “When,” “Who,” and “Where” checkboxes and drop-down menus to filter for the changes to review. Then click the “OK” button to begin reviewing the selected changes.
Next, each selected change then appears, individually, in the “Accept or Reject Changes” dialog box. It shows who made the change, when they made the change, and what they changed. At the bottom of the dialog box, click “Accept,” to accept the change shown; “Reject,” to reject the change shown; “Accept All,” to accept all changes made; or “Reject All” to reject all changes made.
If multiple changes were made to a cell, you may have to select which change to keep in the dialog box before pressing one of the available buttons. When you are finished, the dialog box automatically closes. To close it before then, if needed, simply click the “Close” button to exit.
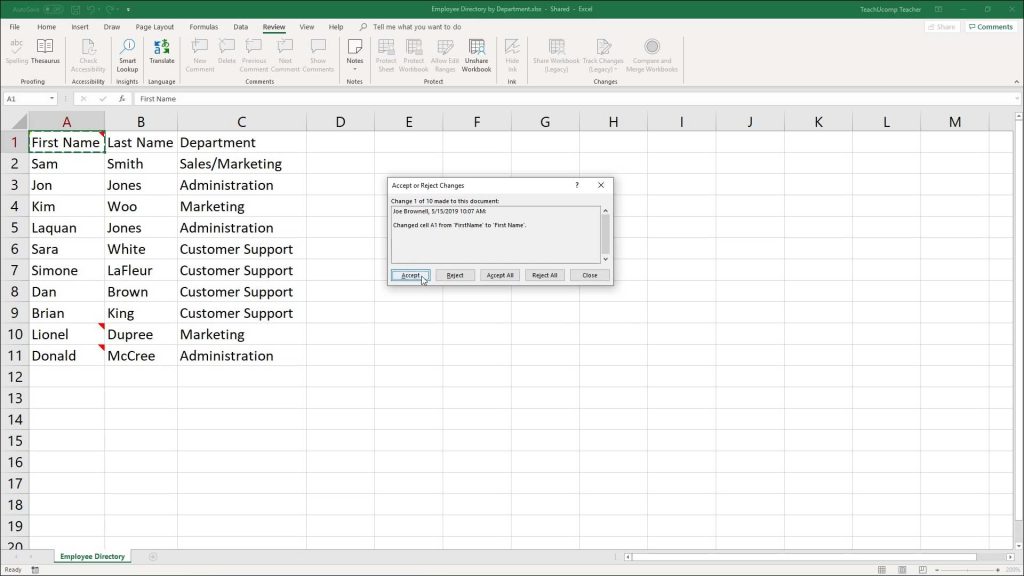
A picture showing how to accept or reject changes to a shared workbook in Excel if using the traditional “Shared Workbooks” feature.
Instructions on How to Accept or Reject Changes to a Shared Workbook in Excel
- To accept or reject changes to a shared workbook in Excel after highlighting the changes made if using the traditional “Shared Workbooks” feature, click the “Track Changes” button in the “Changes” button group on the “Review” tab of the Ribbon.
- Then click the “Accept/Reject Changes” command in the button’s drop-down menu to open the “Select Changes to Accept or Reject” dialog box.
- In this dialog box, use the “When,” “Who,” and “Where” checkboxes and drop-down menus to filter for the changes to review.
- Then click the “OK” button to begin reviewing the selected changes.
- Each selected change then appears, individually, and shows who made the change, when they made it, and what they changed in the “Accept or Reject Changes” dialog box.
- To accept the change shown, click “Accept” at the bottom of the dialog box.
- To reject the change shown, click “Reject” at the bottom of the dialog box.
- If you want to accept all the changes, click the “Accept All” button at the bottom of the dialog box.
- Alternatively, to reject all changes, click the “Reject All” button at the bottom of the dialog box.
- If multiple changes were made to a cell, you may have to select which change to keep in the dialog box before pressing one of the available buttons.
- When you are finished, the dialog box automatically closes.
- To close it before then, if needed, simply click the “Close” button to exit.

