TeachUcomp, Inc.

 MY CART
  • VIDEO COURSES
    • All-Access Subscriptions
    • Business Licensing
    • Course List
      • Accounting
      • Adobe
        • Acrobat
        • Lightroom Classic
        • Photoshop
        • Photoshop Elements
      • Crystal Reports
      • Employment Skills
        • Interview Skills
        • Resume Skills
      • For Lawyers
        • Excel for Lawyers
        • Outlook for Lawyers
        • QuickBooks for Lawyers
        • Word for Lawyers
      • HTML
      • JavaScript
      • Microsoft Office
        • Access
        • Excel
        • Microsoft Office Suite
        • OneNote
        • Outlook
        • Outlook on the Web
        • PowerPoint
        • Publisher
        • Word
      • Microsoft Project
      • Microsoft Teams
      • QuickBooks Online
      • QuickBooks Pro
      • Sage
        • Peachtree
        • Sage 50
      • SQL
      • Windows
    • Video Course Options
  • SUBSCRIPTIONS
  • MANUALS
    • Adobe
      • Acrobat
      • Lightroom Classic
      • Photoshop
      • Photoshop Elements
    • Crystal Reports
    • For Lawyers
      • Excel for Lawyers
      • Outlook for Lawyers
      • QuickBooks for Lawyers
      • Word for Lawyers
    • HTML
    • JavaScript
    • Microsoft Office
      • Access
      • Excel
      • OneNote
      • Outlook
      • Outlook on the Web
      • PowerPoint
      • Publisher
      • Word
    • Microsoft Project
    • Microsoft Teams
    • QuickBooks Online
    • QuickBooks Pro
    • Sage
      • Peachtree
      • Sage 50
    • SQL
    • Windows
  • REFERENCE CARDS
    • Adobe
      • Acrobat
      • Lightroom Classic
      • Photoshop
      • Photoshop Elements 2025
      • Photoshop Elements 2024
      • Photoshop Elements 2023
      • Photoshop Elements 2022
      • Photoshop Elements 2021
      • Photoshop Elements 2020
      • Photoshop Elements 2019
      • Photoshop Elements 2018
      • Photoshop Elements 15
    • Google
      • Google Classroom for Teachers
      • Google Docs
      • Google Drive
      • Google Forms
      • Google Sheets
      • Google Slides
    • Mac OS
      • Mac OS Keyboard Shortcuts
    • Microsoft Office
      • Excel Formulas and Functions
      • Excel Keyboard Shortcuts
      • Excel Tables PivotTables and Charts
      • Microsoft 365
        • Access for Microsoft 365
        • Excel for Microsoft 365
        • Microsoft Office 365
        • Outlook for Microsoft 365 Classic Edition
        • Outlook for Microsoft 365 (New Outlook)
        • PowerPoint for Microsoft 365
        • Publisher for Microsoft 365
        • Word for Microsoft 365
      • Microsoft Office 2021
        • Access 2021
        • Excel 2021
        • Microsoft Office 2021
        • OneNote for Windows 10
        • Outlook 2021
        • PowerPoint 2021
        • Publisher 2021
        • Word 2021
      • Microsoft Office 2019
        • Access 2019
        • Excel 2019
        • Microsoft Office 2019
        • Outlook 2019
        • PowerPoint 2019
        • Publisher 2019
        • Word 2019
      • Microsoft Office 2016
        • Access 2016
        • Excel 2016
        • Microsoft Office 2016
        • OneNote 2016
        • Outlook 2016
        • PowerPoint 2016
        • Publisher 2016
        • Word 2016
      • Microsoft Office 2013
        • Excel 2013
        • Microsoft Office 2013
        • OneNote 2013
        • Outlook 2013
        • PowerPoint 2013
        • Word 2013
      • Microsoft Office for iPad
        • Microsoft Office for iPad
      • Word Keyboard Shortcuts
    • Microsoft Teams
      • Microsoft Teams
    • QuickBooks Online
      • QuickBooks Online
    • QuickBooks Pro
      • QuickBooks Pro 2024
      • QuickBooks Pro 2023
      • QuickBooks Pro 2022
      • QuickBooks Pro 2021
      • QuickBooks Pro 2020
      • QuickBooks Pro 2019
      • QuickBooks Pro 2018
      • QuickBooks Pro 2017
      • QuickBooks Pro 2016
      • QuickBooks Pro 2015
      • QuickBooks Pro 2014
    • Sage
      • Sage 50 Accounting
    • SQL
      • SQL
    • Windows
      • Windows 11
      • Windows 11 and 10 Keyboard Shortcuts
      • Windows 10
  • STICKERS
    • Chrome OS
      • Chrome OS for Chromebooks
    • Mac OS
      • Mac OS
    • Microsoft Office
      • Word and Excel (Mac) 2022
      • Word and Excel (PC/Windows) 2021-2016 and 365
    • QuickBooks Desktop
      • QuickBooks Desktop (PC/Windows) 2024
      • QuickBooks Desktop (PC/Windows) 2023
      • QuickBooks Desktop (PC/Windows) 2022-2015
    • Windows
      • Windows 11 and 10
  • SUPPORT
    • Company
      • About Us
      • Blog
      • Contact Us
      • Our History
      • Our Philosophy
        • Customer Service
        • Mission
      • Policies
      • Testimonials
    • Contact Us
    • FAQ
    • Help
    • Lost Password
    • Register a Product
  • LOGIN
    • Manage My Account
    • Member Login
    • My Courses
Shop Now

Account Reconciliation in Peachtree- Tutorial

by Joseph Brownell / Monday, April 13 2015 / Published in Latest, Peachtree, Small Business Accounting

Account Reconciliation in Peachtree: Video Lesson

            This video lesson, titled “Reconciling the Bank Accounts,” shows you how to perform account reconciliation in Peachtree. This video is from our complete Peachtree training, titled “Mastering Peachtree Made Easy v.2012-2010.”

Account Reconciliation in Peachtree: Overview

            You can perform account reconciliation for any account in Peachtree using the “Account Reconciliation” window. This window shows your uncleared transactions that have affected the account balance through the end of the current accounting period. You can use this information to then reconcile the transactions in Peachtree with your bank account statements. As you clear the Peachtree transactions, the “Unreconciled Difference” will approach zero. Once you have marked all of your cleared transactions, the difference should be zero.

            Additional transactions, such as bank service charges can be added while you perform account reconciliation in Peachtree by using the “Adjust” button in the toolbar. Starting in Peachtree 2004, you can input bank service fees and interest earned directly into the reconciliation window, if desired. You can also use the “Adjust” button, if you prefer that method. Starting in Peachtree 2004, clicking the “Adjust” button brings up the “General Journal Entry” screen where you can enter the necessary entries. To perform account reconciliation in Peachtree, select “Tasks| Account Reconciliation…” from the Menu Bar.

Account Reconciliation in Peachtree- Tutorial: A picture of the "Account Reconciliation" window in Peachtree.

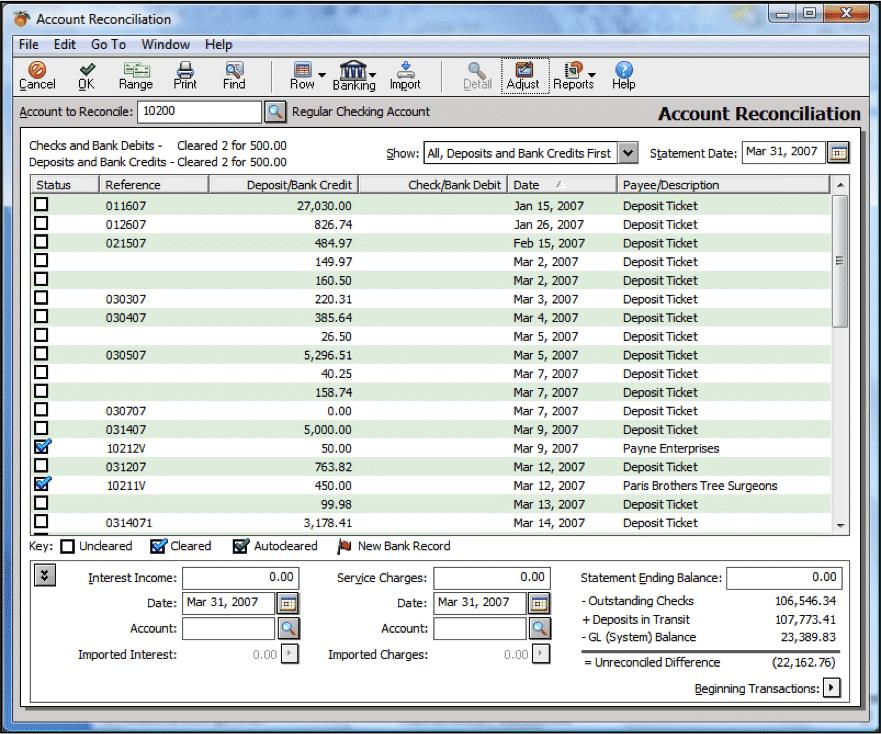
Account Reconciliation in Peachtree- Tutorial: A picture of the “Account Reconciliation” window in Peachtree.

            First, select the ID of the account that you want to reconcile from the “Account to Reconcile:” drop-down. Next, enter the statement date in the “Statement date:” field. Then, if using Peachtree 2003-2007, look in the “Checks” and “Deposits” lists to find your entered transactions to compare them to your bank statement. Starting in Peachtree 2007, all the bank account transactions are displayed in a single list.

            Check the checkbox at the left of any transaction to clear it. After you successfully perform account reconciliation in Peachtree, Peachtree removes these cleared transactions when you move to the next accounting period.

            At the bottom of this window, in the “Statement Ending Balance:” field, enter the ending balance for this account as shown in your bank statement. This will be the figure used to calculate the unreconciled difference. If you are just beginning to use Peachtree, you may need to click the “Beginning Transactions” gray arrow button to bring up the “Beginning Transactions” window. In this window, you can enter transactions that occurred before the Peachtree start date. These transactions do not affect the General Ledger and only help you perform account reconciliation in Peachtree.

            You also have some unique buttons on the toolbar in the “Account Reconciliation” window. If you click the “OK” button, you will save your changes and close the “Account Reconciliation” window. You can return at any time within the accounting period to finish the reconciliation, if needed.

            Clicking the “Range” button lets you enter a range of check numbers to clear. You can also click the “Row” drop-down to select either “All (checked),” which will check every transaction listed, or “All (unchecked),” which will clear every transaction listed.

            The most important button is the “Adjust” button. If you click this button in Peachtree 2003, it will display the “Additional Transactions” window where you can enter transactions listed on your bank statement that aren’t in Peachtree. This is used for things like “Interest Earned” from the Bank Statement. Entries that you make in this window do affect the General Ledger. Starting in Peachtree 2004, clicking the “Adjust” button simply launches the “General Journal Entry” screen where you can also enter these types of additional unrecorded transactions in a true journal entry format.

Account Reconciliation in Peachtree: Instructions

  1. To perform account reconciliation in Peachtree, select “Tasks| Account Reconciliation…” from the Menu Bar.
  2. Select the ID of the account to reconcile from the “Account to Reconcile:” drop-down.
  3. Enter the statement date into the “Statement date:” field.
  4. In the “Statement Ending Balance:” field at the bottom of the “Account Reconciliation” window, also enter the ending balance for the account, as shown in your bank statement.
  5. Check the “Clear” check box to clear a transaction marked as “cleared” in your bank statement using the “Checks” or “Deposits” list windows. Moving to the next accounting period removes these items from your list. The “Reference,” “Amount,” “Date,” and “Vendor/Payee” fields show that information for the transaction.
  6. To enter transactions that occurred before the Peachtree company file’s “start date,” click the “Beginning Transactions” button to bring up the “Beginning Transactions” window.
  7. In this window, enter the transactions that occurred before the Peachtree start date. These transactions do not affect the General Ledger and only help you perform account reconciliation in Peachtree.
  8. To then enter transactions not recorded in Peachtree if using Peachtree 2003 or earlier, click the “Adjust” button to display the “Additional Transactions” window, where you can enter transactions listed on your bank statement that aren’t recorded in Peachtree. You use this for things like “Bank Service Fees” or “Interest Earned” in the bank statement. Entries that you make in this window do affect the General Ledger.
  9. To enter transactions not recorded in Peachtree if using Peachtree 2004 or later, enter the “Service charges:” and “Interest income:” into the text boxes provided below the list of “Checks” and “Deposits.” If you need to enter multiple additional transactions, click the “Adjust” button and enter the transactions as General Journal Entries.
  10. Once the “Unreconciled Difference” is zero, click “OK” to finish the account reconciliation in Peachtree.
Tagged under: account reconciliation, Account Reconciliation in Peachtree, accounting software training, bank statements, course, help, how-to, instructions, learn, lesson, overview, peachtree, peachtree accounting, reconcile, reconcile accounts, reconciling bank accounts, teach, training, tutorial, video

About Joseph Brownell

Joseph Brownell is founder and Vice President of TeachUcomp, Inc. He is the author of dozens of titles across the TeachUcomp, Inc. product line.
Save $150! One Year Online Entire Library $49. Click here for more info.


Categories

  • GET SOCIAL

© 2001-2025 Copyright TeachUcomp, Inc. All rights reserved.

TOP
SALE! $49 All-Access 4 Days 13 Hours 16 Minutes 44 Seconds      $199 $49 Entire Library!
See Deal