Add a Macro to a Button in Access – Instructions
How to Add a Macro to a Button in Access: Video
This video lesson, titled “Assigning Macros to a Command Button,” shows you how to add a macro to a button in Access. This video lesson is from our complete Access tutorial, titled “Mastering Access Made Easy v.2019 and 365.”
Overview of Adding Macros to Buttons in Access Forms
You can add a macro to a button in Access forms to run the macro when a user clicks the form’s button. To run macros in Access forms, you often assign a macro to an “event” associated with a command button control in a form. Whenever the associated button’s “event” occurs, the macro is then run, or executed. Most often, macros are associated with the “click” event of a command button. This lets the user run the macro by clicking the button.
When adding macros to form button in Access, you can either add a standalone macro, which exists as a separate object in the database, or add an embedded macro, which only exists within the form.
How to Add a Standalone Macro to a Button in Access
To add a command button control to a form that a user can click to run a standalone macro in Access, first create the standalone macro to run. Then open the desired form to which to add the button and attach the macro in form design view.
Next, ensure you enable the “Use Control Wizards” button by clicking the “More” arrow in the lower-right corner of the scrollable list of controls in the “Controls” button group on the “Form Design” contextual tab in the Ribbon to show its drop-down menu. Ensure the “Use Control Wizards” button is highlighted, which means it is enabled. If not highlighted, click the button in the drop-down menu to enable it. This makes it much easier to create a command button.
Next, click the “Button” control in the scrollable list of controls in the “Controls” button group on the “Form Design” contextual tab in the Ribbon. Then click and drag over the area in the form over which to place the command button. When you release your mouse button, the command button is added to the form and the “Command Button Wizard” opens.
In the first screen of the “Command Button Wizard” dialog box, select the “Miscellaneous” choice from the “Categories” list. Then click the “Run Macro” choice in the “Actions” list to the right. Then click the “Next >” button to continue. In the next screen, click to select the name of the standalone macro to attach. Then click the “Next >” button to continue.
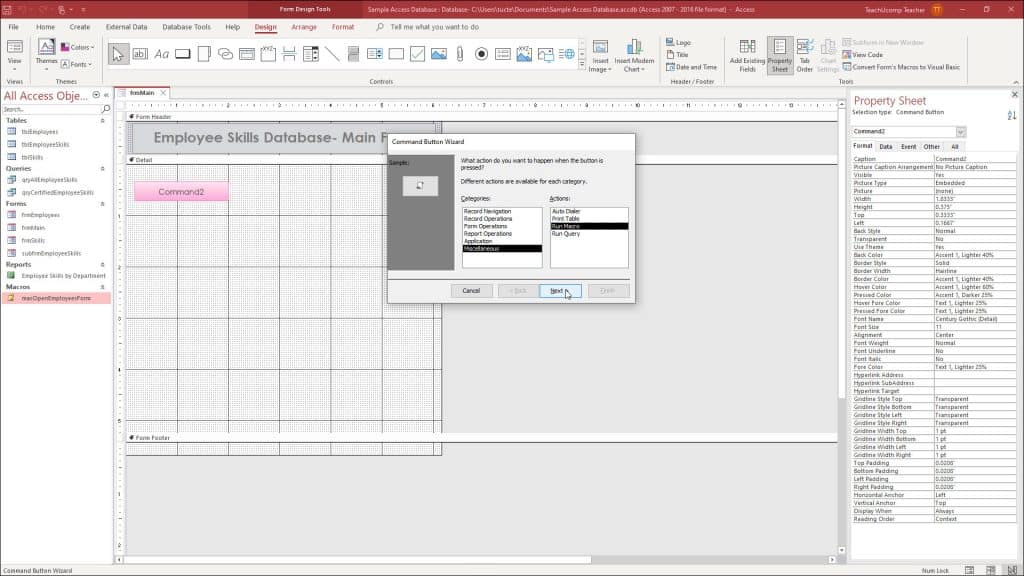
A picture showing how to add a macro to a button in Access.
To set the command button’s face, select either the “Text” or “Picture” option button. Then enter the button’s text in the adjacent field or select the icon to include on the button’s face using the adjacent options. Then click the “Next >” button to continue. In the final screen, type a name for the command button into the field provided and click the “Finish” button to add the button to the form.
How to Add an Embedded Macro to a Button in Access
Using the “Command Button Wizard” in Access is a very quick and easy way to assign a macro to a command button in a form. However, note the other options for quickly creating buttons for common macro events in the “Categories” and “Actions” lists in the first screen of the “Command Button Wizard” dialog box. Instead of embedding a standalone macro, as we just saw, you can also create embedded macros that perform the single actions listed by the choices in these two lists, if desired.
To add an embedded macro for a single, common action to an Access form, add the command button to the form using the “Command Button Wizard,” as shown above. Then just select the desired action choices in the “Category” and “Action” lists and continue to click the “Next >” button, answering questions, until you finish. Doing this lets you create quick command buttons that contain embedded macros, without needing to separately create standalone macros.
Instructions on How to Add a Macro to a Button in Access
How to Add a Standalone Macro to a Button in Access
- To add a standalone macro to a button in Access, first create the standalone macro to run.
- Then open the form to which to add the button in form design view.
- Enable the “Use Control Wizards” button by clicking the “More” arrow in the lower-right corner of the scrollable list of controls in the “Controls” button group on the “Design” tab of the “Form Design Tools” contextual tab in the Ribbon to show its drop-down menu.
- Ensure the “Use Control Wizards” button is highlighted, which means it is enabled.
- If not highlighted, click the button in the drop-down menu to enable it.
- Next, click the “Button” control in the scrollable list of controls in the “Controls” button group on the “Design” tab of the “Form Design Tools” contextual tab in the Ribbon.
- Then click and drag over the area in the form over which to place the button.
- Release your mouse button to add the command button to the form and open the “Command Button Wizard” dialog box.
- In the first screen of the “Command Button Wizard” dialog box, select the “Miscellaneous” choice from the “Categories” list.
- Then click the “Run Macro” choice in the “Actions” list to the right.
- Then click the “Next >” button to continue.
- In the next screen, click to select the name of the standalone macro to attach.
- Then click the “Next >” button to continue.
- To set the button’s face, select either the “Text” or “Picture” option button.
- Then enter the button’s text in the adjacent field or select the icon to include on its face using the adjacent options.
- Then click the “Next >” button to continue.
- Finally, type a name for the button into the field provided and click the “Finish” button.
How to Add an Embedded Macro for Common Actions to a Button in Access
- To add an embedded macro to a button in Access for common actions, open the form to which to add the button in form design view.
- Enable the “Use Control Wizards” button by clicking the “More” arrow in the lower-right corner of the scrollable list of controls in the “Controls” button group on the “Design” tab of the “Form Design Tools” contextual tab in the Ribbon to show its drop-down menu.
- Ensure the “Use Control Wizards” button is highlighted, which means it is enabled.
- If not highlighted, click the button in the drop-down menu to enable it.
- Next, click the “Button” control in the scrollable list of controls in the “Controls” button group on the “Design” tab of the “Form Design Tools” contextual tab in the Ribbon.
- Then click and drag over the area in the form over which to place the button.
- Release your mouse button to add the command button to the form and open the “Command Button Wizard” dialog box.
- In the first screen of the “Command Button Wizard” dialog box, select the desired action choices in the “Category” and “Action” lists.
- Then click the “Next >” button and continue to answer the questions posed, until you finish.