Add a Password to a PDF in Acrobat Pro DC – Instructions
Add a Password to a PDF in Acrobat Pro DC: Video Lesson
This video lesson, titled “Password-Protecting a PDF,” shows you how to add a password to a PDF in Acrobat Pro DC. This video lesson is from our complete Acrobat tutorial, titled “Mastering Acrobat Made Easy v.Pro DC.”
Add a Password to a PDF in Acrobat Pro DC: Overview
You can add a password to a PDF in Acrobat Pro DC to protect its contents. Passwords can prevent others from opening, editing, copying, or printing PDF files. You can add two kinds of passwords to a document using Acrobat. A “Document Open” password, also known as a “user password,” prevents users from opening the PDF without the password. A “Permissions” password, also known as a “master password,” prevents users from changing the PDF’s permissions without the password. This prevents users from changing the PDF’s editing and printing permissions.
To add a password to a PDF in Acrobat Pro DC, open a PDF to password-protect in Acrobat. Then select the “Protect” tool from the Tools Center to show the “Protect” toolbar. Click the “Encrypt” drop-down button in the toolbar. Then select the “Encrypt with Password” command from the drop-down list that appears. The “Applying New Security Settings” message box appears and asks you to confirm you want to add security to the PDF. Click the “Yes” button to continue and open the “Password Security – Settings” dialog box.
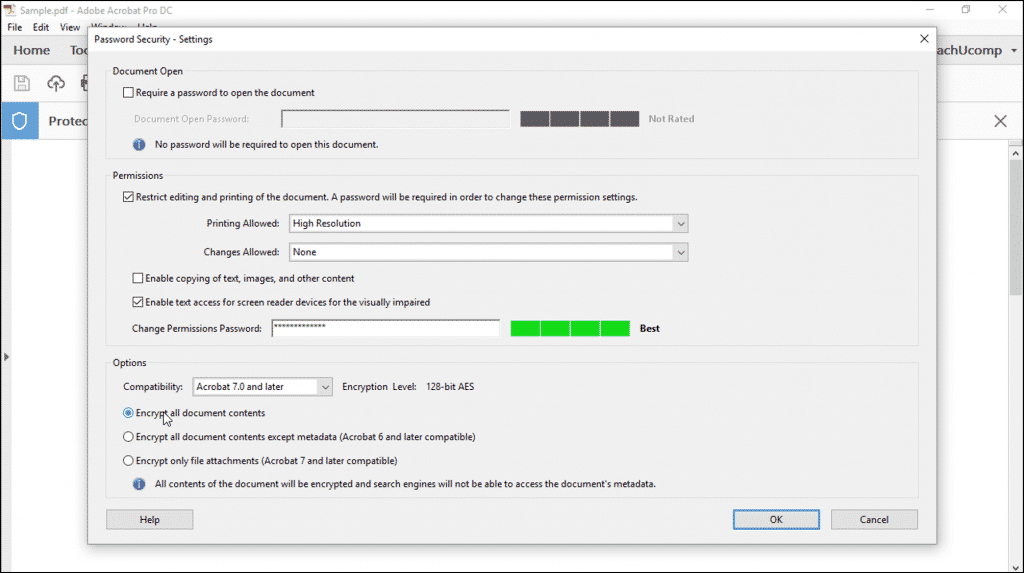
Add a Password to a PDF in Acrobat Pro DC – Instructions: A picture of a user adding a “Permissions” password to a PDF using the “Password Security – Settings” dialog box of Acrobat Pro DC.
To apply a password to open the PDF, check the “Require a password to open the document” checkbox in the “Document Open” section of the dialog box. Then enter a “Document Open Password” into the field of the same name. Remember to write down the password, so you can give it to others later. Without this password, no one can open this PDF. As you enter the password into the “Document Open Password” field, Acrobat analyzes the strength of your password in the area to the right of the field.
To apply a “Permissions” password to the PDF, check the “Restrict editing and printing of the document. A password will be required in order to change these permission settings” checkbox. Then use the “Printing Allowed” and “Changes Allowed” drop-downs to select the printing and changes to allow. To enable copying of PDF content, check the “Enable copying of text, images and other content” checkbox. To enable text access for screen readers for accessibility, check the “Enable text access for screen reader devices for the visually impaired” checkbox. Then enter a password needed to change these permissions into the “Change Permissions Password” field.
The “Options” area of the dialog box lets you select which parts of the PDF to encrypt by choosing an option button and selecting an Acrobat compatibility setting from the “Compatibility” drop-down. When finished, click the “OK” button. You must then re-enter any passwords you added in separate dialog boxes that appear. This is a double-check that ensures you entered them correctly. Enter each password again in the corresponding prompt and click the “OK” button. Finally, save your PDF. Security changes are not applied to a PDF until you save the changes.
Add a Password to a PDF in Acrobat Pro DC: Instructions
- To add a password to a PDF in Acrobat Pro DC, open the PDF to password-protect.
- Then select the “Protect” tool from the Tools Center to show the “Protect” toolbar.
- Click the “Encrypt” drop-down in the toolbar.
- Then select the “Encrypt with Password” command from the drop-down menu.
- Click “Yes” in the “Applying New Security Settings” message box that appears to open the “Password Security – Settings” dialog box.
- To apply a password to open the PDF, check the “Require a password to open the document” checkbox in the “Document Open” section.
- Then enter a “Document Open Password” into the field of the same name.
- To also add a “Permissions” password, check the “Restrict editing and printing of the document. A password will be required in order to change these permission settings” checkbox.
- Then use the “Printing Allowed” and “Changes Allowed” drop-downs to select the printing and changes to allow.
- Optionally, check the “Enable copying of text, images and other content” checkbox to enable copying of PDF content.
- To enable text access for screen readers for accessibility, check the “Enable text access for screen reader devices for the visually impaired” checkbox.
- Then enter the “Permissions” password into the “Change Permissions Password” field.
- To select which parts of the PDF to encrypt, choose an option button in the “Options” area of the dialog box.
- To select an Acrobat compatibility setting, use the “Compatibility” drop-down.
- When finished applying your passwords, click the “OK” button.
- Re-enter any corresponding password and then click the “OK” button in the dialog box prompts that appear for each password you applied.
- To apply the security changes to the PDF, then save the PDF.
