Add an Identity Plate to a Slideshow in Lightroom Classic CC- Instructions
Add an Identity Plate to a Slideshow in Lightroom Classic CC: Video Lesson
This video lesson, titled “Adding an Identity Plate to a Slideshow,” shows you how to add an identity plate to a slideshow in Lightroom Classic CC. This video lesson is from our complete Lightroom Classic CC tutorial, titled “Mastering Lightroom Classic Made Easy v.CC.”
Add an Identity Plate to a Slideshow in Lightroom Classic CC: Overview
How to Add an Identity Plate to a Slideshow in Lightroom Classic CC
You can easily add an identity plate to a slideshow in Lightroom Classic CC. The “Overlays” panel in Lightroom Classic CC’s Slideshow module lets you add an identity plate to a slide. It also lets you add a copyright watermark, ratings, text, and metadata to slides. You use an identity plate to provide identifying information about yourself to others. You can apply identity plates you save to the content you create in the Slideshow, Print, and Web modules. To add an identity plate to a slideshow in Lightroom Classic CC, expand the Overlays panel.
Check the “Identity Plate” checkbox at the top of the panel to add an identity plate to the upper-left corner of the slideshow in the Slide Editor view. If you have already created and saved identity plates you want to use, then click the preview image of the identity plate in the Overlays panel or the drop-down in its lower-right corner and then select the name of the saved identity plate to apply from the drop-down menu.
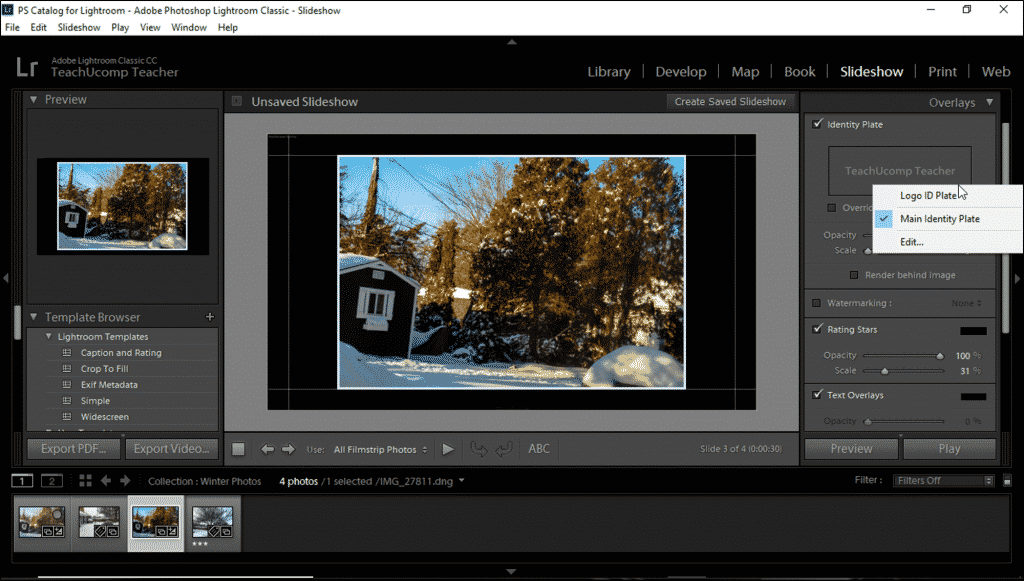
Add an Identity Plate to a Slideshow in Lightroom Classic CC- Instructions: A picture of a user adding a saved identity plate to a slideshow in Lightroom Classic CC.
How to Add a New Identity Plate to a Slideshow in Lightroom Classic CC
To create a new identity plate or customize an existing one, either click the identity plate preview in the Overlays panel or click the small triangle in its lower-right corner. Then choose the “Edit…” command from the drop-down menu to open the “Identity Plate Editor” dialog box. First, select the type of identity plate to create by selecting either the “Use a styled text identity plate” or “Use a graphical identity plate” option.
If you choose the “Use a styled text identity plate” option, then click into the text field below that option. Then type the identity plate’s text. To format the text, click and drag over the text to format to select it. Then use the font, font style, and font size drop-downs below the fields, and the adjacent font color chip, to set the font face and color of the selected text.
If you chose the “Use a graphical identity plate” option button, then either click and drag an image from your computer’s file explorer onto the “Click here or drag an image into this space…” field, or click the same field, or click the “Locate File…” button under the field. Doing either of the last two actions opens the “Locate File” dialog box, which you can then use to find and select the image to use. Then click the “Choose” button to close the dialog box and add the image to the identity plate. If you try to add an image that is too big, Lightroom advises you to choose another image.
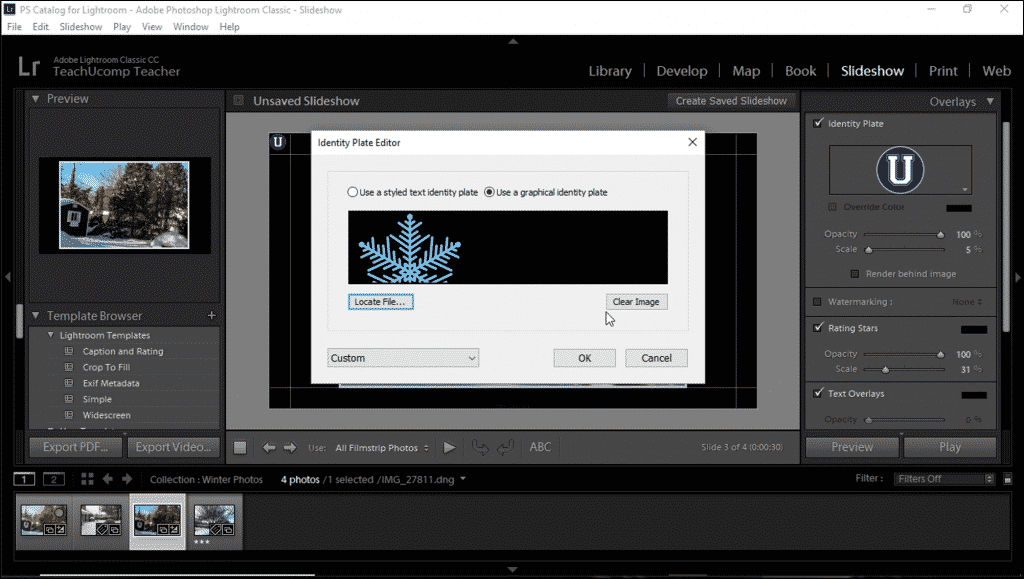
Add an Identity Plate to a Slideshow in Lightroom Classic CC- Instructions: A picture of a user creating a graphic identity plate within the “Identity Plate Editor” dialog box in Lightroom Classic CC.
To clear the image after adding it, click the “Clear Image” button below the identity plate preview. Then start over adding a new graphic. To apply your current identity plate when finished, click the “OK” button in the Identity Plate Editor” dialog box.
How to Save a New Identity Plate within a Slideshow in Lightroom Classic CC
To save your identity plate for future use, click the drop-down in the lower-left corner of the “Identity Plate Editor” dialog box. Then choose the “Save As…” command to open the “Save Identity Plate As…” dialog box. Type a name for the identity plate into the “Name” field. Then click the “Save” button in this dialog box.
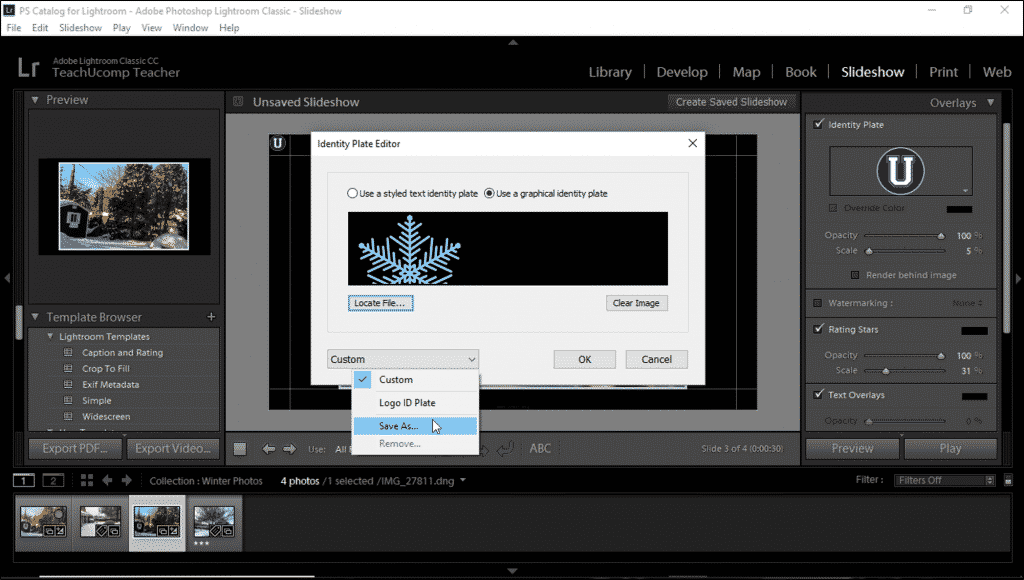
Add an Identity Plate to a Slideshow in Lightroom Classic CC- Instructions: A picture of a user saving a new identity plate within the “Identity Plate Editor” dialog box in Lightroom Classic CC.
If you click the same drop-down in the lower-left corner of the “Identity Plate Editor” dialog box, you can now select the name of the saved identity plate. As mentioned at the start of this lesson, this choice then also becomes an option you can select later on. To do this, click the identity plate preview in the “Overlays” panel. Alternatively, click the drop-down arrow in its lower-right corner in the “Overlays” panel. Then select the name of the saved identity plate.
How to Delete a Saved Identity Plate within a Slideshow in Lightroom Classic CC
If you want to delete the saved identity plate, click the drop-down in the lower-left corner of the “Identity Plate Editor” dialog box and choose the name of the custom identity plate to delete from the drop-down menu. Then click the same drop-down again and choose the “Remove…” command. Then click the “Remove” button in the “Confirm” dialog box.
How to Format an Identity Plate within a Slideshow in Lightroom Classic CC
After selecting an identity plate, you can use the sliders in the Overlays panel to adjust its appearance on slides. If you chose a text identity plate and want to override its color for this slideshow, check the “Override color” checkbox. Then click the adjacent color chip to the right to select the color to apply from the “Override Color” pop-up color menu. Drag the slider at the right side of this pop-up color menu upward to show the colors in the palette to the left. Then click a color in the palette to apply. Then click the “X” button in the upper-left corner of the pop-up color menu to close it.
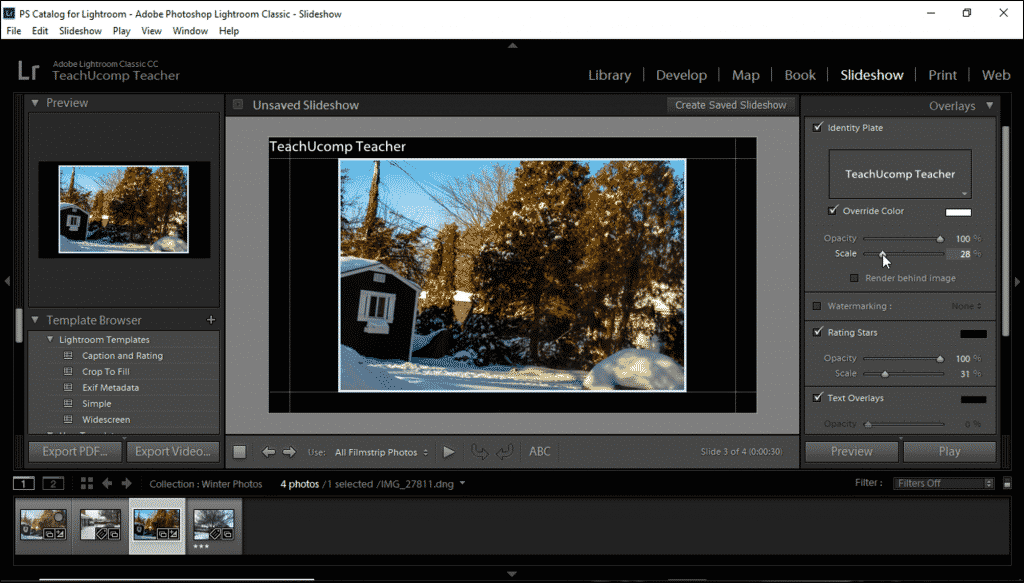
Add an Identity Plate to a Slideshow in Lightroom Classic CC- Instructions: A picture of a user formatting a selected identity plate within a slideshow in Lightroom Classic CC.
The next few options apply to both text and graphic identity plates. The “Opacity” slider in the Overlays panel lets you adjust the transparency of the identity plate. The “Scale” slider lets you adjust the size of the identity plate relative to the size of the slide. Checking the “Render behind image” checkbox only shows the identity plate on parts of the slide outside the image cell. This is because this setting forces the plate to appear behind the image. This helps if you don’t want the identity plate to overlay slide images. However, if you then need to move the identity plate to a different area of the slide in order to show it, click to select the identity plate within the Slide Editor and then drag it to a new place in the slide.
Add an Identity Plate to a Slideshow in Lightroom Classic CC: Instructions
Instructions on How to Add an Identity Plate to a Slideshow in Lightroom Classic CC
- If you want to add an identity plate to a slideshow in Lightroom Classic CC, expand the Overlays panel.
- To add an identity plate to the upper-left corner of the slideshow in the Slide Editor view, check the “Identity Plate” checkbox at the top of the panel.
- To select an identity plate you have already created and saved, click the preview image of the identity plate in the Overlays panel or the drop-down in its lower-right corner.
- Then select the name of the saved identity plate to apply from the drop-down menu.
Instructions on How to Add a New Identity Plate to a Slideshow in Lightroom Classic CC
- To create a new identity plate or customize an existing one, either click the identity plate preview in the Overlays panel or click the small triangle in its lower-right corner.
- Then choose the “Edit…” command from the drop-down menu to open the “Identity Plate Editor” dialog box.
- Then choose the type of identity plate to create by selecting either the “Use a styled text identity plate” or “Use a graphical identity plate” option button.
- If you choose the “Use a styled text identity plate” option, then click into the text field below that option button.
- Then type the identity plate’s text.
- To format the text, click and drag over the text to format to select it.
- Then use the font, font style, and font size drop-downs below the fields, and the adjacent font color chip, to set the font face and color of the selected text in the field.
- If you chose the “Use a graphical identity plate” option button, then either click and drag an image from your computer’s file explorer onto the “Click here or drag an image into this space…” field, or click the same field, or click the “Locate File…” button underneath the field.
- Doing either of the last two actions opens the “Locate File” dialog box.
- Use this dialog box to find and select the image to use.
- Then click the “Choose” button to add the image to the identity plate.
- To clear the image after adding it, click the “Clear Image” button below the identity plate preview.
- Then start over adding a new graphic.
- To apply your current identity plate, click the “OK” button in the Identity Plate Editor” dialog box.
Instructions on How to Save a New Identity Plate within a Slideshow in Lightroom Classic CC
- To save your identity plate for future use, click the drop-down in the lower-left corner of the “Identity Plate Editor” dialog box.
- Then choose the “Save As…” command to open the “Save Identity Plate As…” dialog box.
- Type a name for the identity plate into the “Name” field and click the “Save” button in this dialog box.
- If you click the same drop-down in the lower-left corner of the “Identity Plate Editor” dialog box, you can now select the name of the saved identity plate.
- This choice then also becomes an option you can select in the future.
- To do this, click the identity plate preview in the “Overlays” panel.
- Alternatively, click the drop-down arrow in its lower-right corner in the “Overlays” panel.
- Then select the name of the saved identity plate.
Instructions on How to Delete a Saved Identity Plate within a Slideshow in Lightroom Classic CC
- To delete the saved identity plate, click the drop-down in the lower-left corner of the “Identity Plate Editor” dialog box.
- Choose the name of the custom identity plate to delete from the drop-down menu.
- Then click the same drop-down again and choose the “Remove…” command.
- Then click the “Remove” button in the “Confirm” dialog box.
Instructions on How to Format an Identity Plate within a Slideshow in Lightroom Classic CC
- To change the selected identity plate’s appearance on slides, use the sliders in the Overlays panel.
- To override the color of a text identity plate, check the “Override color” checkbox.
- Then click the adjacent color chip to the right to select the color to apply from the “Override Color” pop-up color menu.
- Drag the slider at the right side of this pop-up color menu upward to show the colors in the palette to the left.
- Then click a color in the palette to apply.
- Then click the “X” button in the upper-left corner of the pop-up color menu to close it.
- To change the opacity of both text and graphic identity plates, use the “Opacity” slider in the Overlays panel.
- To adjust the size of the identity plate relative to the size of the slide, use the “Scale” slider.
- If you want to show the identity plate only behind the image cell, check the “Render behind image” checkbox.
