Add Captions in Word – Instructions
Add Captions in Word: Video Lesson
This video lesson, titled “Inserting Captions,” shows how to add captions in Word. This video lesson is from our complete Word tutorial, titled “Mastering Word Made Easy v.2019 and 365.”
Add Captions in Word: Overview
You can easily add captions in Word to document elements to label them. A caption is a numbered label you can apply to objects, equations and tables within your documents. This makes it easy to reference within your text, as there is an easily recognizable label on your object.
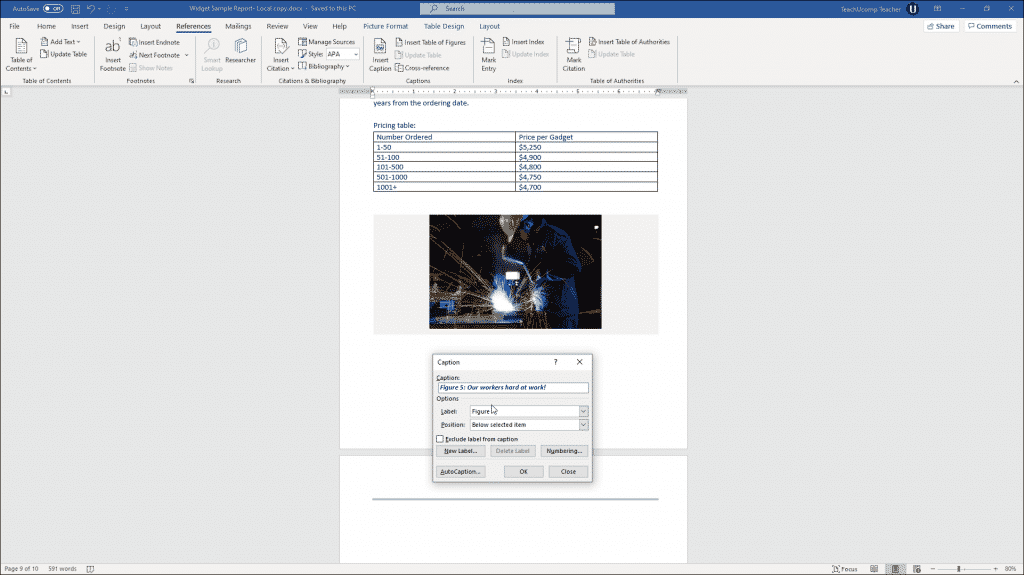
How to Manually Add Captions in Word
To add captions in Word, first select the object, table or equation to which you want to apply a caption. Then click the “References” tab in the Ribbon. Then click the “Insert Caption” button in the “Captions” button group to open the “Caption” dialog box.
To choose the caption label to use, click the “Label:” drop-down. Then choose either the “Equation,” “Figure” or “Table” choice from the drop-down menu. Your selection appears in the “Caption:” text field. To set the label’s placement, click the “Position:” drop-down. Then select either the “Above selected item” or “Below selected item” choice from the drop-down menu.
Add Captions in Word – Instructions: A picture of a user setting caption options in Word.
To display only the caption number, check the “Exclude label from caption” checkbox. To create a new label, click the “New Label…” button to open the “New Label” dialog box. Enter a name in the “Label:” field and then click “OK” to add the new label to the “Label:” list.
You can delete labels you have created, but you cannot delete the default labels. To delete a label you created, first choose the label from the “Label:” list within the “Caption” dialog box. Then click the “Delete Label” button. The label you created is immediately deleted.
To change the caption’s numbering, click the “Numbering…” button. Then choose how to number the caption in the “Caption Numbering” dialog box. Click “OK” when you are finished to return to the “Caption” dialog box. To apply the caption, click the “OK” button.
How to Automatically Add Captions in Word
Alternatively, you can also set Word to “AutoCaption” items when you insert them into your document. To automatically add captions in Word to selected types of objects when you insert them, then in the “Caption” dialog box, click the “AutoCaption…” button to open the “AutoCaption” dialog box. Then use the checkboxes in the “Add caption when inserting:” list to choose what to automatically caption. You can also use the drop-downs and buttons in the “Options” section to set the caption formatting. Click “OK” when you are finished to save the changes you made. After that, every time you insert an object that matches a selection made in the “AutoCaption” dialog box, Word automatically inserts a caption with the object.
Add Captions in Word: Instructions
Instructions on How to Manually Add Captions in Word
- To manually add captions in Word, select the object, table or equation to which you want to apply the caption.
- Then click the “References” tab in the Ribbon.
- Then click the “Insert Caption” button in the “Captions” button group to open the “Caption” dialog box.
- Choose the label to use from the “Label:” drop-down to show your selection in the “Caption:” text field.
- Set the label’s placement by using the “Position:” drop-down.
- To display only the number of the caption, check the “Exclude label from caption” checkbox.
- To create a new label, click the “New Label…” button to open the “New Label” dialog box.
- Enter a name in the “Label:” field and click “OK” to add your new label to the “Label:” list.
- To delete a label you created, choose the label from the “Label:” list in the “Caption” dialog box.
- Then click the “Delete Label” button.
- To change the caption’s numbering, click the “Numbering…” button to open the “Caption Numbering” dialog box.
- Choose how to number your caption and click “OK” to return to the “Caption” dialog box.
- To apply the caption, click the “OK” button.
Instructions on How to Automatically Add Captions in Word
- Alternatively, to automatically add captions in Word to selected types of objects when you insert them, open the “Caption” dialog box, as shown in steps #2 and #3, above.
- Then click the “AutoCaption…” button to launch the “AutoCaption” dialog box.
- Use the checkboxes in this dialog box to choose what type of objects to automatically caption.
- Use the drop-downs and buttons in the “Options” section to set the formatting for the captions.
- Click “OK” to save your settings.
- The next time you insert an object that matches a selection in the “AutoCaption” dialog box, Word automatically inserts a caption with that object.

