Add Excel Tables to a Data Model in Excel 2019- Instructions
Add Excel Tables to a Data Model in Excel 2019: Video Lesson
This video lesson, titled “Creating a Data Model from Excel Tables,” shows how to add Excel tables to a data model in Excel for Microsoft 365 or Excel 2019. This video on how to add Excel tables to a data model is from our complete Excel tutorial, titled “Mastering Excel Made Easy v.2019 and 365.”
Add Excel Tables to a Data Model in Excel 2019: Overview
You can manually add Excel tables to a data model in Excel 2019 or Excel for Office 365 workbooks. You can then use them as the data source for PivotTables and PivotCharts. However, note that this process changed from earlier versions of Excel. To learn how to add Excel tables to a data model in Excel 2016 or earlier, please read our previous blog post, titled “Add Excel Tables to a Data Model in Excel 2016,” instead.
Before you add Excel tables to a data model in Excel 2019 or Excel for Office 365, however, first create the tables in Excel. Also, ensure you create or format them as tables using either the “Create Table” or “Format As Table” dialog box. The tables must have a “Table Name” value to which Excel can refer to add them to the data model. However, note that the tables can be available within any opened Excel workbook. They do not need to exist in the Excel workbook in which you add them to the data model.
First, open the Excel workbooks that contain the tables. Then open the workbook in which to add the tables to the data model. To then add Excel tables to a data model in Excel 2019 or Excel for Office 365, click the “Data” tab in the Ribbon of that workbook. Then click the “Existing Connections” button in the “Get & Transform Data” button group to open the “Existing Connections” dialog box.
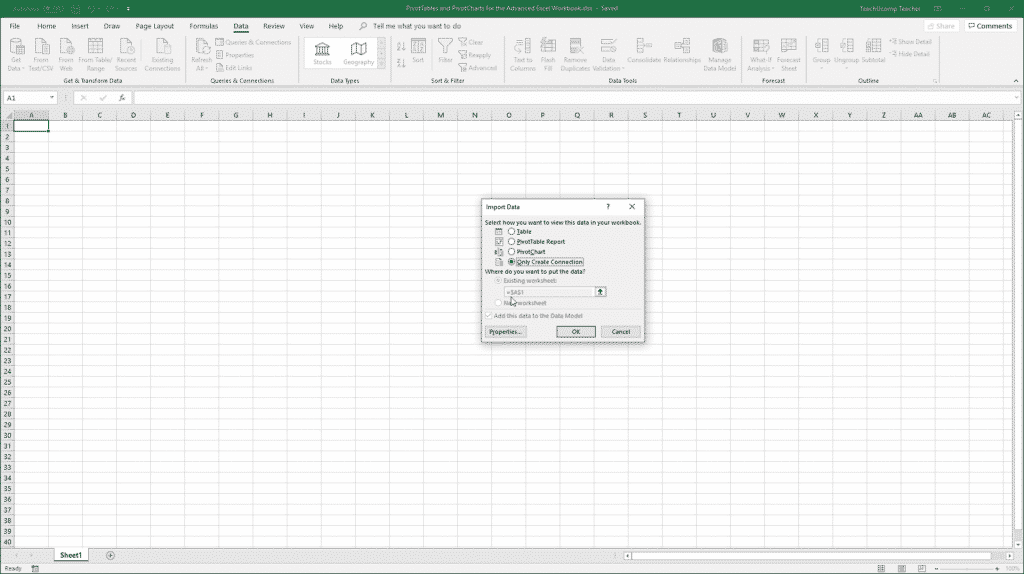
Add Excel Tables to a Data Model in Excel 2019- Instructions: A picture of the “Import Data” dialog box. This dialog box lets users add tables to a workbook’s data model.
Click the “Tables” tab in the “Existing Connections” dialog box to see all the Excel tables in all opened workbooks. Click or tap to select the table to add to the data model. Then click the “Open” button at the bottom of the dialog box to open the “Import Data” dialog box. In the “Import Data” dialog box, choose the option you prefer within the “Select how you want to view this data in your workbook” section. To add the table to the workbook’s data model as a workbook connection, select the “Only Create Connection” option button.
If needed, then choose where to place the data by selecting an option in the “Where do you want to put the data?” section. If you select the “Only Create Connection” option, then you won’t need to select a worksheet location. Most importantly, you must add the table to the data model. To do this, make sure the “Add this data to the Data Model” checkbox is checked. After deciding how to add the data and where to place it, then click the “OK” button to finish.
From then on, you can select the table from the workbook’s data model when creating PivotTables and PivotCharts. Within both the “Create PivotTable” or “Create PivotChart” dialog boxes, select the “Use this workbook’s Data Model” option button within the “Choose the data that you want to analyze” section to set the tables in the workbook’s data model as the data source. Then finish creating the desired objects, as usual.
Add Excel Tables to a Data Model in Excel 2019: Instructions
- To manually add Excel tables to a workbook’s data model in Excel 2019 or Excel for Office 365, first create the necessary tables in Excel. Ensure you create or format them as tables using either the “Create Table” or “Format As Table” dialog box. The tables must have a “Table Name” value to which Excel can refer to add them to the data model. However, note that the tables can be available within any opened Excel workbook. They do not need to exist in the Excel workbook in which you add them to the data model.
- First, open the Excel workbooks that contain the tables.
- Then open the workbook in which to add the tables to the data model.
- In this workbook, then click the “Data” tab in the Ribbon.
- Then click the “Existing Connections” button in the “Get & Transform Data” button group on the “Data” tab of the Ribbon to open the “Existing Connections” dialog box.
- Click the “Tables” tab in the “Existing Connections” dialog box to see all the Excel tables in all opened workbooks.
- Click or tap to select the table to add to the data model.
- Then click the “Open” button at the bottom of the dialog box to open the “Import Data” dialog box.
- In the “Import Data” dialog box, choose the option you prefer within the “Select how you want to view this data in your workbook” section.
- To add the table to the workbook’s data model as a workbook connection, select the “Only Create Connection” option button.
- If needed, then choose where to place the data by selecting an option within the “Where do you want to put the data?” section. If you select the “Only Create Connection” option, then you won’t need to select a worksheet location.
- Most importantly, you must add the table to the data model.
- To do this, make sure the “Add this data to the Data Model” checkbox is checked.
- After deciding how to add the data and where to place the data, then click the “OK” button to finish.
- From then on, you can select the table from the workbook’s data model when creating PivotTables and PivotCharts.
- Within both the “Create PivotTable” or “Create PivotChart” dialog boxes, select the “Use this workbook’s Data Model” option button within the “Choose the data that you want to analyze” section to set the tables in the workbook’s data model as the data source.
- Then finish creating the desired objects, as usual.

