Add Line Numbers in Word – Instructions
Add Line Numbers in Word: Video Lesson
This video lesson, titled “Adding Line Numbers,” shows how to add line numbers in Word. This video lesson is from our complete Word tutorial, titled “Mastering Word Made Easy v.2019 and 365.”
Add Line Numbers in Word: Overview
You may need to add line numbers in Word to a document. To add line numbers in Word, first click the “Layout” tab in the Ribbon. Then click the “Line Numbers” drop-down button in the “Page Setup” button group to display a drop-down menu of line number options. There are five preset options in this menu and a “Line Numbering Options…” command. To apply a preset line numbering option, select either the “None,” “Continuous,” “Restart Each Page,” “Restart Each Section” or “Suppress for Current Paragraph” choice to immediately apply it.
Alternatively, to apply custom line numbering in Word, click the “Line Numbering Options…” command in this drop-down menu to open the “Page Setup” dialog box and show the “Layout” tab. Then click the “Line Numbers” button at the bottom of the dialog box to open the “Line Numbers” dialog box.
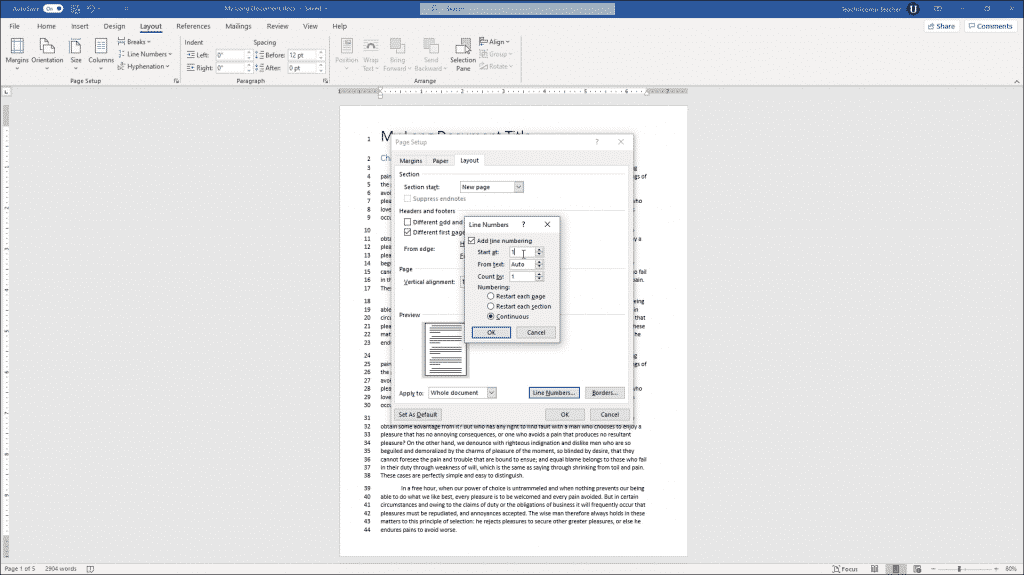
Add Line Numbers in Word – Instructions: A picture of the “Line Numbers” dialog box in Word.
To enable line numbers, check the “Add line numbering” checkbox in this dialog box. To specify the starting line number, use the “Start at” spinner box. To specify the line numbers’ distance from the text, use the “From text” spinner box. To set the increment by which the line numbers appear in the document, use the “Count by” spinner box.
Under the “Numbering” option, choose the desired option for when to restart the line numbering. After setting the custom line numbering, click the “OK” button to apply it and close the “Line Numbers” dialog box. Then click the “OK” button in the “Page Setup” dialog box to apply the custom line numbering.
Add Line Numbers in Word: Instructions
- To add line numbers in Word, click the “Layout” tab in the Ribbon.
- Then click the “Line Numbers” drop-down button in the “Page Setup” button group to display a list of line number options.
- To apply a preset line numbering option, select either the “None,” “Continuous,” “Restart Each Page,” “Restart Each Section” or “Suppress for Current Paragraph” choice to immediately apply it.
- Alternatively, to apply custom line numbering in Word, click the “Line Numbering Options…” command in this drop-down menu to open the “Page Setup” dialog box and show the “Layout” tab.
- Then click the “Line Numbers” button at the bottom of the dialog box to open the “Line Numbers” dialog box.
- To enable line numbers, check the “Add line numbering” checkbox in this dialog box.
- To specify the starting line number, use the “Start at” spinner box.
- If you want to specify the line numbers’ distance from the text, use the “From text” spinner box.
- To set the increment by which the line numbers appear in the document, use the “Count by” spinner box.
- Under the “Numbering” option, choose the desired option for when to restart the line numbering.
- Then click the “OK” button to apply it and close the “Line Numbers” dialog box.
- Then click the “OK” button in the “Page Setup” dialog box to apply the custom line numbering.

