Add Stamps and Create Stamps in Acrobat XI Pro- Tutorial
Add Stamps and Create Stamps in Acrobat XI Pro: Video Lesson
This video lesson, titled “Stamping and Creating Custom Stamps,” shows you how to add stamps and create stamps in Acrobat XI Pro. This video lesson on how to add stamps and create stamps in Acrobat XI Pro is from our complete Acrobat XI Pro training, titled “Mastering Acrobat Made Easy v.XI Pro.”
Add Stamps and Create Stamps in Acrobat XI Pro: Overview
In this lesson, you will learn how to add stamps and create stamps in Acrobat XI Pro. The “Add stamp” tool in the Annotations panel of the Comment pane in the Task Pane is used to add stamps and create stamps in Acrobat XI Pro. Acrobat comes with several preset stamps that are commonly used in business, such as stamps for approving a document or indicating where a user needs to add a signature to a document. You can also create your own custom stamps, if needed.
A common task when you add stamps and create stamps in Acrobat XI Pro is to add a preset stamp to the current PDF page. To do this, click the “Add stamp” tool in the Annotations panel of the Comment pane in the Task Pane. Either select a “Favorite” stamp shown in the top section of the drop-down menu or roll your mouse pointer over the stamp categories shown in the second section of the drop-down menu and then click the stamp to use in the side menu that appears.
Note that the “Identity Setup” dialog box will appear and prompt you to enter your identity information, if you haven’t entered that information already, after selecting a stamp from the “Dynamic” stamp category.
The mouse pointer changes to reflect the selected stamp when you place it over the PDF page. Click anywhere in the PDF page to apply the digital stamp.
To add a stamp to the “Favorite” stamps list shown at the top of the drop-down menu that appears when you click the “Add stamp” tool, select the stamp to use in the drop-down menu. Then immediately select the “Add stamp” tool button again and select the “Add Current Stamp To Favorites” command in the drop-down menu.
Another common task when you add stamps and create stamps in Acrobat XI Pro is to create a custom stamp from an existing image file. To do this, click the “Add stamp” tool, roll over the “Custom Stamps” command, and then choose “Create Custom Stamp…” within the side menu to open the “Select Image for Custom Stamp” dialog box. Click the “Browse…” button to find the image file to use for the custom stamp. Use the file format drop-down in the lower-right corner of the dialog box to select the type of image files to view, if needed. After finding the image file, click it to select it and then click the “Open” button to return to the “Select Image for Custom Stamp” dialog box. Click the “OK” button in this dialog box to open the “Create Custom Stamp” dialog box. You can choose to add the stamp to one of Acrobat’s existing stamp categories by selecting one from the “Category” drop-down, or you can create a new category for your stamp by typing a new category name into this drop-down field. Type a name for the stamp into the “Name” field. Ensure that there is a checkmark in the “Down sample stamp to reduce file size” checkbox to ensure the stamp is not too large. When finished, click the “OK” button to create the custom stamp.
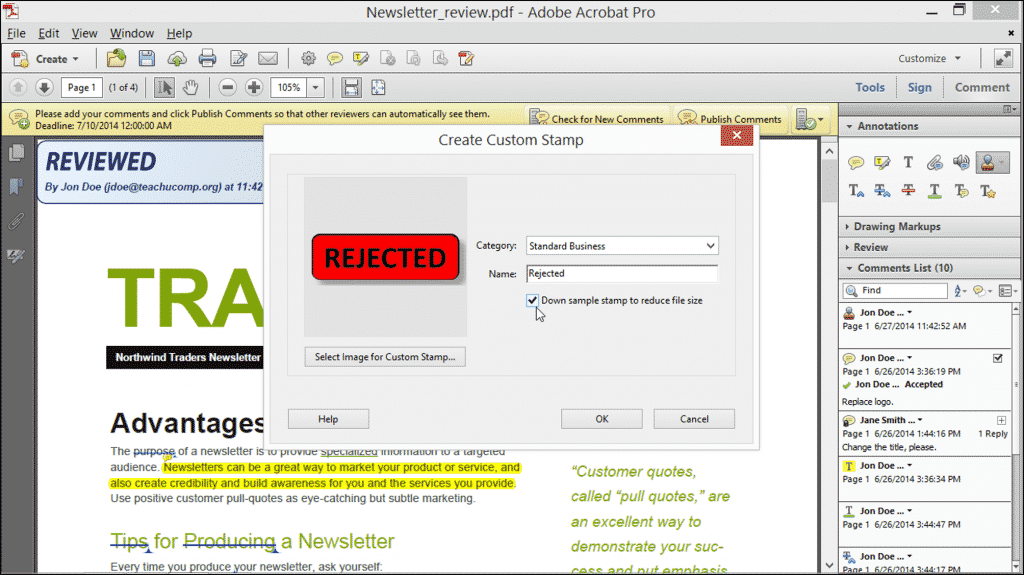
Add Stamps and Create Stamps in Acrobat XI Pro- Tutorial: A picture of the “Create Custom Stamp” dialog box in Acrobat XI Pro.
While you can add stamps and create stamps in Acrobat XI Pro, you can also create a temporary stamp from the contents of an image file you have copied to your clipboard to create a one-time use type of stamp in a PDF. To do this, copy the image file you want to apply as a stamp using your image editing software. Then click the “Add stamp” tool in the Annotations panel and select the “Paste Clipboard Image as Stamp Tool” command. Then click into the document at the location at which you want to stamp the copied image file.
Add Stamps and Create Stamps in Acrobat XI Pro: Instructions
- To add a preset stamp to the current PDF page, click the “Add stamp” tool in the Annotations panel of the Comment pane in the Task Pane.
- Either select a “Favorite” stamp shown in the top section of the drop-down menu or roll your mouse pointer over the stamp categories shown in the second section of the drop-down menu and then click the stamp to use in the side menu that appears.
- Note that the “Identity Setup” dialog box will appear and prompt you to enter your identity information, if you haven’t entered that information already, after selecting a stamp in the “Dynamic” stamp category.
- The mouse pointer changes to reflect the selected stamp when you place it over the PDF page.
- Click anywhere in the PDF page to apply the digital stamp.
- To add a stamp to the “Favorite” stamps list shown at the top of the drop-down menu that appears when you click the “Add stamp” tool, select the stamp to use in the drop-down menu.
- Immediately select the “Add stamp” tool button again and select the “Add Current Stamp To Favorites” command in the drop-down menu.
- To create a custom stamp from an existing image file, click the “Add stamp” tool, roll over the “Custom Stamps” command, and then choose “Create Custom Stamp…” within the side menu to open the “Select Image for Custom Stamp” dialog box.
- Click the “Browse…” button to find the image file to use for the custom stamp.
- Use the file format drop-down in the lower-right corner of the dialog box to select the type of image files to view, if needed.
- After finding the image file, click it to select it and then click the “Open” button to return to the “Select Image for Custom Stamp” dialog box.
- Click the “OK” button in this dialog box to open the “Create Custom Stamp” dialog box.
- Choose to add the stamp to one of Acrobat’s existing stamp categories by selecting one from the “Category” drop-down or create a new category for your stamp by typing a new category name into this drop-down field.
- Type a name for the stamp into the “Name” field.
- Ensure that there is a checkmark in the “Down sample stamp to reduce file size” checkbox to ensure the stamp is not too large.
- When finished, click the “OK” button to create the custom stamp.
- To create a temporary stamp from the contents of an image file you have copied to your clipboard, copy the image file you want to apply as a stamp using your image editing software.
- Then click the “Add stamp” tool in the Annotations panel and select the “Paste Clipboard Image as Stamp Tool” command.
- Then click into the document at the location at which you want to stamp the copied image file.
