Aging Report Settings in QuickBooks Online – Instructions
How to Customize Aging Report Settings in QuickBooks Online: Video
This video lesson, titled “How to Customize the Aging Report Settings in QuickBooks Online,” shows you how to customize the aging settings for aging reports in QuickBooks Online. This video lesson is from our complete QuickBooks Online tutorial, titled “Mastering QuickBooks Online Made Easy.”
Overview:
How to Find and Run Aging Reports in QuickBooks Online:
Aging settings only appear for aging reports in QuickBooks Online. QuickBooks Online contains both summary and detail aging reports for both accounts payable and accounts receivable. To quickly find aging reports in QuickBooks Online, type “aging” into the “Type report name here” search field at the top of the “Standard reports” page and then select the desired aging report from the drop-down that then appears.
How to Change the Report Date and Set Advanced Aging Report Options:
To change the date as of which to view aging data in QuickBooks Online, select a date from the “Report date” and/or “as of” drop-downs in the report customization settings section above the report. To view advanced aging report settings, click the “Customize” button in the report customization settings section above the report and then expand the “Aging” section in the “Customize” pane. The aging settings are the same for both accounts payable and accounts receivable, but the “Minimum days past due” setting only appears for aging detail reports.
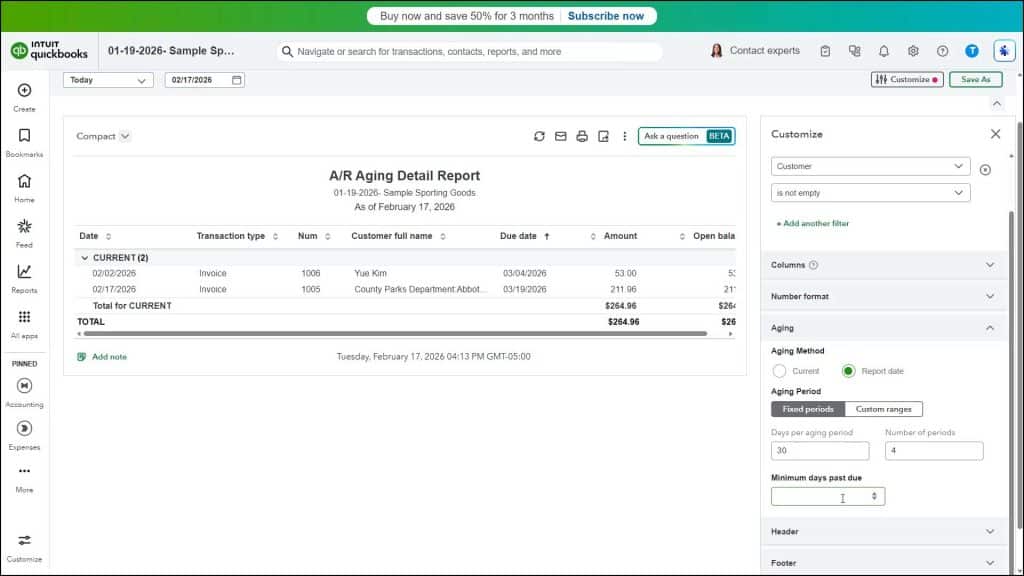
How to Set the Report Date Aging Method and Set Fixed Aging Periods:
To choose which date to use for the method to determine aging, select either the “Current” or “Report date” option button for the “Aging method” setting. To set the number of days in each aging period, select either the “Fixed periods” or “Custom ranges” toggle switch. If you select “Fixed periods,” then enter the number of days into the “Days per aging period” field and enter the number of aging periods to show within the report into the “Number of periods” field. To specify the minimum days past due to show in aging detail reports, type a number into the “Min. Days Past Due” field.
How to Set Custom Aging Periods
Alternatively, to define custom aging periods if you select “Custom ranges,” enter the number of days to set within each aging period range by changing the last day number for a range, which then sets the starting day number for the next range. To delete an aging period range you don’t need, click the “X” button at its right end. To add more aging period ranges, click the “+ Add another range” link under the existing periods. To delete all the aging period ranges, click the “Clear all ranges” link under the list of ranges.


