Apply a Theme in Word- Instructions and Video Lesson
Apply a Theme in Word: Video Lesson
This video lesson, titled “Applying a Theme,” shows you how to apply a theme in Word. This video lesson is from our complete Word tutorial, titled “Mastering Word Made Easy v.2019 and 365.”
Apply a Theme in Word: Overview
You can easily apply a theme in Word to your document. A theme in Word is a collection of a style set, color set, font set, effects, and paragraph spacing you can apply to your document.
How to Apply a Theme in Word
To apply a theme in Word to a document, click the “Design” tab in the Ribbon. Then click the “Themes” drop-down button in the “Document Formatting” button group to show a drop-down menu of theme choices. To preview a theme in your document, hold your mouse over a theme in this drop-down menu. To apply a theme to your document, click the theme to apply in the drop-down menu.
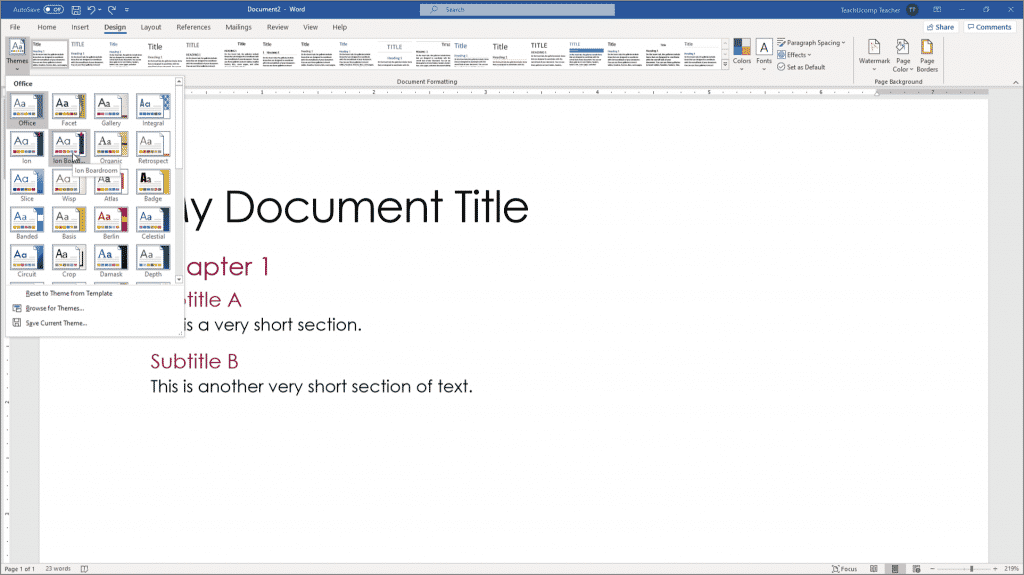
Apply a Theme in Word- Instructions and Video Lesson: A picture of a user applying a theme to a document in Word.
How to Remove a Theme in Word
To remove an applied theme from your document, click the “Design” tab in the Ribbon. Then click the “Themes” drop-down button in the “Document Formatting” button group. Then choose the “Reset to Theme from Template” command from the drop-down menu to revert your document back to the default theme for its related document template.
How to Save a Custom Theme in Word
You can customize the individual elements of a theme by changing its style set, color set, font set, and paragraph spacing. After making changes to a theme, you can then save it as a new theme you can later apply to other documents in Word. To do this, modify the theme, as desired. Then click the “Design” tab in the Ribbon. Then click the “Themes” drop-down button in the “Document Formatting” button group. Then choose the “Save Current Theme…” command from the drop-down menu to open a “Save Current Theme” dialog box.
By default, it opens to the “Document Themes” folder. Do not change this folder location to make it easier to apply custom themes in the future. Then type the name for your custom theme into the File Name” field. Then click the “Save” button in the dialog box to save it as a theme file in the selected location, with a .thmx file extension. Your custom theme will then also appear as a theme choice you can select from the list of choices in the “Themes” button’s drop-down menu of choices.
How to Set a Default Theme in Word
To set the currently applied theme as the default theme for all new blank documents you create, click the “Design” tab in the Ribbon. Then click the “Set as Default” button in the “Document Formatting” button group.
Apply a Theme in Word: Instructions
Instructions on How to Apply a Theme in Word
- To apply a theme in Word to a document, click the “Design” tab in the Ribbon.
- Then click the “Themes” drop-down button in the “Document Formatting” button group to open a drop-down menu of theme choices.
- To preview a theme in your document, hold your mouse over a theme in this drop-down menu.
- To apply a theme to your document, click the theme to apply in the drop-down menu.
Instructions on How to Remove a Theme in Word
- To remove an applied theme from your document, click the “Design” tab in the Ribbon.
- Then click the “Themes” drop-down button in the “Document Formatting” button group.
- Then choose the “Reset to Theme from Template” command from the drop-down menu to revert your document back to the default theme for its related document template.
Instructions on How to Save a Custom Theme in Word
- To save a modified theme as a new theme you can later apply to other documents in Word, modify the theme, as desired.
- Then click the “Design” tab in the Ribbon.
- Then click the “Themes” drop-down button in the “Document Formatting” button group.
- Choose the “Save Current Theme…” command from the drop-down menu to open a “Save Current Theme” dialog box.
- By default, it opens to the “Document Themes” folder. Do not change this folder location to make it easier to apply custom themes in the future.
- Then type the name for your custom theme into the File Name” field.
- Then click the “Save” button in the dialog box to save it as a theme file in the selected location, with a .thmx file extension.
- Your custom theme will then also appear as a theme choice you can select from the list of choices in the “Themes” button’s drop-down menu of choices.
Instructions on How to Set a Default Theme in Word
- To set the currently applied theme as the default theme for all new blank documents you create, click the “Design” tab in the Ribbon.
- Then click the “Set as Default” button in the “Document Formatting” button group.

