Apply Fills in Photoshop Elements – Instructions
How to Apply Fills in Photoshop Elements: Video
This video lesson is titled “Learn How to Apply Fills in Adobe Photoshop Elements 2023: A Training Tutorial.” This video lesson shows you how to apply fills in Photoshop Elements. This video lesson is from our complete Photoshop Elements tutorial, titled “Mastering Photoshop Elements Made Easy v.2023.”
Overview of How to Apply Fills in Photoshop Elements:
You can apply fills in Photoshop Elements to fill-in selections within raster layers or fill-in entire raster layers. You can apply fills in Photoshop Elements using colors, gradients, or patterns. This lesson shows you how to apply pixel-based fills to selected content in a raster layer or to an entire selected raster layer in Photoshop Elements.
Choose the Selection or Layer to Fill:
To apply a fill to a selection in a raster layer or an entire raster layer in Photoshop Elements, select the desired raster layer within which to apply the fill in the Layers panel. Optionally, then use one of the selection tools to select the area to fill in the layer. If you do not make a selection, you will instead fill-in the entire selected layer.
How to Quickly Fill the Background Color or Foreground Color:
One of the most common fills you can perform is a fill of the currently selected background or foreground color. To then apply a background or foreground fill, select the desired background and foreground colors in the Toolbox.
To then quickly fill the foreground color into the selection or layer, press both the “Alt” + “Delete” keys (“Option” + “Delete” for macs) at the same time on your keyboard. Alternatively, to quickly fill the background color into the selection or layer, press the “Ctrl” + “Delete” keys (“Command” + “Delete” for macs) on your keyboard.
How to Apply Fills in Photoshop Elements Using the “Fill Layer” Dialog Box:
Alternatively, to instead apply a fill using the “Fill Layer” dialog box, select either “Edit| Fill Selection…” or “Edit| Fill Layer…” from the Menu Bar. This command changes, depending on whether you have an active selection within a raster layer or only a raster layer selected in the Layers panel. However, after selecting either command, the “Fill Layer” dialog box then opens in Photoshop Elements. This dialog box provides you with many fill options.
In the “Fill Layer” dialog box, select what to use as the fill content from the “Use:” drop-down in the “Contents” section. Note that the choices include the current “Foreground Color” or the “Background Color.” Alternatively, to select a new fill color to use, select the “Color…” choice, which opens the “Color Picker” dialog box. Then use the “Color Picker” dialog box to select the desired fill color and then click the “OK” button to return to the “Fill Layer” dialog box.
Alternatively, to apply a pattern as a fill, select the “Pattern” choice. If you select the “Pattern” choice, then select the pattern to apply from the “Custom Pattern” drop-down that appears in the “Contents” section. Alternatively, to apply one of the other basic color fills, select either “Black,” “White,” or “50% Gray” choice from the “Use” drop-down menu.
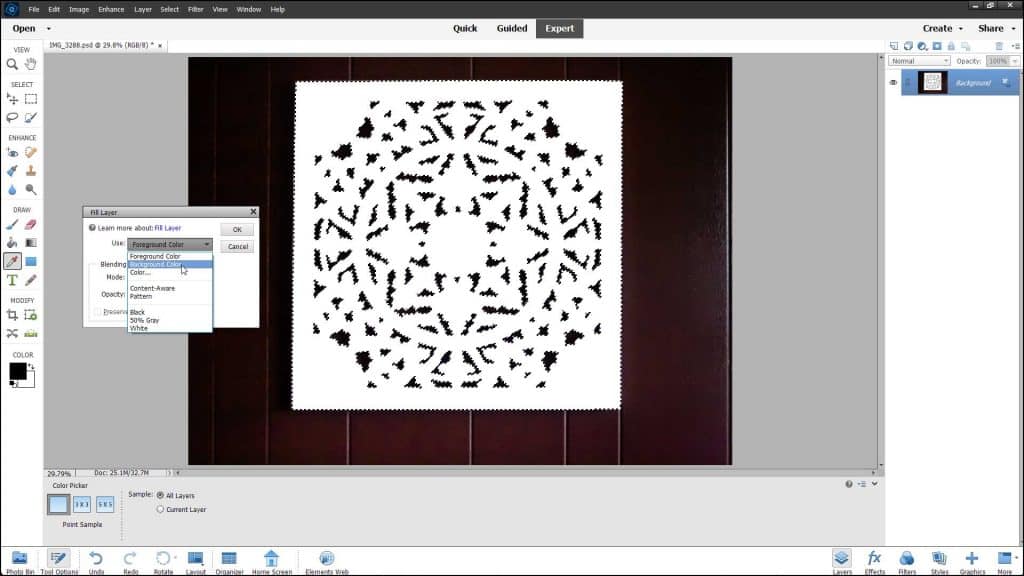
A picture that shows how to apply fills in Photoshop Elements by using the “Fill Layer” dialog box.
Alternatively, to attempt to fill-in a selection with content from the image, select the “Content-Aware” choice. Note that this choice is only available if you are trying to fill a selection within a raster layer and not if you are trying to fill an entire raster layer. A content-aware fill is useful for removing selected blemishes, or unusual elements, from an image or for quickly filling-in selected, empty canvas areas in an image within images that have a fairly consistent background pattern.
After selecting your desired fill in the “Fill Layer” dialog box, then select the desired fill blending mode from the “Mode” drop-down. To set the opacity percentage of the fill, type the desired percentage into the “Opacity” field. To preserve transparent pixels, if needed and if available, check the “Preserve Transparency” checkbox. To apply the selected fill after setting its options in the “Fill Layer” dialog box, click the “OK” button.
Instructions on How to Apply Fills in Photoshop Elements:
- To apply a fill to a selection in a raster layer or an entire raster layer in Photoshop Elements, select the desired raster layer within which to apply the fill in the Layers panel.
- Optionally, then use one of the selection tools to select the area to fill in the layer. If you do not make a selection, you will instead fill-in the entire selected layer.
- To then apply a background or foreground fill, select the desired background and foreground colors in the Toolbox.
- To then quickly fill the foreground color into the selection or layer, press both the “Alt” + “Delete” keys (“Option” + “Delete” for macs) at the same time on your keyboard.
- Alternatively, to quickly fill the background color into the selection or layer, press the “Ctrl” + “Delete” keys (“Command” + “Delete” for macs) on your keyboard.
- Alternatively, to instead apply a fill using the “Fill Layer” dialog box, select either “Edit| Fill Selection…” or “Edit| Fill Layer…” from the Menu Bar. This command changes, depending on whether you have an active selection within a raster layer or only a raster layer selected in the Layers panel. However, after selecting either command, the “Fill Layer” dialog box then opens in Photoshop Elements.
- Select what to use as the fill from the “Use:” drop-down in the “Contents” section of the “Fill Layer” dialog box. Note that the choices include the current “Foreground Color” or the “Background Color.”
- Alternatively, to select a new fill color to use, select the “Color…” choice, to open the “Color Picker” dialog box, use the “Color Picker” dialog box to select the desired fill color, and then click the “OK” button to return to the “Fill Layer” dialog box.
- Alternatively, to apply a pattern as a fill, select the “Pattern” choice and then select the pattern to apply from the “Custom Pattern” drop-down that appears in the “Contents” section.
- Alternatively, to apply one of the other basic color fills, select either “Black,” “White,” or “50% Gray” choice from the “Use” drop-down menu.
- Alternatively, to attempt to fill-in a selection with content from the image, select the “Content-Aware” choice. Note that this choice is only available if you are trying to fill a selection within a raster layer and not if you are trying to fill an entire raster layer.
- After selecting your desired fill in the “Fill Layer” dialog box, then select the desired fill blending mode from the “Mode” drop-down.
- To set the opacity percentage of the fill, type the desired percentage into the “Opacity” field.
- To preserve transparent pixels, if available, check the “Preserve Transparency” checkbox.
- To apply the selected fill after setting its options, click the “OK” button.

