Apply One Payment to Multiple Invoices in QuickBooks – Instructions
How to Apply One Payment to Multiple Invoices in QuickBooks: Video
This video, titled “How to Apply One Payment to Multiple Invoices in Intuit QuickBooks Desktop Pro 2024,” shows how to apply one payment to multiple invoices in QuickBooks Desktop Pro. This video is from our full QuickBooks tutorial, titled “Mastering QuickBooks Desktop Pro Made Easy v.2024.”
Overview:
You can apply one payment to multiple invoices in QuickBooks for a single customer. To do this, place a checkmark in the checkmark column to the left of the invoices against which you want to apply the cumulative payment amount received. Repeat this until the total payment has been distributed to the correct invoices.
To apply one payment to multiple invoices in QuickBooks, select “Customers| Receive Payments” from the Menu Bar. Doing this then opens the “Receive Payments” window. Select the customer or customer:job who sent you the payment from the “Received From” drop-down. Then enter the payment date, amount, and payment method at the top of this window.
QuickBooks automatically attributes the amount entered against all the outstanding invoices shown, from oldest to newest. Check and uncheck the invoices by clicking into the leftmost checkmark column to apply and remove payment amounts, as needed. Do this until the entire amount received is attributed to the correct invoices in the correct amounts. You can also change the amounts applied to each invoice, if needed, by changing the amounts in the “Payment” column at the right end of the outstanding invoice list.
After attributing the single payment received to the correct outstanding invoices in the correct amounts, then click either the “Save & Close” or “Save & New” button to save the transaction and then either close the window or open another new transaction window.
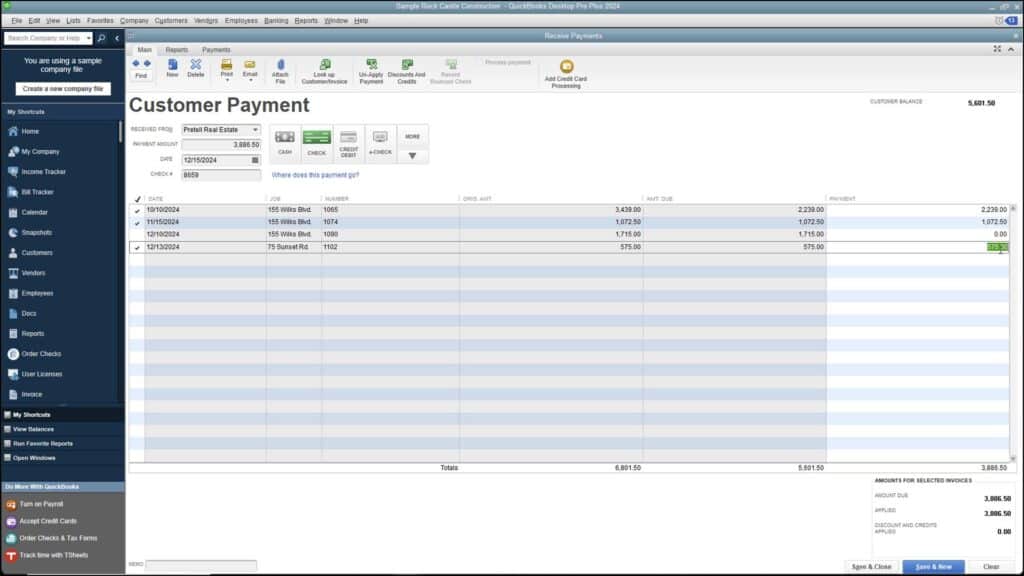
A picture showing how to apply one payment to multiple invoices in QuickBooks in the “Receive Payments” window.
Instructions on How to Apply One Payment to Multiple Invoices in QuickBooks:
- To apply one payment to multiple invoices in QuickBooks, select “Customers| Receive Payments” from the Menu Bar.
- Then select the customer from the “Received From” drop-down.
- Then select the payment date from the “Date” calendar selector.
- Enter the amount of the single payment into the “Amount” field.
- Then click the payment method button for the method of payment received.
- To see more payment methods, if needed, click the drop-down in the lower-right corner of this button group. Then select a payment method from the drop-down.
- To enter “Credit/Debit” payments, select a credit card type from the “Payment” drop-down.
- Then enter the credit card number and expiration date into the “Card Number” and “Exp. Date” fields in the drop-down menu that appears.
- Then click the “Done” button in the drop-down menu to record the credit card.
- If recording a check, enter the check number into the “Check No.” field.
- QuickBooks automatically applies the single payment against the outstanding invoices, from oldest to newest.
- To remove the checkmarks from the invoices, click the “Un-Apply Payment” button in the “Main” tab of the Ribbon to clear the checkmark(s) from the invoice(s).
- Then check and uncheck the invoices by clicking into the leftmost checkmark column to apply and remove payment amounts, as needed.
- Repeat step #13 until the entire amount is attributed to the correct invoices in the correct amounts.
- To change the amounts applied to each invoice, if needed, change the amounts in the “Payment” column to the right of the invoices.
- To save and close the “Receive Payments” window, click the “Save & Close” button.
- Alternatively, to save the transaction but leave the “Receive Payments” window open, click the “Save & New” button.
