Apply Password Protection to an Excel File – Instructions
Apply Password Protection to an Excel File: Video Lesson
This video lesson, titled “Password Protecting Excel Files,” shows you how to apply password protection to an Excel file. This video lesson is from our complete Excel tutorial, titled “Mastering Excel Made Easy v.2019 and 365.”
Apply Password Protection to an Excel File: Overview
When you apply password protection to an Excel file, you prevent people from opening it without knowing the required password. After password protection is enabled on a file, no one can open it without the password. Therefore, password-protecting files poses some risk. This is because if you forget the password, you cannot open the files, either.
To apply password protection to an Excel file, open the file to which to apply password protection. Next, click the “File” tab in the Ribbon. Then click the “Info” command at the left side of the backstage view. In the area to the right, click the “Protect Workbook” button to display a drop-down menu of choices. Then select the “Encrypt with Password” choice from the drop-down menu.
In the “Encrypt Document” dialog box that appears, enter the password to apply to this file. Then click the “OK” button to set the password. Confirm this password by retyping it into the “Confirm Password” dialog box that appears. Then click the “OK” button to finish. Then save your changes to the file. When a user tries to open the file in the future, they must enter the password into the “Password” dialog box that appears to open it.
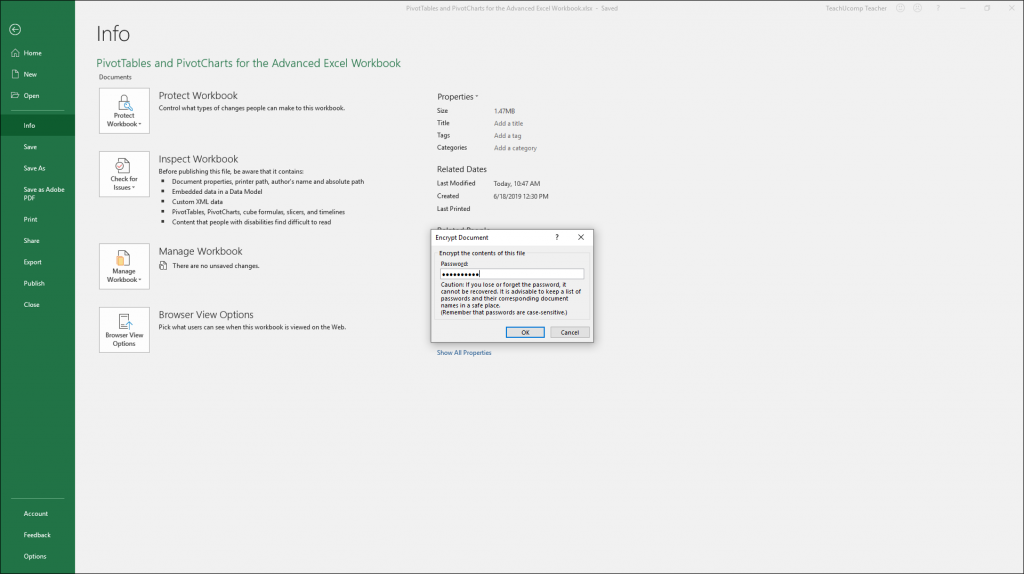
Apply Password Protection to an Excel File – Instructions: A picture of a user adding a password for opening the Excel file to a workbook.
To remove password protection from an Excel file, open the file. You must supply the password to do this. Then click the “File” tab in the Ribbon. Then click the “Info” command at the left side of the backstage view. In the area to the right, click the Protect Workbook” button to display a drop-down menu of choices. Select the “Encrypt with Password” choice from the drop-down menu.
In the “Encrypt Document” dialog box that appears, delete the password from the text box in this dialog box. Then click the “OK” button. Then save the file again, as usual, to remove the password protection.
Apply Password Protection to an Excel File: Instructions
- To apply password protection to an Excel file, open the file to which to apply password protection.
- Click the “File” tab in the Ribbon.
- Then click the “Info” command at the left side of the backstage view.
- In the area to the right, click the “Protect Workbook” button to display a drop-down menu of choices.
- Then select the “Encrypt with Password” choice from the drop-down menu.
- In the “Encrypt Document” dialog box that appears, enter the password to apply to this file.
- Then click the “OK” button to set the password.
- Confirm this password by retyping it into the “Confirm Password” dialog box that appears.
- Then click the “OK” button to finish.
- Then save your changes to the file.
- When a user tries to open the file in the future, they must enter the password into the “Password” dialog box that appears to open the file.
- To remove password protection from an Excel file, open the file and enter the password needed to open it.
- Click the “File” tab in the Ribbon.
- Then click the “Info” command at the left side of the backstage view.
- In the area to the right, click the Protect Workbook” button to show a drop-down menu of choices.
- Select the “Encrypt with Password” choice from the drop-down menu.
- In the “Encrypt Document” dialog box that appears, delete the password from the text box within this dialog box.
- Then click the “OK” button.
- Then save the file again, as usual, to remove the password protection.

