Apply Styles in Word – Instructions
Apply Styles in Word: Video Lesson
This video lesson, titled “Applying Styles,” shows you how to apply styles in Word. This video lesson is from our complete Word tutorial, titled “Mastering Word Made Easy v.2019 and 365.”
Apply Styles in Word: Overview
In this lesson, you will learn how to apply styles in Word to document text. You can apply styles in Word by using the “Styles” button group in the “Home” tab of the Ribbon. Alternatively, you can also apply styles to text by using the “Apply Styles” pane in Word.
You can apply a style in Word before or after entering text. To set a style in Word before you type, first choose the style, then type the text. To apply a style in Word to existing document text, first select the text to which to apply the style. Then apply the desired style.
How to Apply a Style in Word by Using the Ribbon
To apply a style in Word by using the Ribbon, click the “Home” tab in the Ribbon. A preset list of styles then appears in the “Styles” button group on this tab. Scroll through this list using the arrow buttons to its right or click the “More” button below those arrows to fully expand the list.
These presets are the most-commonly used styles in Word. If you currently have text selected in your document, hovering over a style choice in this list shows you a preview of how the style will appear before you select it. To apply a style to the selected text in your document, then click the style you want to apply.
How to Apply a Style in Word by Using the “Apply Styles” Pane
Alternatively, to apply a style in Word by using the “Apply Styles” pane, click the “More” button in the “Styles” button group on the “Home” tab of the Ribbon. Then click the “Apply Styles…” command that appears at the bottom of the drop-down menu to open the “Apply Styles” pane. To select a style in Word, click the “Style name” drop-down and select a choice from the drop-down menu. Alternatively, type the name of the style into the drop-down, if desired. To turn this feature on or off, check or uncheck the “AutoComplete style names” checkbox.
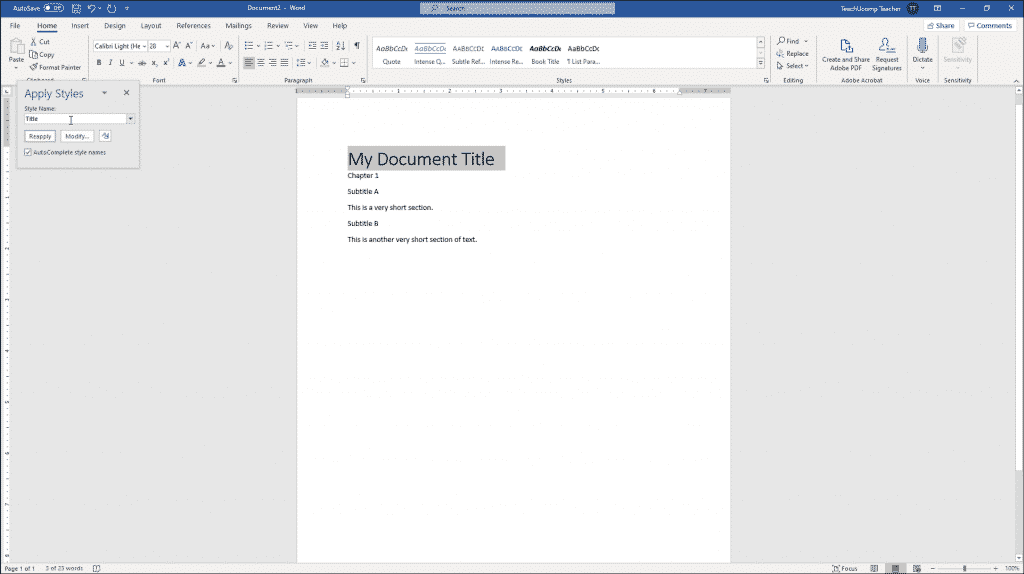
Apply Styles in Word – Instructions: A picture of the “Apply Styles” pane in Word for Office 365.
After selecting a style, click the “Apply” or “Reapply” button to apply it. Clicking the “Modify…” button lets you modify a selected style. Clicking the “Styles” button opens the “Styles” pane. Modifying styles and using the “Styles” pane is covered in a separate lesson.
Note that the “Apply Styles” pane appears floating above the work area. Like all panes in Word, you can dock the pane on the left or right side of the application window or resize it, as needed.
Apply Styles in Word: Instructions
- To set a style in Word before you type text, select a style first, then type the text.
- Alternatively, to apply a style in Word to existing text, select the text first, and then apply a style to it.
Instructions on How to Apply a Style in Word by Using the Ribbon
- To apply a style in Word by using the Ribbon, click the “Home” tab in the Ribbon.
- A preset list of styles then appears in the “Styles” button group on this tab.
- Scroll through this list using the arrow buttons to its right or click the “More” button below those arrows to fully expand the list.
- To preview how a style in this list would look if applied to currently selected document text, hover over a style choice in this list.
- To apply a style in Word to the selected text in your document, then click the style to apply.
Instructions on How to Apply a Style in Word by Using the “Apply Styles” Pane
- Alternatively, to apply a style in Word by using the “Apply Styles” pane, click the “More” button in the “Styles” button group on the “Home” tab of the Ribbon.
- Then click the “Apply Styles…” command that appears at the bottom of the drop-down menu to open the “Apply Styles” pane.
- To select a style, click the “Style name” drop-down and select a choice from the drop-down menu.
- Alternatively, to select a style, type the name of the style into the drop-down, if desired.
- To turn this feature on or off, check or uncheck the “AutoComplete style names” checkbox.
- Click the “Reapply” or “Apply” button to apply the selected style to your document.
- To modify a selected style, click the “Modify…” button in the “Apply Styles” pane.
- To open the “Styles” pane, click the “Styles” button.
- Note that the first time you open the “Apply Styles” pane, it appears floating over the work area. Like all panes in Word, you can dock the pane to the left or right side of the application window or resize it, as needed.

