Assign Macros to Events in Access – Instructions
Assign Macros to Events in Access: Video
This video lesson, titled “Assigning Macros to Events,” shows you how to assign macros to events in Access. This video lesson is from our complete Access tutorial, titled “Mastering Access Made Easy v.2019 and 365.”
Overview of Assigning Macros to Events in Access
You can manually assign macros to events in Access forms by using the “Property Sheet” pane. This is an alternative to using the “Command Button Wizard.” This is most often used with command button controls in forms. However, you can also run macros for events that happen to many different types of selected form controls, if needed.
How to Assign a Standalone Macro to an Event in Access
To assign a standalone macro to a form object’s event in Access by using the “Property Sheet” pane, select the object in the form to which to attach the macro in form design view. If needed, to show the “Property Sheet” pane, click the “Property Sheet” button in the “Tools” button group on the “Form Design” contextual tab in the Ribbon. In the “Property Sheet” pane, click the “Event” tab to view all the available events for the selected type of form object.
Typically, macros are assigned to the “On Click” event of a command button, which runs the macro when someone clicks the button. However, there are other types of objects and events to which you may want to attach macros. For example, you might want a macro that runs when a user rolls the mouse pointer over a selected object. In this case, you would program the macro to launch on the selected control’s “On Mouse Move” event. After determining the appropriate event to associate with a macro, click into the event property field in the “Event” tab of the “Property Sheet” pane.
To then assign a standalone macro to the selected event, click the drop-down arrow that appears at the right end of the property field. Then select the name of the standalone macro to run when that event occurs from the drop-down menu that appears. Note that you must have previously created the standalone macro, separately, for it to appear in this drop-down list.
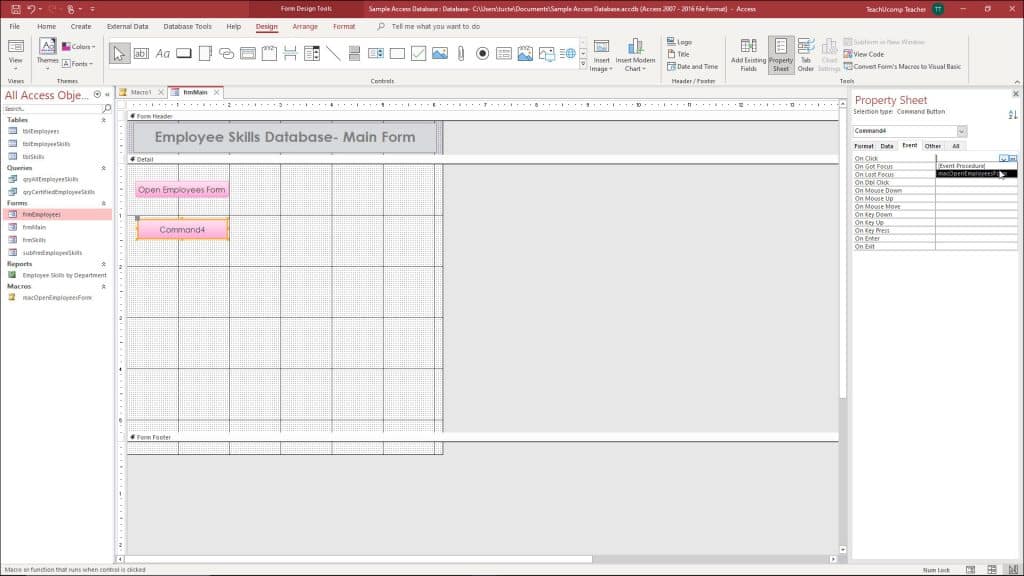
A picture showing how to assign macros to events in Access.
How to Create an Embedded Macro for an Event in Access
As an alternative to using a standalone macro, you can embed a macro directly into the form. Macros embedded within a form in Access do not appear as separate objects in the Navigation Pane. Access macros you create as separate objects, and which appear in the Navigation Pane, are called standalone macros.
In contrast to these macros, embedded macros in Access become part of the form and can only be edited within the form. This reduces the number of database objects to manage in the Navigation Pane. It also ensures if the form is copied in the future, the associated code used by the form is also copied, since the code is contained in the properties of the form’s controls. However, you cannot run an embedded macro in Access from another form, other than the one within which it is embedded.
So, alternatively, to create an embedded macro in Access after you click into the event’s property field in the “Event” tab, click the builder button […] that then appears at the right end of the event’s property field. In the “Choose Builder” dialog box that opens, select the “Macro Builder” command, and then click the “OK” button to open a new macro design view window.
In this window, build the embedded macro, as normal. When finished, click the “Close” button in the “Close” button group on the “Macro Design” contextual tab in the Ribbon. Then click the “Yes” button in the confirmation prompt window that appears to save the embedded macro into the form. To edit the embedded macro in the future, if needed, click the builder button […] that appears at the right end of the event’s property field to reopen the window and repeat the process of editing it, closing it, and then saving your changes.
Instructions on How to Assign Macros to Events in Access
How to Assign a Standalone Macro to an Event in Access
- To assign a standalone macro to a form object’s event in Access by using the “Property Sheet” pane, select the object in the form to which to attach the macro in form design view.
- If needed, to show the “Property Sheet” pane, click the “Property Sheet” button in the “Tools” button group on the “Design” tab of the “Form Design Tools” contextual tab in the Ribbon.
- In the “Property Sheet” pane, click the “Event” tab to view all the available events for the selected type of form object.
- After determining the appropriate event to associate with a macro, click into the event property field in the “Event” tab of the “Property Sheet” pane.
- To then assign a standalone macro to the selected event, click the drop-down arrow that appears at the right end of the property field and select the name of the standalone macro to run when that event occurs from the drop-down menu that appears. Note that you must have previously created the standalone macro, separately, for it to appear in this drop-down list.
How to Create an Embedded Macro for an Event in Access
- Alternatively, to create an embedded macro in Access after you click into the event’s property field in the “Event” tab, click the builder button […] that then appears at the right end of the event’s property field.
- In the “Choose Builder” dialog box that opens, select the “Macro Builder” command, and then click the “OK” button to open a new macro design view window.
- In this window, build the embedded macro, as normal.
- When finished, click the “Close” button in the “Close” button group on the “Design” tab of the “Macro Tools” contextual tab in the Ribbon.
- Then click the “Yes” button in the confirmation prompt window that appears to save the embedded macro into the form.
- To edit the embedded macro in the future, if needed, click the builder button […] that appears at the right end of the event’s property field to reopen the window and repeat the process of editing it, closing it, and then saving your changes.