Attach Files to a PDF in Acrobat Pro DC- Instructions
Attach Files to a PDF in Acrobat Pro DC: Video Lesson
This video lesson, titled “Attaching Files to a PDF,” shows you how to attach files to a PDF in Acrobat Pro DC. This video lesson on how to attach files to a PDF in Acrobat Pro DC is from our complete Acrobat tutorial, titled “Mastering Acrobat Made Easy v.Pro DC.”
Attach Files to a PDF in Acrobat Pro DC: Overview
You can attach files to a PDF in Acrobat Pro DC. These files can be of many file types, including other PDF files. Alternatively, to attach files to a PDF using the older Acrobat XI, instead, please see our previous blog post, titled “Attach Files to a PDF in Acrobat XI- Tutorial,” to learn how to do that.
To attach files to a PDF in Acrobat Pro DC, open a PDF document and then select the “Edit PDF” tool from the Tools Center or the Tools panel. Then click the “More” button in the Edit PDF toolbar to open the “Add Files” dialog box. Navigate to the file to attach to the PDF, select it, and then click the “Open” button in the dialog box. The attached file then appears in the Attachments panel of the Navigation Pane in the PDF. You can then save the PDF to save the attachment to the PDF file.
You can add a description to the attached files in the Attachments panel in the Navigation Pane. This can be helpful when attaching many files or when attached files have confusing file names.
To add a description to an attached file, first click the attachment within the Attachments panel to select it. Then click the “Options” drop-down button at the top of the Navigation Pane. Then choose the “Edit Description…” command to open the “Edit Attachment Description” dialog box. Enter a description for the attachment and then click “OK” to close the dialog box and apply your choices. When you hover over the attachment’s file name with your cursor in the Attachments panel, an informational box then appears. The description you typed appears under the file name.
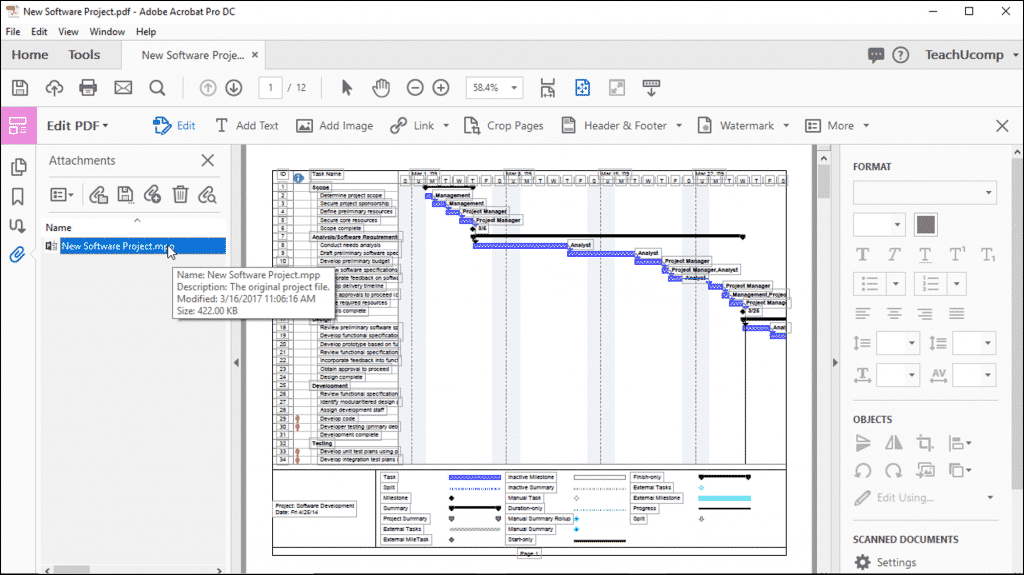
Attach Files to a PDF in Acrobat Pro DC- Instructions: A picture of a file with a description that has been attached to a PDF in Acrobat.
You can attach a variety of file types to a PDF using Acrobat. However, there are several file types that Acrobat will not open once attached to a PDF, including .EXE and .ZIP files. If you try to attach a prohibited file type, a warning message will inform you that the file type cannot be opened or saved due to your Trust Manager settings, but that you can click the “OK” button to override these settings to add the file. Again, Acrobat will not open these types of files, even if they are attached to a PDF created with Acrobat.
To delete an attachment, click the attachment to delete within the Attachments panel of the Navigation pane to select it. Then click the “Delete attachment” button in the toolbar at the top of the Attachments panel. Click the “Yes” button in the confirmation message box that appears to delete the selected attachment.
Attach Files to a PDF in Acrobat Pro DC: Instructions
- To attach files to a PDF in Acrobat Pro DC, open a PDF document and then select the “Edit PDF” tool from the Tools Center or the Tools panel.
- Then click the “More” button in the Edit PDF toolbar to open the “Add Files” dialog box.
- Navigate to the file to attach to the PDF, select it, and then click the “Open” button in the dialog box.
- The attached file then appears in the Attachments panel of the Navigation Pane in the PDF.
- To add a description to an attached file, click the attachment in the Attachments panel to select it.
- Then click the “Options” drop-down button at the top of the Navigation Pane.
- Then choose the “Edit Description…” command to open the “Edit Attachment Description” dialog box.
- Enter a description for the attachment and then click “OK” to close the dialog box and apply your choices.
- When you hover over the attachment’s file name with your cursor in the Attachments panel, an informational box then appears. The description you typed appears under the file name.
- To delete an attachment, click the attachment to delete within the Attachments panel of the Navigation pane to select it.
- Then click the “Delete attachment” button in the toolbar at the top of the Attachments panel.
- Click the “Yes” button in the confirmation message box that appears to delete the selected attachment.
