AutoArchive in Outlook- Instructions
AutoArchive in Outlook: Video Lesson
This video, titled “Setting AutoArchiving for Folders,” shows you how to AutoArchive in Outlook. This video is from from our complete Outlook tutorial titled “Mastering Outlook Made Easy v.2019 and 365.”
Overview of AutoArchive in Outlook
AutoArchive in Outlook lets you automatically move messages from a specified folder to an archive folder. An archive is a folder to which you can save old email to clear them from your Inbox but retain them for record keeping. Alternatively, you can instead delete them from a specified folder after a set period of time has elapsed. AutoArchiving reduces the number of items that Outlook must process when it opens a folder. It also reduces the amount of storage space needed for item storage in Outlook. AutoArchiving does this automatically, reducing the amount of time you spend manually archiving items.
How to Set Up AutoArchive in Outlook
To set up AutoArchive in Outlook, right-click the folder for which to set AutoArchiving. Then select the “Properties” command from the pop-up menu that appears to access the folder’s properties. dialog box. Then click the “AutoArchive” tab to set the folder’s AutoArchiving features. The three AutoArchiving options you can set are “Do not archive items in this folder,” “Archive items in this folder using the default settings,” or “Archive this folder using these settings.”
To set the default AutoArchiving behavior for all folders in Outlook, select the “Archive items in this folder using the default settings” option. Then click the “Default Archive Settings…” button to open the “AutoArchive” dialog box. This dialog box lets you set the default AutoArchiving settings for your Outlook folders.
To set how often to AutoArchive, check the “Run AutoArchive every X days” checkbox. Then change the number next to the “Run AutoArchive every X days” checkbox. To show a prompt before the AutoArchiving starts, check the “Prompt before AutoArchive runs” checkbox.
In the “During AutoArchive:” section, set any other default AutoArchiving options you want. To delete expired items from your mail folders, check the “Delete expired items (e-mail folders only)” checkbox. To delete or archive items, check the “Archive or delete old items” checkbox. Doing this also enables the “Default folder settings for archiving” section below. To show the archive folder in the Folder Pane in Outlook to easily access archived materials, check the “Show archive folder in folder list” checkbox.
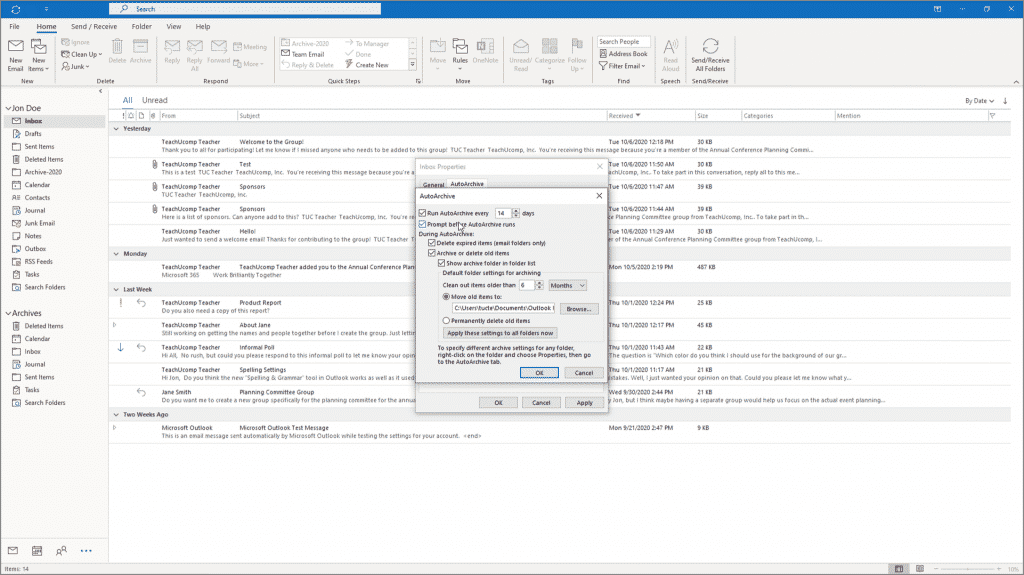
AutoArchive in Outlook- Instructions: A picture of the “AutoArchive” dialog box, which lets you set the default AutoArchiving settings for your Outlook folders.
If you enabled the “Archive or delete old items” checkbox, then you can set the default archive folder settings in the “Default folder settings for archiving” section. To set the duration of time for which to archive items, enter a number into the spinner box next to the “Clean out items older than” label and use the adjacent drop-down to select a unit of time for the number you entered.
Then choose what to do with the archived items. You can either move them to a personal folder file or permanently delete them by choosing either the “Move old items to” or “Permanently delete old items” option button. If you choose to move them to a personal folder, click the adjacent “Browse…” button to select the personal folder to use to store the old items.
After setting the AutoArchiving defaults, to apply them to all the folders in Outlook, click the “Apply these settings to all folders now” button. Note that you must check the “Run AutoArchive every” checkbox to enable default settings for AutoArchiving. Finally, click the “OK” button to save the new default settings and return to the initial folder’s AutoArchive tab.
Alternatively, to specify custom AutoArchiving settings for a folder, instead select the “Archive this folder using these settings:” choice on the folder’s “AutoArchive” tab within its “Properties” dialog box. Then specify when to clean the folder and what to do with the old items directly in this tab, just as you did when setting the AutoArchiving defaults. However, these setting are only applied to the current folder. When you are done setting the folder’s AutoArchiving settings in Outlook, click the “OK” button at the bottom of the folder’s “Properties” dialog box to apply them.
Instructions on How to AutoArchive in Outlook
- To AutoArchive in Outlook, right-click the folder for which to set AutoArchiving.
- Then select the “Properties” command from the pop-up menu that appears to access the folder’s properties dialog box.
- Then click the “AutoArchive” tab to set the folder’s AutoArchiving features.
- The three AutoArchiving options you can set are “Do not archive items in this folder,” “Archive items in this folder using the default settings,” or “Archive this folder using these settings.”
- To set the default AutoArchiving behavior for all folders in Outlook, select the “Archive items in this folder using the default settings” option.
- Then click the “Default Archive Settings…” button to open the “AutoArchive” dialog box.
- This dialog box lets you set the default AutoArchiving settings for your Outlook folder.
- To set how often to AutoArchive, check the “Run AutoArchive every X days” checkbox.
- Then change the number next to the “Run AutoArchive every X days” checkbox.
- To show a prompt before the AutoArchiving starts, check the “Prompt before AutoArchive runs” checkbox.
- In the “During AutoArchive:” section, set any other default AutoArchiving options you want.
- To delete expired items from your mail folders, check the “Delete expired items (e-mail folders only)” checkbox.
- To delete or archive items, check the “Archive or delete old items” checkbox. Doing this also enables the “Default folder settings for archiving” section below.
- To show the archive folder in the Folder Pane in Outlook to easily access archived materials, check the “Show archive folder in folder list” checkbox.
- If you enabled the “Archive or delete old items” checkbox, then you can set the default archive folder settings in the “Default folder settings for archiving” section.
- To set the duration of time for which to archive items, enter a number into the spinner box next to the “Clean out items older than” label and use the adjacent drop-down to select a unit of time for the number you entered.
- Then choose what to do with the archived items by choosing either the “Move old items to” or “Permanently delete old items” option button.
- If you choose to move them to a personal folder, click the adjacent “Browse…” button to select the personal folder to use to store the old items.
- To apply the default AutoArchiving settings to all the folders in Outlook, click the “Apply these settings to all folders now” button. Note that you must check the “Run AutoArchive every” checkbox to enable default settings for AutoArchiving.
- To save the new settings and return to the initial folder’s AutoArchive tab, click the “OK” button.
- Alternatively, to specify custom AutoArchiving settings for a folder, instead select the “Archive this folder using these settings:” choice on the folder’s “AutoArchive” tab within its “Properties” dialog box.
- Then specify when to clean the folder and what to do with the old items directly in this tab, just as when setting the AutoArchiving defaults. However, these setting are only applied to the current folder.
- To apply the folder’s AutoArchiving settings in Outlook, click the “OK” button at the bottom of the folder’s “Properties” dialog box.