AutoSave in Excel for Microsoft 365 – Instructions
AutoSave in Excel for Microsoft 365: Video Lesson
This video lesson, titled “AutoSave Online Workbooks,” shows you how to use AutoSave in Excel for Microsoft 365. This video lesson is from our complete Excel tutorial, titled “Mastering Excel Made Easy v.2019 and 365.”
AutoSave in Excel for Microsoft 365: Overview
How to Enable AutoSave in Excel for Microsoft 365
This tutorial shows you how to use AutoSave in Excel for Microsoft 365. AutoSave in Excel for Microsoft 365 is automatically enabled when you save a workbook using the newest file formats to an online destination, like OneDrive or SharePoint. AutoSave in Excel for Microsoft 365 saves the file to the online location every few seconds as you work. To toggle AutoSave in Excel for Microsoft 365 on or off for the current workbook, click the “AutoSave” toggle button in the upper-left corner of the workbook window in the Quick Access Toolbar.
How to Manually Save Changes in AutoSave in Excel for Microsoft 365
When you enable AutoSave in Excel for Microsoft 365, you can choose to manually save changes and also update the file with any changes made by other users of the shared file by clicking the “Save” button in the Quick Access Toolbar. However, note that you cannot click the “Save” command in the backstage view when AutoSave is enabled.
How to Save a Copy in AutoSave in Excel for Microsoft 365
To make a copy of a file after enabling AutoSave in Excel for Microsoft 365, click the “File” tab in the Ribbon. Then click the “Save a Copy” command at the left side of the backstage view. Doing this then shows the save locations in the area to the right. This works the same way as initially saving the file. However, note that the saved copy is completely separate from the original file. Therefore, changes you make to the copy do not appear in the original file. However, this is useful for making changes to a copy of the file you don’t necessarily want other users to see when working on the original, shared online file.
How to Undo Changes and Revert to a Previous Save State in AutoSave in Excel for Microsoft 365
To reverse changes you make to a file with AutoSave enabled, click the “Undo” button in the Quick Access toolbar. However, in addition, you can also revert an online file with AutoSave enabled back to a previous save state. One way to do this is to click the drop-down at the right end of the file’s title within the Title Bar. Then select the “Version History” command from the drop-down menu. Alternatively, click the “File” tab in the Ribbon. Then click the “Info” command at the left side of the workbook, if necessary. Then click the “View and restore previous versions” link under the “Version History” section to the right.
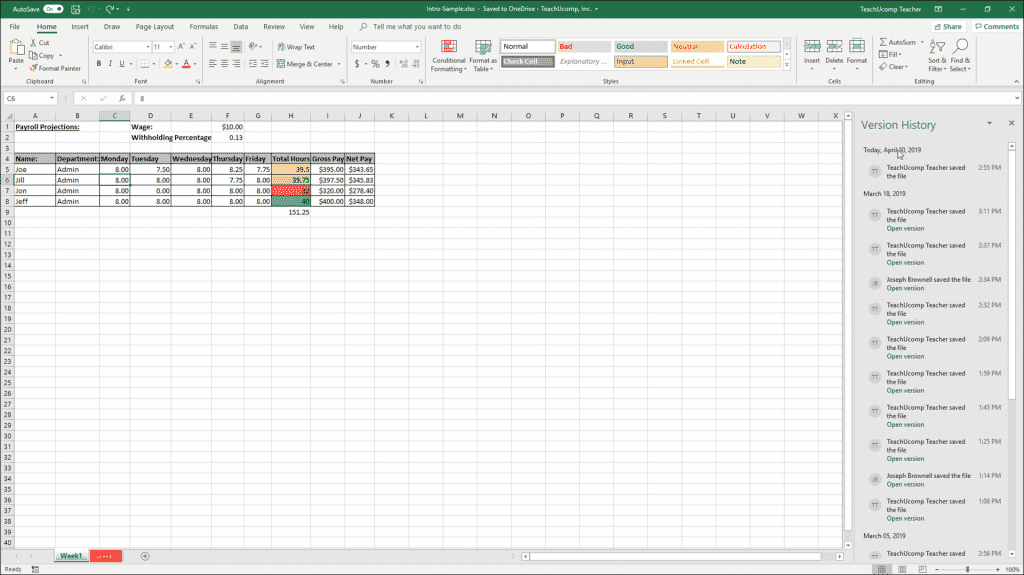
AutoSave in Excel for Microsoft 365 – Instructions: A picture of the “Version History” panel you can use to revert changes made to a file with AutoSave enabled in Excel for Microsoft 365.
Either way, the “Version History” panel then appears at the right side of the workbook window. The various file save states appear, sorted by date. Scroll through the list and then click the version of the file to which to revert the current file. Doing this then loads the saved version in a separate window. A message box then appears at the top of the copy of the file, above the Formula Bar, stating that this is a previous version. You can then either copy content from the saved copy window into the current version’s window, save the previous version as a copy, or click the “Restore” button in the message box to restore the old copy of the file and overwrite the new copy. Alternatively, you can simply close the copy of the previous version to exit it without making any changes.
How to Disable AutoSave in Excel for Microsoft 365
To stop Excel from automatically enabling AutoSave in Excel for Microsoft 365 for all online files by default, click the “File” tab in the Ribbon. Then click the “Options” command at the left side of the backstage view to open the “Excel Options” window. Then click the “Save” category at the left side of the “Excel Options” window. Uncheck the “AutoSave OneDrive and SharePoint Online files by default in Excel” checkbox to the right. Then click the “OK” button to save your settings and restart Excel.
Regardless of whether or not it is enabled by default, you can always toggle AutoSave on or off by using the toggle switch in the Quick Access toolbar for an individual online file. Excel remembers the individual file’s AutoSave state each time you reopen the file in the future.
AutoSave in Excel for Microsoft 365: Instructions
Instructions on How to Enable AutoSave in Excel for Microsoft 365
- Excel automatically enables the “AutoSave” feature when you save a workbook using the newest file formats to an online destination, like OneDrive or SharePoint.
- To toggle AutoSave in Excel for Microsoft 365 on or off for the current workbook, click the “AutoSave” toggle button in the upper-left corner of the workbook window in the Quick Access Toolbar.
Instructions on How to Manually Save Changes in AutoSave in Excel for Microsoft 365
- After AutoSave in Excel for Office 365 is enabled, to manually save changes and also update the file with any changes made by other users of a shared file, click the “Save” button in the Quick Access Toolbar. Note that you cannot click the “Save” command in the backstage view when AutoSave is enabled.
Instructions on How to Save a Copy in AutoSave in Excel for Microsoft 365
- To make a copy of a file after enabling AutoSave in Excel for Microsoft 365, click the “File” tab in the Ribbon.
- Then click the “Save a Copy” command at the left side of the backstage view to open the save locations in the area to the right. This works the same way as initially saving the file. However, note that the saved copy is completely separate from the original file and changes you make to the copy do not appear in the original file.
Instructions on How to Undo Changes and Revert to a Previous Save State in AutoSave in Excel for Microsoft 365
- To reverse changes you make to a file with AutoSave enabled, click the “Undo” button in the Quick Access toolbar.
- To revert an online file with AutoSave enabled back to a previous save state, click the drop-down at the right end of the file’s title within the Title Bar and then select the “Version History” command from the drop-down menu.
- Alternatively, click the “File” tab in the Ribbon
- Then click the “Info” command at the left side of the workbook, if necessary.
- Then click the “View and restore previous versions” link under the “Version History” section to the right.
- Either way, the “Version History” panel then appears at the right side of the workbook window.
- The various file save states appear, sorted by date.
- Scroll through the list and then click the version of the file to which to revert the current file.
- Doing this then loads it in a separate window.
- A message box then appears at the top of the copy of the file, above the Formula Bar, stating that this is a previous version.
- You can then either copy content from the saved copy window into the current version’s window, save the previous version as a copy, or click the “Restore” button in the message box to restore the old copy of the file and overwrite the new copy.
- Alternatively, you can simply close the copy of the previous version to exit it without making any changes.
Instructions on How to Disable AutoSave in Excel for Microsoft 365
- To stop Excel from automatically enabling AutoSave for all online files by default, click the “File” tab in the Ribbon.
- Then click the “Options” command at the left side of the backstage view to open the “Excel Options” window.
- Then click the “Save” category at the left side of the “Excel Options” window.
- Uncheck the “AutoSave OneDrive and SharePoint Online files by default in Excel” checkbox to the right.
- Then click the “OK” button to save your settings and restart Excel.

