Basic Adjustments in Camera Raw in Photoshop: Video
This video lesson, titled “Learn How to Make Basic Tonal Adjustments in Camera Raw in Adobe Photoshop: A Training Tutorial,” shows how to apply basic adjustments in Camera Raw in Photoshop. This video lesson is from our complete Photoshop tutorial, titled “Mastering Photoshop Made Easy.”
Overview:
If needed, you can make basic adjustments in Camera Raw in Photoshop to correct tone after setting the correct white balance for a camera raw image. To make basic adjustments in Camera Raw in Photoshop, click the “Edit” button in the toolbar at the right side of the Camera Raw dialog box, if needed. Then click the “Basic” tab in the Edit panel that appears to the left of the toolbar to expand it, if needed.
Then use the sliders below the “White Balance” section to change the basic adjustment settings. The specific sliders shown in this section depend on the process version you chose from the “Process” drop-down on the “Calibration” tab. This lesson covers the settings for process “Version 5” in the “Camera Raw” dialog box in Photoshop.
How to Apply Auto Adjustments in Camera Raw in Photoshop:
To apply automatic adjustments, click the “Auto” button at the top of the Edit panel. To undo the automatic adjustments, click the “Auto” button again. If desired, to apply a black and white treatment in camera raw, click the “B&W” button at the top of the Edit panel. Doing this applies the “Adobe Monochrome” profile to the image. To remove the black and white treatment, click the “B&W” button again.
How to Manually Adjust the Exposure in Camera Raw in Photoshop:
To manually adjust the exposure for the selected camera raw image, click and drag the “Exposure” slider or enter a value into the adjacent field. This adjusts the brightness or darkness of the image. Move the slider to the left to darken the image or move the slider to the right to brighten it. The values shown in the adjacent field are equivalent to f-stops. So, a setting of +1.00 is equivalent to widening the camera aperture by one f-stop. Likewise, a value of -1.00 is equivalent to reducing the aperture by one f-stop.
Alternatively, to use the “Exposure” slider to preview where highlights are clipped in an image, hold down the “Alt” key on your keyboard (“Option” on Macs) when dragging the “Exposure” slider to show clipped regions as colored areas in the image. The color indicates areas clipped in only one or two color channels. Non-clipped areas appear black. Move the slider until the non-specular highlights, meaning highlights not from light or reflected light, are completely clipped. Then slightly reverse the adjustment.
How to Manually Adjust the Contrast in Camera Raw in Photoshop:
To manually adjust the contrast of a camera raw image, use the “Contrast” slider. Generally, you should only adjust the contrast of an image after adjusting its exposure, shadows, and brightness. You can slide the slider to the left to decrease the values, resulting in less midtone contrast in the image by lightening middle-to-dark image areas and darkening middle-to-light image areas.
You can slide the slider to the right to increase the values, resulting in more midtone contrast in the image by darkening middle-to-dark image areas and lightening middle-to-light image areas. Alternatively, you can also enter values into the adjacent field for the slider, if preferred.
How to Adjust Highlights, Shadows, Whites, and Blacks in Camera Raw in Photoshop:
The “Highlights” slider help recover details in overexposed highlight areas of an image. Dragging the slider to the left darkens highlights to help recover details in overexposed highlight areas. Dragging the slider to the right brightens highlights while minimizing clipping. You can also enter values into the adjacent field for the slider, if preferred.
The “Shadows” slider recovers details in underexposed shadow areas in the image. Dragging the slider to the left darkens shadows while reducing any clipping. Dragging the slider to the right brightens shadows to help recover details in underexposed shadow areas of the camera raw image. You can also enter values into the adjacent field for the slider, if preferred.
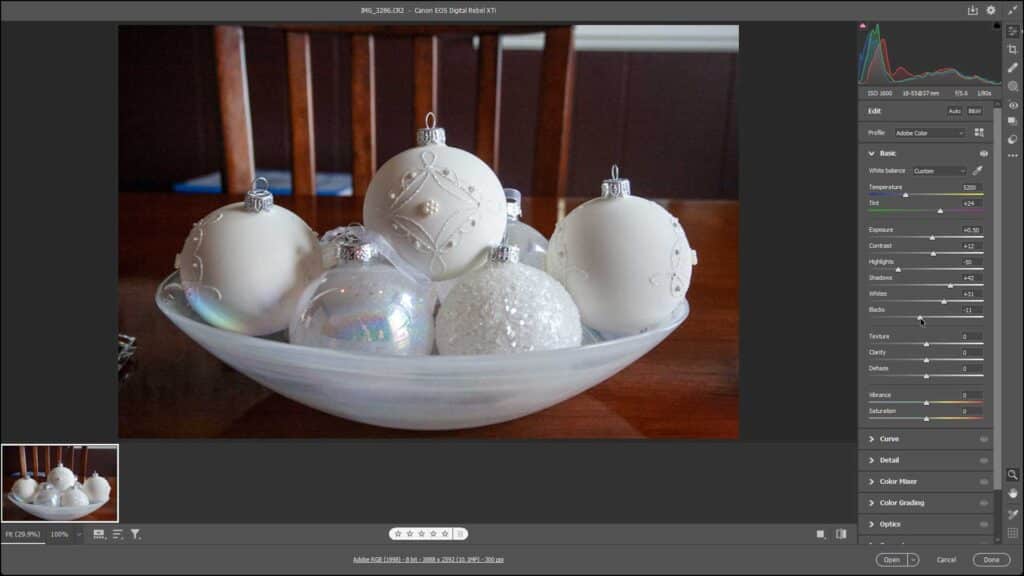
A picture of a user applying basic adjustments in Camera Raw in Photoshop to a camera raw image.
The “Whites” slider adjusts the highlight clipping in an image. Drag this slider to the left to reduce highlight clipping. Drag the slider to the right to increase highlight clipping. You can also enter values into the adjacent field for the slider, if preferred. The “Blacks” slider adjusts the shadow slipping in an image. Drag this slider to the left to increase shadow clipping. Drag the slider to the right to decrease shadow clipping. You can also enter values into the adjacent field for the slider, if preferred.
How to Adjust Texture, Clarity, and Dehaze in Camera Raw in Photoshop:
The “Texture” slider increases or decreases medium frequency details in a camera raw image by sliding this slider to the right or left, respectively. The “Clarity” slider increases or decreases local contrast in a wide range, with the greatest effect on the midtones, by sliding the slider to the right or left, respectively. This can restore detail and sharpness other tonal adjustments may remove.
The “Dehaze” slider helps you to remove haze from an image or add haze to an image. Drag this slider to the right to increase the removal of haze in an image or drag it to the left to add haze to an image. You can also enter values into the adjacent fields for all three of these sliders, if preferred.
How to Adjust Vibrance and Saturation in Camera Raw in Photoshop:
The “Vibrance” slider adjusts color saturation, so clipping is minimized as colors approach full saturation. It does this by changing the saturation of all lower-saturated colors without changing the higher-saturated colors as much. This also helps prevent skin tones from becoming oversaturated. Drag this slider to the right to increase saturation or slide it to the left to decrease saturation.
Similarly, the “Saturation” slider equally adjusts the saturation levels of all color in the image from pure monochrome to double-saturation. Drag this slider to the right to increase all color saturation or drag it to the left to decrease all color saturation. If preferred, you can also enter values into the adjacent fields for both these sliders, which range in values from -100 to +100.
How to Temporarily Hide Basic Adjustments in Camera Raw in Photoshop:
To temporarily hide all the white balance and basic adjustments in the preview image in camera raw after changing these settings, click and hold down on the “eye” icon in the upper-right corner of the “Basic” tab within the Edit panel. This temporarily hides the changes in the preview image while you hold down on this icon so you can see the changes to the camera raw preview image. Simply release the mouse button to then restore the visibility of the changes.
Instructions on How to Make Basic Adjustments in Camera Raw in Photoshop:
- To make basic tonal adjustments to camera raw photos in Photoshop, click the “Edit” button in the toolbar at the right side of the “Camera Raw” dialog box, if needed.
- Then click the “Basic” tab in the Edit panel that appears to the left of the toolbar to expand it, if needed.
- Then use the sliders below the “White Balance” section to change the basic adjustment settings.
- The specific sliders shown in this section depend on the process you chose from the “Process” drop-down on the “Calibration” tab. This lesson covers the settings for process “Version 5” in the “Camera Raw” dialog box in Photoshop.
- To apply automatic adjustments, click the “Auto” button at the top of the Edit panel.
- To then undo the automatic adjustments, click the “Auto” button again.
- If desired, to apply a black and white treatment in camera raw, click the “B&W” button at the top of the Edit panel to apply the “Adobe Monochrome” profile to the image.
- To then remove the black and white treatment, click the “B&W” button again.
- To manually adjust the exposure for the selected camera raw image, click and drag the “Exposure” slider or enter a value into the adjacent field.
- Alternatively, to use the “Exposure” slider to preview where highlights are clipped in an image, hold down the “Alt” key on your keyboard (“Option” on Macs) when dragging the “Exposure” slider to show clipped regions as colored areas in the image.
- Move the slider until the non-specular highlights, meaning highlights not from light or reflected light, are completely clipped, and then slightly reverse the adjustment you made.
- To manually adjust the contrast of a camera raw image, use the “Contrast” slider or enter values into the adjacent field for the slider, if preferred.
- To recover details in overexposed highlight areas of an image, use the “Highlights” slider or enter values into the adjacent field for the slider, if preferred.
- If needed, to recover details in underexposed shadow areas in the image, use the “Shadows” slider, or enter values into the adjacent field for the slider, if preferred.
- To adjust the highlight clipping in an image, use the “Whites” slider or enter values into the adjacent field for the slider, if preferred.
- To increase or decrease medium frequency details in a camera raw image, slide the “Texture” slider to the right or left, respectively.
- If needed, to increase or decrease local contrast in a wide range, with the greatest effect on the midtones, slide the “Clarity” slider to the right or left, respectively.
- To increase the removal of haze in an image or add haze to an image, drag the “Dehaze” slider to the right or left, respectively.
- To adjust color saturation, so clipping is minimized as colors approach full saturation, drag the “Vibrance” slider to the right to increase saturation or left to decrease saturation.
- If needed, to adjust the saturation levels of all color in an image from pure monochrome to double-saturation, drag the “Saturation” slider to the left or right, respectively.
- To temporarily hide all the white balance and basic adjustments in the preview image in camera raw after changing these settings, click and hold down on the “eye” icon in the upper-right corner of the “Basic” tab within the Edit panel.
- To then restore the visibility of the changes, then release the mouse button.