TeachUcomp, Inc.

 MY CART
  • VIDEO COURSES
    • All-Access Subscriptions
    • Business Licensing
    • Course List
      • Accounting
      • Adobe
        • Acrobat
        • Lightroom Classic
        • Photoshop
        • Photoshop Elements
      • Crystal Reports
      • Employment Skills
        • Interview Skills
        • Resume Skills
      • For Lawyers
        • Excel for Lawyers
        • Outlook for Lawyers
        • QuickBooks for Lawyers
        • Word for Lawyers
      • HTML
      • JavaScript
      • Microsoft Office
        • Access
        • Excel
        • Microsoft Office Suite
        • OneNote
        • Outlook
        • Outlook on the Web
        • PowerPoint
        • Publisher
        • Word
      • Microsoft Project
      • Microsoft Teams
      • QuickBooks Online
      • QuickBooks Pro
      • Sage
        • Peachtree
        • Sage 50
      • SQL
      • Windows
    • My Courses
    • Video Course Options
  • SUBSCRIPTIONS
  • MANUALS
    • Adobe
      • Acrobat
      • Lightroom Classic
      • Photoshop
      • Photoshop Elements
    • Crystal Reports
    • For Lawyers
      • Excel for Lawyers
      • Outlook for Lawyers
      • QuickBooks for Lawyers
      • Word for Lawyers
    • HTML
    • JavaScript
    • Microsoft Office
      • Access
      • Excel
      • OneNote
      • Outlook
      • Outlook on the Web
      • PowerPoint
      • Publisher
      • Word
    • Microsoft Project
    • Microsoft Teams
    • QuickBooks Online
    • QuickBooks Pro
    • Sage
      • Peachtree
      • Sage 50
    • SQL
    • Windows
  • BOOKS
    • QuickBooks Online
  • REFERENCE CARDS
    • Adobe
      • Acrobat
      • Lightroom Classic
      • Photoshop
      • Photoshop Elements 2026
      • Photoshop Elements 2025
      • Photoshop Elements 2024
      • Photoshop Elements 2023
      • Photoshop Elements 2022
      • Photoshop Elements 2021
      • Photoshop Elements 2020
      • Photoshop Elements 2019
      • Photoshop Elements 2018
      • Photoshop Elements 15
    • Chrome OS
      • Chrome OS Keyboard Shortcuts
    • FreshBooks
    • Google
      • Google Classroom for Teachers
      • Google Docs
      • Google Drive
      • Google Forms
      • Google Sheets
      • Google Slides
    • macOS
      • macOS Keyboard Shortcuts
      • macOS Tahoe
    • Microsoft Office
      • Excel Formulas and Functions
      • Excel Keyboard Shortcuts (macOS)
      • Excel Keyboard Shortcuts (PC/Windows)
      • Excel Tables PivotTables and Charts
      • Microsoft 365
        • Access for Microsoft 365
        • Excel for Microsoft 365
        • Microsoft Office 365
        • Outlook for Microsoft 365 Classic Edition
        • Outlook for Microsoft 365 (New Outlook)
        • PowerPoint for Microsoft 365
        • Publisher for Microsoft 365
        • Word for Microsoft 365
      • Microsoft Office 2021
        • Access 2021
        • Excel 2021
        • Microsoft Office 2021
        • OneNote for Windows 10
        • Outlook 2021
        • PowerPoint 2021
        • Publisher 2021
        • Word 2021
      • Microsoft Office 2019
        • Access 2019
        • Excel 2019
        • Microsoft Office 2019
        • Outlook 2019
        • PowerPoint 2019
        • Publisher 2019
        • Word 2019
      • Microsoft Office 2016
        • Access 2016
        • Excel 2016
        • Microsoft Office 2016
        • OneNote 2016
        • Outlook 2016
        • PowerPoint 2016
        • Publisher 2016
        • Word 2016
      • Microsoft Office 2013
        • Excel 2013
        • Microsoft Office 2013
        • OneNote 2013
        • Outlook 2013
        • PowerPoint 2013
        • Word 2013
      • Microsoft Office for iPad
        • Microsoft Office for iPad
      • Word Keyboard Shortcuts (PC/Windows)
    • Microsoft Teams
    • QuickBooks Online
    • QuickBooks Pro
      • QuickBooks Pro 2024
      • QuickBooks Pro 2023
      • QuickBooks Pro 2022
      • QuickBooks Pro 2021
      • QuickBooks Pro 2020
      • QuickBooks Pro 2019
      • QuickBooks Pro 2018
      • QuickBooks Pro 2017
      • QuickBooks Pro 2016
      • QuickBooks Pro 2015
      • QuickBooks Pro 2014
    • Sage 50 Accounting
    • SQL
    • Windows
      • Windows 11
      • Windows 11 and 10 Keyboard Shortcuts
      • Windows 10
  • STICKERS
    • Chrome OS
    • macOS
    • Microsoft Office
      • Word and Excel (Mac)
      • Word and Excel (PC/Windows)
    • QuickBooks Desktop
      • QuickBooks Desktop (PC/Windows) 2024
      • QuickBooks Desktop (PC/Windows) 2023
      • QuickBooks Desktop (PC/Windows) 2022-2015
    • QuickBooks Online
    • Windows
  • SUPPORT
    • Company
      • About Us
      • Blog
      • Contact Us
      • Our History
      • Our Philosophy
        • Customer Service
        • Mission
      • Policies
      • Testimonials
    • FAQ
      • Contact Us
    • Help
    • Lost Password
    • Register a Product
  • LOGIN
    • Manage My Account
    • Member Login
    • My Courses
Shop Now

Basic Tasks in Microsoft Publisher 2013

by Keeley Byrnes / Monday, August 19 2013 / Published in Latest, Publisher 2013

Creating a New Publication

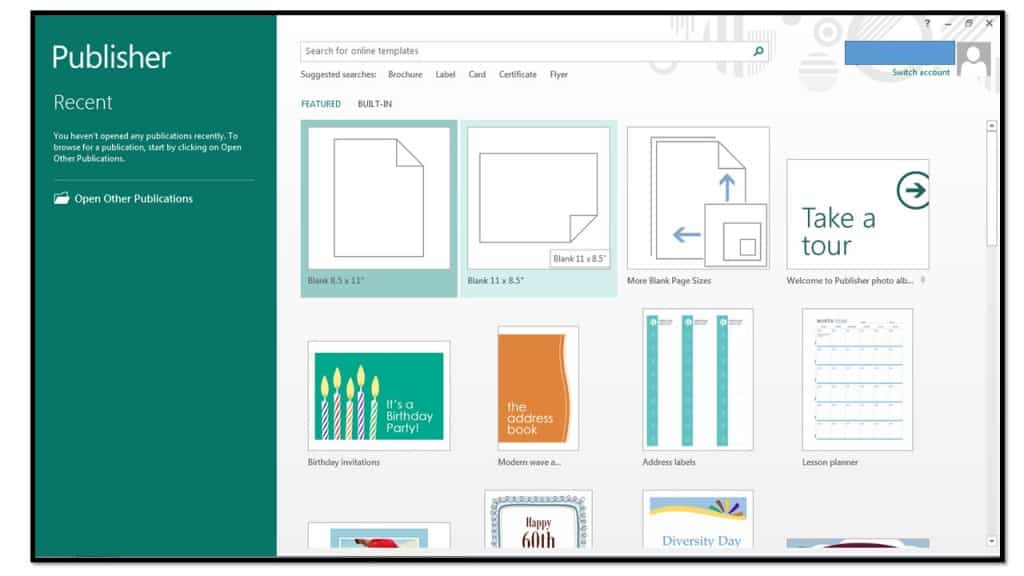
  1. When you first open Publisher 2013, you will see a startup screen that allows you to create a new publication.
  2. Click the type of publication that you want to create within the listing of available templates that appears at the right side of the startup screen.
  3. If you already have opened a publication in Publisher 2013 or Publisher 2010, you can view a similar screen by clicking the “File” tab within the Ribbon and then selecting the “New” command at the left side of the backstage view.
  4. In the listing of available templates that appears to the right in the backstage view, you can choose to start a new publication from one of the many templates available or you can choose to simply create a new blank publication by clicking the desired template choice.
  5. You can then click either the “Create” or “Download” buttons that appear to create a new publication based on the selected template.
  6. To create a new, blank publication that is a standard page size, select the “Blank 8.5 x 11” icon from the templates listing.


Slide1


Saving Publications

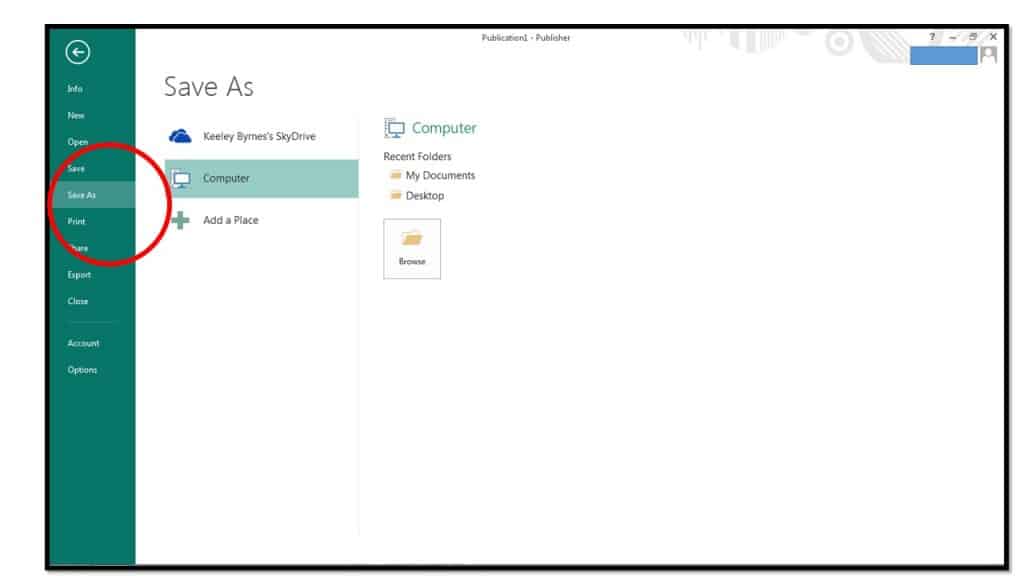
  1. To save a publication for the first time, click the “File” tab within the Ribbon.
  2. Click the “Save As” command in the command panel shown at the left side of the backstage view.
  3. To the right of the command panel, under the “Places” section, you will see the places that are available for you to save the file.
  4. If you are signed into your computer and Microsoft Office 2013 by using a Microsoft user account, then you can click the “SkyDrive” choice under the “Places” section to save to your online SkyDrive folders.
  5. After selecting this choice, you will see any recently selected SkyDrive folders shown to the right under the “Recent Folders” section.
  6. You can click on a recently accessed folder to select it as the save location.
  7. At that point a “Save As” dialog box will appear.
  8. If you have no folders listed in the “Recent Folders” section, then instead click the “Browse” button to open a “Save As” dialog box where you can select the desired folder within the SkyDrive to use.
  9. Alternately, you can select the “Computer” choice under the “Places” section versus “SkyDrive.”
  10. Just as when saving to the SkyDrive, select a recently used folder on your computer from the “Recent Folders” section or click the “Browse” button to open the “Save As” dialog box.
  11. After selecting a location to save the publication file, the “Save As” dialog box appears.
  12. In this dialog box, enter a file name into the “File name” field.
  13. Once you have entered the file name and noted the save location, click the “Save” button within the “Save As” dialog box to finish saving the file.
  14. To save changes made to the publication in the future, just click the “Save” button in the Quick Access toolbar, or click the “File” tab in the Ribbon and then click the “Save” command. Publisher will automatically save the changes to the existing file.


Slide2


Closing Publications

  1. If you have multiple publications open, then to close a publication you can just click the “x” in the upper right corner of the application window to close the current publication. Clicking the “x” is equivalent to executing the “Close” command.
  2. If you only have a single publication open, and you want to leave the Publisher application open, then click the “File” tab in the Ribbon or click the Microsoft Office button and then click the “Close” command to close the file and leave the program open.
  3. If you click the “x” in the upper-right corner of the application window with only one publication open, you will close the publication and also exit the application.


Slide3

Tagged under: closing, help, how-to, microsoft, opening, publication, publisher, saving, training, tutorial

About Keeley Byrnes

Keeley is our Director of Marketing and has been with TeachUcomp since 2010. Keeley manages all aspects of our Marketing Department, acts as liaison for our reseller and affiliate partners and also authors courses in software and taxation.
Sale! One Year Online Entire Library $29. Click here to see the deals.


Categories

  • GET SOCIAL

© 2001-2026 Copyright TeachUcomp, Inc. All rights reserved.

TOP
SALE! $29 All-Access 2 Days 21 Hours 28 Minutes 26 Seconds      $199 $29 Entire Library!
See Deal