Change the Date and Time in Windows 10 – Tutorial
Change the Date and Time in Windows 10: Video Lesson
This video lesson, titled “Date and Time Settings,” shows how to change the date and time in Windows 10. This video lesson is from our complete Windows 10 training, titled “Mastering Windows Made Easy v.10.”
Change the Date and Time in Windows 10: Overview
To change the date and time in Windows 10, open the “Settings” window. Then click the “Time & language” button in the middle of the screen to display time and language settings. Then click the “Date & time” category at the left side of this window to view date and time settings in the area to the right. Another way to change the date and time in Windows is to click the date/time display in the taskbar. Then click the “Date and time settings” link in the pop-up window that appears.
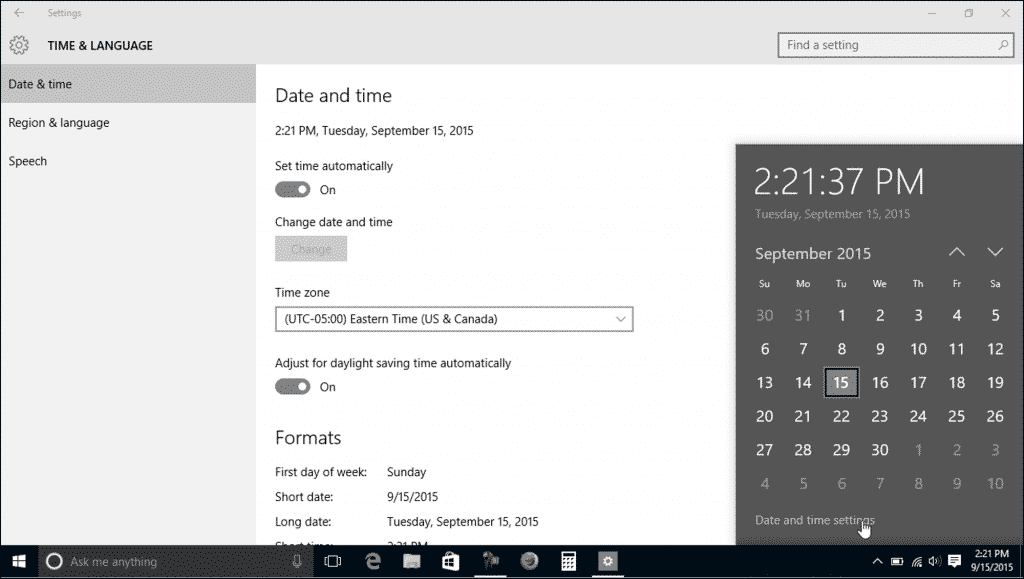
Change the Date and Time in Windows 10 – Tutorial: A picture of the “Date and time” settings in Windows 10 and the pop-up window that appears when you click the date/time display in the Windows 10 taskbar.
In the “Date and time” section, you can see the computer’s current date and time. You can click the “Set time automatically” toggle switch to set it to either the “On” or “Off” position. This enables or disables Internet time synchronizing. If disabled, you can click the “Change” button to manually set the date and time in the window that appears. You can select your time zone from the “Time zone” drop-down. To let your device automatically adjust for daylight savings time, ensure the “Adjust for daylight saving time automatically” toggle switch is set to the “On” position. You can click it to toggle it “Off,” if needed.
In the “Formats” section, you can see the display of date and time increments. To change the formatting of this display, click the “Change date and time formats” command. This opens a window where you can use the drop-downs for each time and date increment to choose the format to use for its display. Then click the “Back” arrow button in the upper-left corner to return to the “Date & time” settings, when finished.
Under the “Related settings” section, you can click the “Additional date, time, & regional settings” link to open the “Clock, Language, and Region” window within the Control Panel. You can click the “Add clocks for different time zones” link to open the “Date and Time” dialog box. When finished, you can close either window by clicking the “X” button in its upper-right corner.
Change the Date and Time in Windows 10: Instructions
- To change the date and time in Windows 10, open the “Settings” window.
- Click the “Time & language” button in the middle of the screen to display time and language settings.
- Click the “Date & time” category at the left side of this window to view date and time settings in the area to the right.
- Another way to change the date and time in Windows is to click the date/time display in the taskbar.
- Then click the “Date and time settings” link in the pop-up window that appears.
- In the “Date and time” section, you can see the computer’s current date and time.
- To enable or disable Internet time synchronizing, click the “Set time automatically” toggle switch to set it to either the “On” or “Off” position.
- If disabled, you can click the “Change” button to manually set the date and time in the window that appears.
- Select your time zone from the “Time zone” drop-down.
- To let your device automatically adjust for daylight savings time, ensure the “Adjust for daylight saving time automatically” toggle switch is set to the “On” position.
- You can click it to toggle it “Off,” if needed.
- In the “Formats” section, you can see the display of date and time increments.
- To change the formatting of this display, click the “Change date and time formats” command.
- In the window that opens, use the drop-downs for each time and date increment to choose the display format to use.
- Click the “Back” arrow button in the upper-left corner to return to the “Date & time” settings, when finished.
- To open the “Clock, Language, and Region” window within the Control Panel, click the “Additional date, time, & regional settings” link under the “Related settings” section.
- To open the “Date and Time” dialog box, click the “Add clocks for different time zones” link.
- When finished, you can close either window by clicking the “X” button in its upper-right corner.
