Change the Date and Time in Windows 11- Instructions
How to Change the Date and Time in Windows 11: Video
This video lesson, titled “Date and Time Settings in Windows 11,” shows how to change the date and time in Windows 11. This video lesson is from our complete Windows 11 tutorial, titled “Mastering Windows Made Easy v.11.”
Overview of How to Change the Date and Time in Windows 11:
To change the date and time in Windows 11, open the “Settings” app window. Then click the “Time & language” button at the left side of the screen to show the time and language settings for your computer to the right. Then click the “Date & time” button to the right to show the “Date & time” settings at the right side of the “Settings” app window.
The computer’s current date and time appears in the “Current date and time” setting button. To enable or disable automatically setting the time in Windows 11, click the “Set time automatically” setting’s toggle switch to set it to the “On” or “Off” position, as desired. To manually set the time in Windows 11 if you disable automatically setting the time, click the “Change” button in the “Set the date and time manually” setting button that is then activated. Then manually set the date and time and click the “Change” button in the “Change date and time” window that appears.
To enable or disable automatically setting the time zone in Windows 11, click the “Set time zone automatically” setting’s toggle switch to set it to the “On” or “Off” position, as desired. To enable or disable automatically adjusting for daylight saving time in Windows 11 if you disable automatically setting the time zone, click the “Adjust for daylight saving time automatically” setting’s toggle switch to set it to the “On” or “Off” position, as desired. If you want to set your time zone in Windows 11 if you disable automatically setting the time zone, select the desired choice from the “Time zone” setting button’s drop-down.
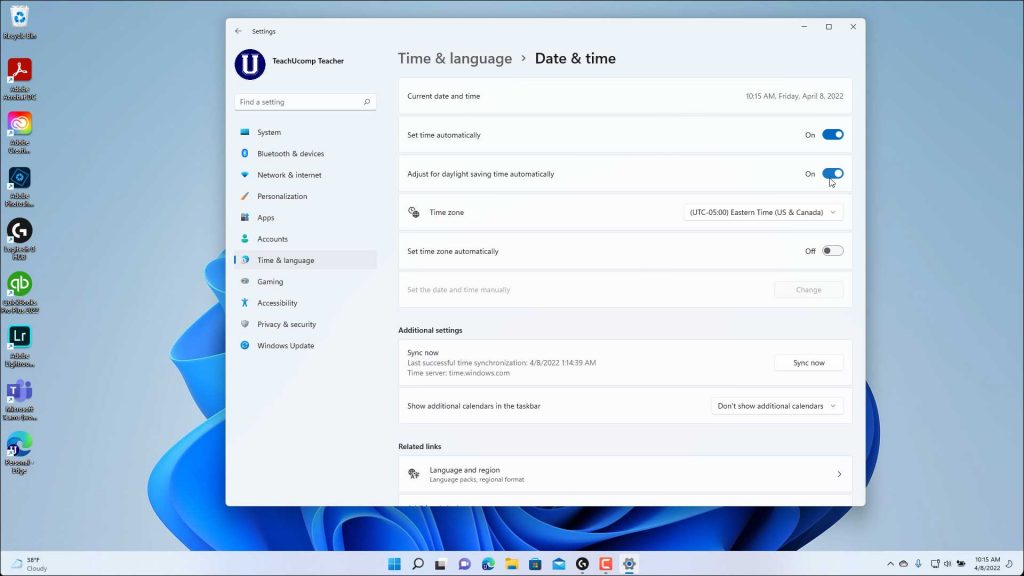
A picture showing how to change the date and time in Windows 11 within the “Settings” app.
To manually sync the date and time with a Windows time server in Windows 11, click the “Sync now” button for the “Sync now” setting under the “Additional settings” section. To show additional calendars in the taskbar, if desired, select a choice from the “Show additional calendars in the taskbar” setting button’s drop-down menu.
Under the “Related links” section, you can click the “Language and region” settings button to show the “Language & region” settings at the right side of the window. We will discuss these settings in the next lesson. To return to the “Date & time” settings, click the “Back” button in the upper-left corner of the “Settings” app window.
If you want to add up to two additional clocks for different time zones that you can view when you click or hover over the clock at the right end of the taskbar in Windows 11, click the “Additional clocks” setting button to open the “Additional Clocks” tab of the “Date and Time” dialog box. To add a clock, check its “Show this clock” checkbox. Then select the clock’s time zone from the “Select time zone” drop-down. Then enter a display name for the clock into the “Enter display name” field. Repeat this process for the other clock to add, if needed. Then click the “OK” button to add the additional clocks to the Windows taskbar. To close the “Settings” app window, when finished, click the “X” button in its upper-right corner.
Instructions on How to Change the Date and Time in Windows 11:
- To change the date and time in Windows 11, open the “Settings” app window.
- Then click the “Time & language” button at the left side of the screen to show the time and language settings for your computer to the right.
- Then click the “Date & time” button to the right to show the “Date & time” settings at the right side of the “Settings” app window.
- The computer’s current date and time appears in the “Current date and time” setting button.
- To enable or disable automatically setting the time in Windows 11, click the “Set time automatically” setting’s toggle switch to set it to the “On” or “Off” position, as desired.
- To manually set the time in Windows 11 if you disable automatically setting the time, click the “Change” button in the “Set the date and time manually” setting button that is then activated.
- Then manually set the date and time and click the “Change” button in the “Change date and time” window that appears.
- To enable or disable automatically setting the time zone in Windows 11, click the “Set time zone automatically” setting’s toggle switch to set it to the “On” or “Off” position, as desired.
- To enable or disable automatically adjusting for daylight saving time in Windows 11 if you disable automatically setting the time zone, click the “Adjust for daylight saving time automatically” setting’s toggle switch to set it to the “On” or “Off” position, as desired.
- If you want to set your time zone in Windows 11 if you disable automatically setting the time zone, select the desired choice from the “Time zone” setting button’s drop-down.
- To manually sync the date and time with a Windows time server in Windows 11, click the “Sync now” button for the “Sync now” setting under the “Additional settings” section.
- To show additional calendars in the taskbar, if desired, select a choice from the “Show additional calendars in the taskbar” setting button’s drop-down menu.
- If you want to add up to two additional clocks for different time zones that you can view when you click or hover over the clock at the right end of the taskbar in Windows 11, click the “Additional clocks” setting button to open the “Additional Clocks” tab of the “Date and Time” dialog box.
- To add a clock, check its “Show this clock” checkbox.
- Then select the clock’s time zone from the “Select time zone” drop-down.
- Then enter a display name for the clock into the “Enter display name” field.
- Repeat steps 14 through 16 for the other clock to add, if needed.
- Then click the “OK” button to add the additional clocks to the Windows taskbar.
- To close the “Settings” app window, when finished, click the “X” button in its upper-right corner.