Changing the Inbox View in Outlook – Instructions
Changing the Inbox View in Outlook: Video Lessons
The following video lessons show you different ways of changing the Inbox view in Outlook.
This video lesson, titled “Changing the Inbox View,” shows you how to switch between the existing Inbox views.
The following video lesson, titled “Creating Custom Mailbox Views,” shows you how to customize the mailbox folder views in Outlook.
If you would like to learn more about using Outlook, the preceding instructions and video lessons are from our complete Outlook tutorial, titled “Mastering Outlook Made Easy v.2019 and 365.”
Changing the Inbox View in Outlook: Overview
Changing the Inbox View in Outlook by Selecting a Different, Existing View
By changing the Inbox view in Outlook, you can organize your email to better suits your individual needs. The first step in changing the Inbox view in Outlook is to open the Inbox folder. Then click the “View” tab in the Ribbon. Then click the “Change View” button in the “Current View” button group. You can then select the name of any of the views listed in the menu that appears to apply them to your Inbox. The “Compact,” “Single,” and “Preview” choices appear by default. The “Compact” view is the default view.
You can also select the “Manage Views…” command from this menu to open the “Manage All Views” dialog box. This dialog box displays all of the available views of the current folder and their associated settings. You can select any view that you want and then modify it, or reset modifications made to one of the views. You can also create, edit or delete your own custom views within this dialog box. This same dialog box lets you customize the views of all the folders in Outlook.
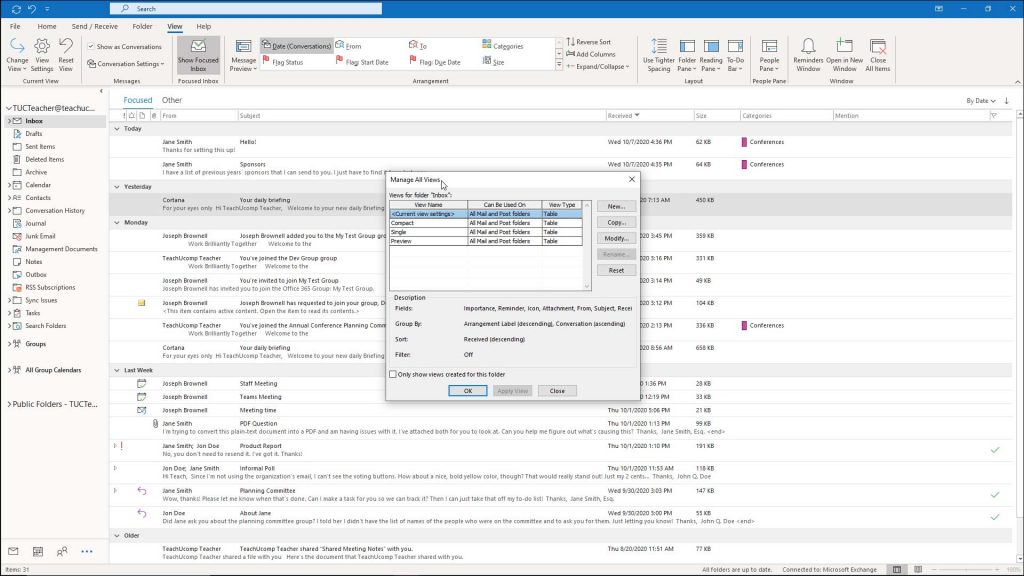
Changing the Inbox View in Outlook – Instructions: A picture of the “Manage All Views” dialog box in Outlook.
Changing the Inbox View in Outlook by Creating a New, Custom View
If changing the Inbox view in Outlook by creating a new custom view is what you want to do, then click the “New…” button at the right side of the dialog box. Doing that then opens the “Create a New View” dialog box. Type a name for the new view into the “Name of new view:” text box.
Below that, select the type of view to create. Your choices include “Table,” which lays out the view’s items in columns and rows; “Timeline,” which shows items accessed over a time period; “Card,” which lays out the items in a card view; “Business Card,” which displays items using an alternate card view; “People,” which display a list of people like the “People” view of the “Contacts” folder; “Day/Week/Month,” which shows items in a day/week/month style; or “Icon,” which shows icons for the items.
After selecting your base folder view, select who can see this new view. You can choose either the “This folder, visible to everyone,” “This folder, visible only to me,” or “All Mail and Post folders” option. Then click “OK” to launch another dialog box, called the “Advanced View Settings” dialog box. This dialog box has seven buttons you can click to set advanced view options. Based on your selected base view type, however, not all of the buttons will necessarily be available.
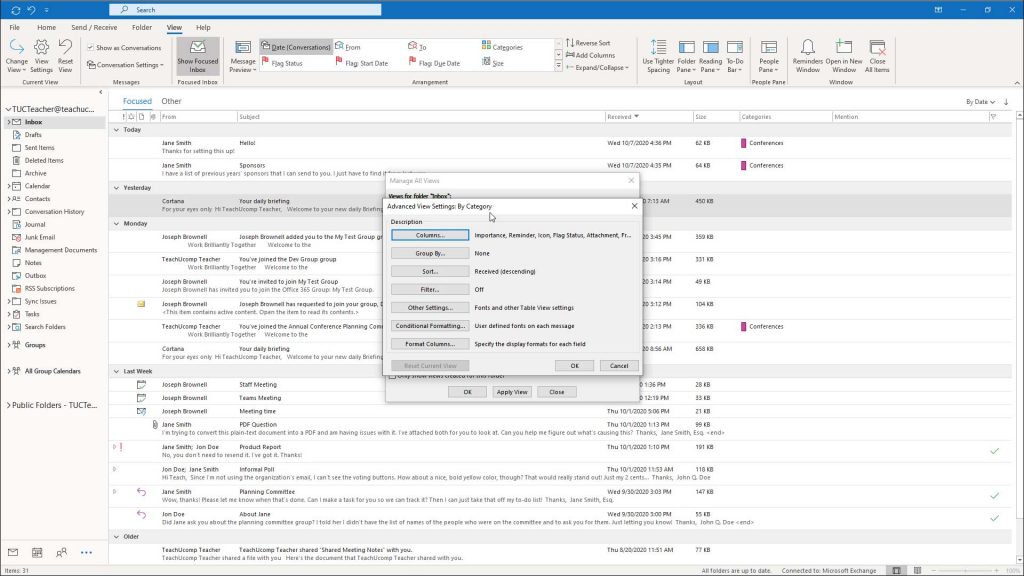
Changing the Inbox View in Outlook – Instructions: A picture of the “Advanced View Settings” dialog box in Outlook.
Changing the Inbox View in Outlook by Changing Advanced View Settings
If You Want Help Changing the Inbox View in Outlook by Adding Columns to the View
If changing the Inbox view in Outlook by adding columns to the view is what you want to do, then click the “Columns…” button in the “Advanced View Settings” dialog box to open the “Show Columns” dialog box. Then use the drop-down in the upper-left corner to choose a set of fields to display in the left list.
To add one of these fields to your new view, select it in the left list and then click the “Add” button to add it to the list to the right. To change its order in the list of columns, select that field from the list to the right and then click the “Move Up” and “Move Down” buttons until it is in the desired place. Then click “OK” after adding and organizing the fields.
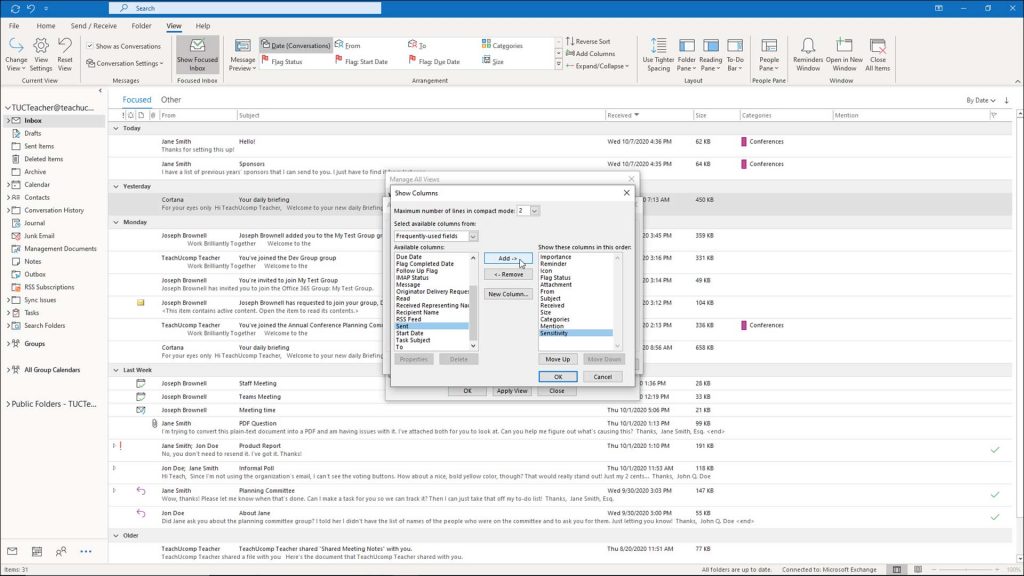
Changing the Inbox View in Outlook – Instructions: A picture of the “Show Columns” dialog box in Outlook.
Changing the Inbox View in Outlook by Grouping Items in the View
If changing the Inbox view in Outlook by grouping items together in the view is what you want to do, then click the “Group By…” button to open the “Group By” dialog box. Then use the drop-down under “Group items by” to select a field by which to group the view’s items. This is usually only used for the “Table” style base view, as it groups the same values in the selected field or fields into expandable and collapsible groups in the table view. You can select up to four fields by which to group. You can also set whether they will be grouped in “Ascending” (A-Z, 1-9) or “Descending” (Z-A, 9-1) order by choosing the desired sorting option at the right end of each grouped field. When finished, click “OK” to set the grouping for your view.
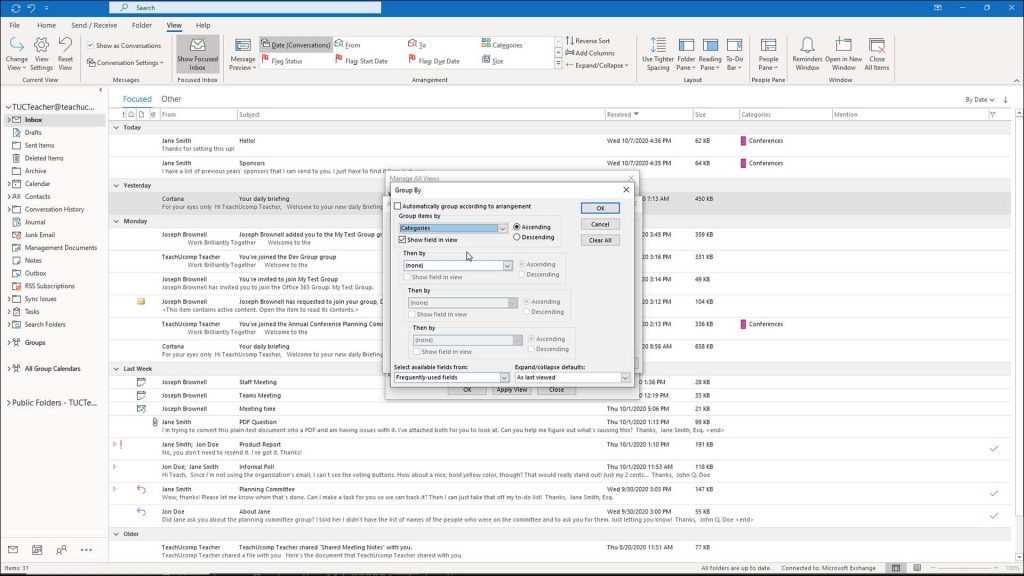
Changing the Inbox View in Outlook – Instructions: A picture of the “Group By” dialog box in Outlook.
Changing the Inbox View in Outlook by Changing the Default Sort Order of the View
If changing the Inbox view in Outlook by changing the default sort order applied to items in the view is what you want to do, then click the “Sort…” button to open the “Sort” dialog box. Then use the drop-down under the “Sort items by” and “Then by” sections to indicate by which field or fields to sort the view. You can sort by up to four fields. They can be sorted in either “Ascending” or “Descending” order by selecting the desired option at the right end of each field. You can choose the set of fields from which to select the sorting fields by using the “Select available fields from:” drop-down list at the bottom of the dialog box. When finished, click “OK” to set the sorting for your view.
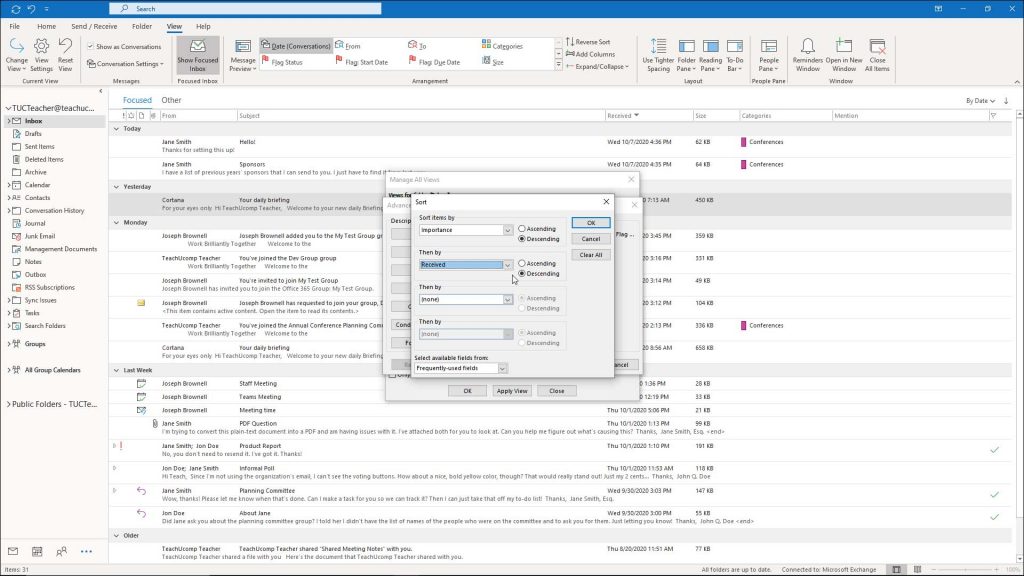
Changing the Inbox View in Outlook – Instructions: A picture of the “Sort” dialog box in Outlook.
Changing the Inbox View in Outlook by Filtering the Items Shown in the View
If changing the Inbox view in Outlook by filtering the items that appear in the view is what you want to do, then click the “Filter…” button to open the “Filter” dialog box. This dialog contains the “Messages,” “More Choices,” “Advanced,” and “SQL” tabs. Click the tab you want to use to set the filtering criteria that includes or excludes items in your view.
The “Messages” tab lets you choose filtering criteria by using common email fields. The “More Choices” tab lets you choose filtering criteria by assigned categories, message statuses, message option settings, and other, less-frequently used fields. The “Advanced” tab lets you use the “Field” drop-down to select from any available fields in Outlook to use as a filter. Then use the “Condition” drop-down to select a comparison condition, and if needed, type the value to which to compare the field’s value in the last text box. Then click the “Add to list” button to add the filtering field to the list box above.
The “SQL” tab lets you create a statement using Structured Query Language to select which items to see. You can do this if you are familiar with how SQL is used in Outlook application. After creating any filters, click the “OK” button to set the filters for your view.
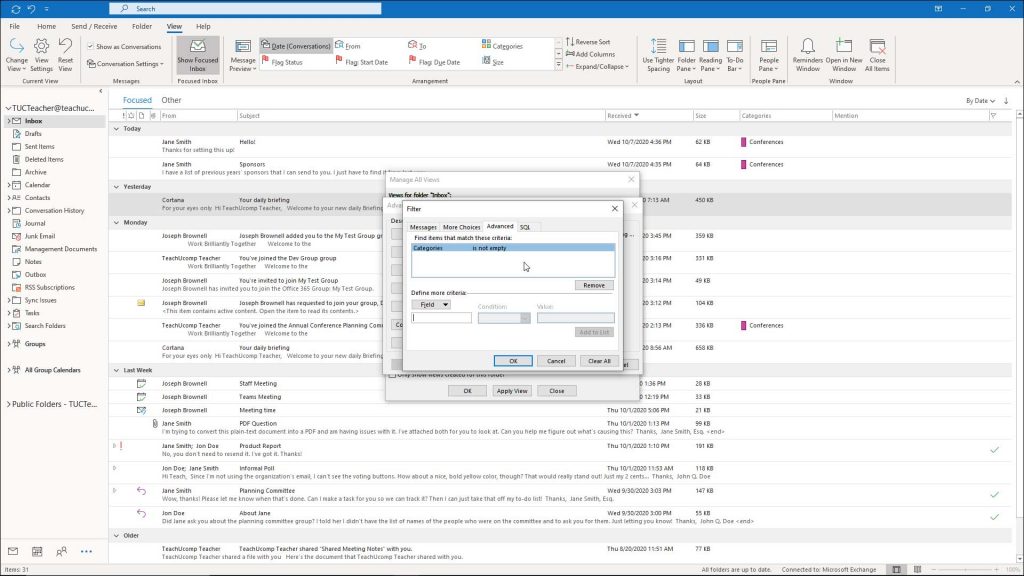
Changing the Inbox View in Outlook – Instructions: A picture of the “Filter” dialog box in Outlook showing the “Advanced” tab.
Changing the Inbox View in Outlook by Changing the Appearance of the Items in the View
If changing the Inbox view in Outlook by changing the appearance of the items in the view is what you want to do, then click the “Other Settings…” button to open the “Other Settings” dialog box. Here you can adjust the font display of items in your view. The content available here changes, depending on the base style of the view you are creating. Make any change you want and then click the “OK” button to apply them to your new view.
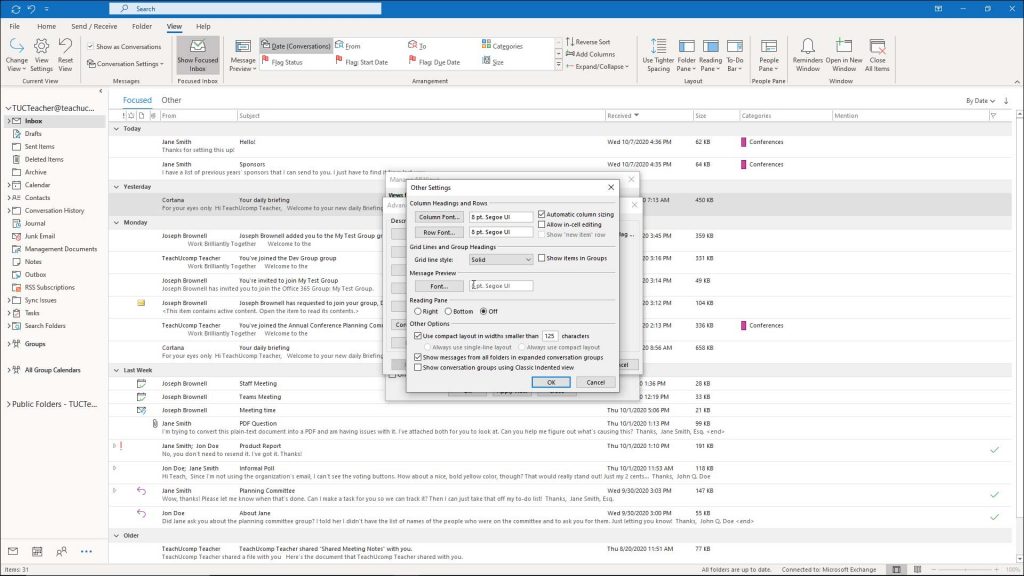
Changing the Inbox View in Outlook – Instructions: A picture of the “Other Settings” dialog box in Outlook.
Changing the Inbox View in Outlook by Changing the Appearance of Items in the View That Match a Specific Condition
If changing the Inbox view in Outlook by changing the appearance of the items in the view based on whether or not the items match a given criteria is what you want to do, then click the “Conditional Formatting…” button to open the “Conditional Formatting” dialog box.
Here you can create rules that apply formatting to items that match a given criteria. Some rules already appear here, and you can also add more. To add a new rule, click the “Add” button at the right side of this dialog box to add a new rule to the list. Type the new rule’s name into the “Name:” text box. Then click the “Font…” button to open a dialog box that lets you set the font formatting to apply to items that match the criteria condition you are about to specify. Then click “OK” in the “Font” dialog box to set the font.
Then click the “Condition…” button to set up the criteria that, when met, applies the formatting you selected. The same choices appear here as when setting the view’s filter. After setting the criteria, click “OK” to apply it. Then click “OK” again after setting your conditional formatting.
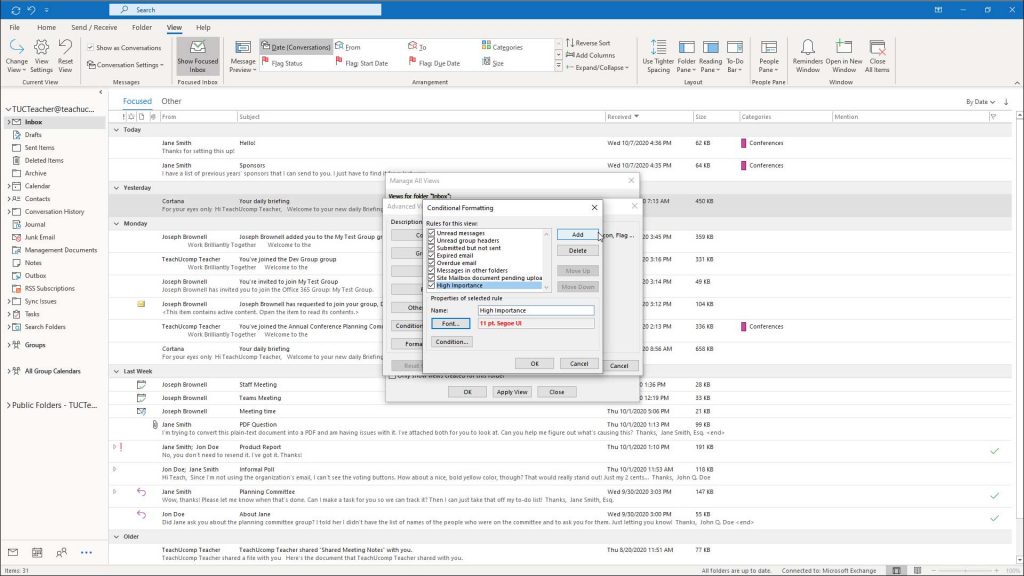
Changing the Inbox View in Outlook – Instructions: A picture of the “Conditional Formatting” dialog box in Outlook.
Changing the Inbox View in Outlook by Changing the Appearance of Columns in a Table View
If using a “Table” base view in Outlook, you can click the “Format Columns…” button to specify a display format for each field in your view. To do this, select the name of the field whose display you wish to modify from the “Available fields:” list at the left side of this dialog box. Then change its settings at the right side of the dialog box. After setting the display of the columns, click “OK” to apply them.
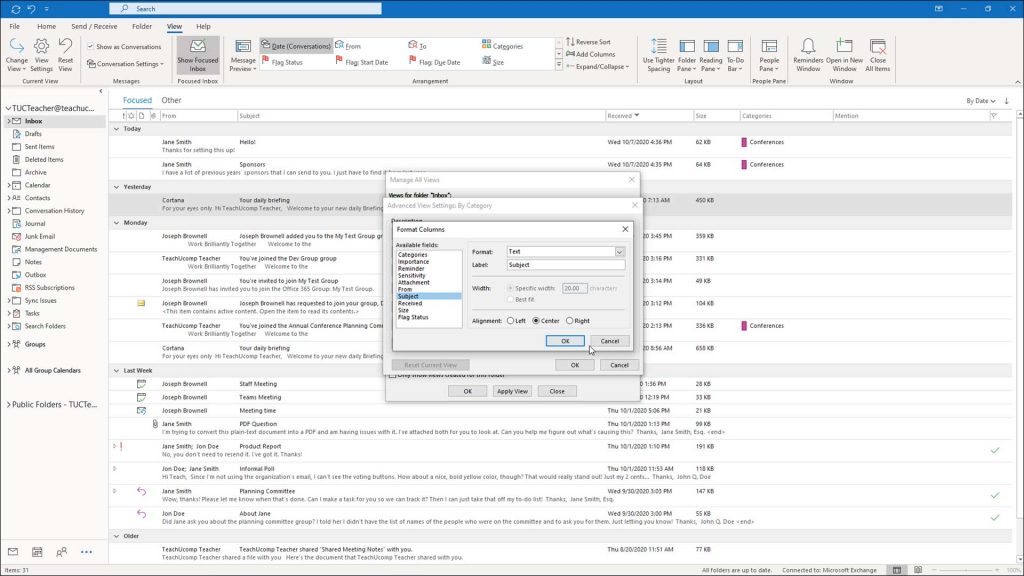
Changing the Inbox View in Outlook – Instructions: A picture of the “Format Columns” dialog box in Outlook.
Changing the Inbox View in Outlook by Saving and Applying Your Advanced View Settings
When you are satisfied with all the view’s advanced settings, click “OK” in the “Advanced View Settings” dialog box to return to the “Manage All Views” dialog box. The name of your new, custom view then appears in the list of views in the dialog box. To apply the view, click its name to select it in the list. Then click the “Apply View” button at the bottom of the dialog box.
Alternatively, you can also apply a custom view in Outlook by clicking the “View” tab in the Ribbon. Then click the “Change View” button in the “Current View” button group. Then select the name of the custom view that appears in the drop-down menu.
Editing and Deleting Custom Mailbox Views in Outlook
To modify or delete a custom view in Outlook, select the name of the view from the listing in the “Manage All Views” dialog box. To change its settings again and edit it, click the “Modify…” button to the right. To delete it, click the “Delete” button, instead. When finished using the “Manage All Views” dialog box, click the “Close” button at the bottom of the dialog box to close it.
Changing the Inbox View in Outlook: Instructions
Instructions for Changing the Inbox View in Outlook by Selecting a Different, Existing View
- To change the Inbox view, click the “View” tab in the Ribbon.
- Then click the “Change View” button in the “Current View” group.
- Then select the name of any of the views listed in the menu that appears to apply them to your inbox.
- Choices include the “Compact,” “Single” or “Preview” views. The “Compact” view is the default view.
- To create a new, custom view or edit existing views, select the “Manage Views…” command from the menu that appears in order to open the “Manage All Views” dialog box.
Instructions for Changing the Inbox View in Outlook by Creating a New, Custom View
- To create a new view, click the “New…” button at the right side of the dialog box.
- In the “Create a New View” dialog box, type a name for the view into the “Name of new view:” text box.
- Select the type of view you want to create: “Table,” “Timeline,” “Card,” “Business Card,” “People,” “Day/Week/Month,” or “Icon.”
- Select the option button to choose who can see this new view: “This folder, visible to everyone,” “This folder, visible only to me,” or “All Mail and Post folders.”
- Click the “OK” button to launch the “Advanced View Settings” dialog box. The dialog box has seven buttons that you can click to set options for your view. Based on your selected base view type, however, not all of the buttons will necessarily be available.
Instructions for Changing the Inbox View in Outlook by Adding Columns to the View
- To add columns to the view, click the “Columns…” button in the “Advanced View Settings” dialog box to open the “Show Columns” dialog box.
- Set the “Maximum number of lines in compact mode” by using the drop-down to the right of that label.
- Then use the “Select available columns from:” drop-down in the upper-left corner to choose a set of fields to display in the left list.
- To add a field to your new view, select it in the left list and then click the “Add” button to add it to the list to the right.
- To change the position of the newly added field, select it in the list to the right and then click the “Move Up” and “Move Down” buttons until it is in the desired place.
- Click “OK” after adding and organizing the fields.
Instructions for Changing the Inbox View in Outlook by Grouping Items in the View
- To group the items in your new view, click the “Group By…” button to open the “Group By” dialog box.
- Then use the drop-down under “Group items by” to select a field by which to group the items. You can select up to four fields by which to group.
- Then choose whether they are grouped in “Ascending” (A-Z, 1-9) or “Descending” (Z-A, 9-1) order by choosing a sorting option at the right end of each grouped field.
- When finished, click “OK” to set the grouping for your view.
Instructions for Changing the Inbox View in Outlook by Changing the View’s Default Sort Order
- To set how items are sorted by default in the view, click the “Sort…” button to open the “Sort” dialog box.
- To choose the set of fields from which to select the sorting fields, use the “Select available fields from:” drop-down list at the bottom of the dialog box.
- Then use the drop-down under the “Sort items by” and “Then by” sections to indicate by which field or fields to sort the view. You can sort by up to four fields.
- You can sort these fields in either “Ascending” or “Descending” order by selecting the desired option at the right end of each field.
- When finished, click “OK” to set the sorting for your view.
Instructions for Changing the Inbox View in Outlook by Filtering the Items Shown in the View
- To set filtering options for your view, click the “Filter…” button to open the “Filter” dialog box. This dialog box consists of four tabs: “Messages,” “More Choices,” “Advanced,” and “SQL.”
- Click the tab you want to use to set the criteria that includes or excludes items in your view.
- The “Messages” tab lets you choose filtering criteria by using common email fields.
- The “More Choices” tab lets you choose filtering criteria by assigned categories, message statuses, message option settings, and other, less-frequently used fields.
- If you select the “Advanced” tab, you can use the “Field” drop-down to select from any available fields in Outlook to use as a filter.
- Then use the “Condition” drop-down to select a comparison condition, and if needed, type the value to which to compare the field’s value in the last text box.
- Then click the “Add to list” button to add the filtering field to the list box above.
- The “SQL” tab lets you create a statement using Structured Query Language to select which items to see.
- After creating any filters, click the “OK” button to set the filters for your view.
Instructions for Changing the Inbox View in Outlook by Changing the Appearance of the Items in the View
- To adjust the fonts and other appearance options for your view, click the “Other Settings…” button to open the “Other Settings” dialog box.
- Here you can adjust the font display of items in your view. The content available here changes, depending on the base style of view you are creating.
- Make any adjustments and then click the “OK” button to apply them to your new view.
Instructions for Changing the Inbox View in Outlook by Changing the Appearance of Items in the View That Match a Specific Condition
- To create rules that apply specific formatting to items that match a given criteria, click the “Conditional Formatting…” button to launch the “Conditional Formatting” dialog box.
- Some rules already appear in this dialog box, and you can add more.
- To add a new rule, click the “Add” button at the right side of this dialog box to add a new rule to the list.
- Type the new rule’s name into the “Name:” text box.
- Then click the “Font…” button to open a dialog box that lets you set the font formatting to apply to items that match the criteria condition you are about to specify.
- Then click “OK” in the “Font” dialog box to set the font.
- Then click the “Condition…” button to set up the criteria that, when met, applies the formatting you selected.
- The same choices appear here as when setting the view’s filter.
- After setting the criteria, click “OK” to apply it.
- Then click “OK” again after setting your conditional formatting.
Instructions for Changing the Inbox View in Outlook by Changing the Appearance of Columns in a Table View
- To set the display format for your columns when creating a “Table” style base view, click the “Format Columns…” to open the “Format Columns” dialog box.
- Select the name of the field whose display you wish to modify from the “Available fields:” list at the left side of this dialog box.
- Then change its settings at the right side of the dialog box.
- After setting the display of the columns, click “OK” to apply them.
Instructions for Changing the Inbox View in Outlook by Saving and Applying Your Advanced View Settings
- When you are satisfied with all of the view’s advanced settings, click “OK” in the “Advanced View Settings” dialog box to return to the “Manage All Views” dialog box.
- The newly created view then appears in the list of views available in the “Manage All Views” dialog box.
- To apply the view, click its name to select it in the list.
- Then click the “Apply View” button at the bottom of the dialog box.
- Alternatively, select the name of the custom view that appears when you click the “Change View” button in the “Current View” button group on the “View” tab of the Ribbon.
Instructions for Editing and Deleting Custom Mailbox Views in Outlook
- To edit a custom view in Outlook, select the name of the view in the “Manage All Views” dialog box.
- Then click the “Modify…” button at the right side of the dialog box.
- To delete a custom view in Outlook, select the name of the view in the “Manage All Views” dialog box.
- Then click the “Delete” button to delete it.
- To close the “Manage All Views” dialog box, click the “Close” button at the bottom of the dialog box.