Combine PDFs in Acrobat XI: Video Lesson
This video lesson, titled “Combining PDFs,” shows you how to combine PDFs in Acrobat XI. This video comes from our complete Adobe Acrobat XI tutorial, titled “Mastering Acrobat Made Easy v.XI.”
Combine PDFs in Acrobat XI: Overview
To combine PDFs in Acrobat XI together to create one larger PDF, select “File| Create| Combine Files into a Single PDF…” from the Menu Bar to open the “Combine Files” dialog box. This dialog box allows you to select individual PDF files to combine PDFs in Acrobat XI into a larger PDF file. The text in the middle of this dialog box states “Add files using the dropdown or drag and drop them here. You can arrange them in the order you want.” Therefore, one way to add files to this dialog box to combine PDFs in Acrobat is to use your computer’s file explorer, such as “Windows Explorer” or “Finder” to select the PDF files and then drag them from the file explorer window and drop them into this dialog box.
Another way to add files so you can combine PDFs in Acrobat is to click the “Add Files…” drop-down button in the upper-left corner of the “Combine Files” dialog box. You will then see a drop-down menu appear that shows the many ways in which you can add files to this dialog box. You can select the desired command from the drop-down menu to add files using that method.
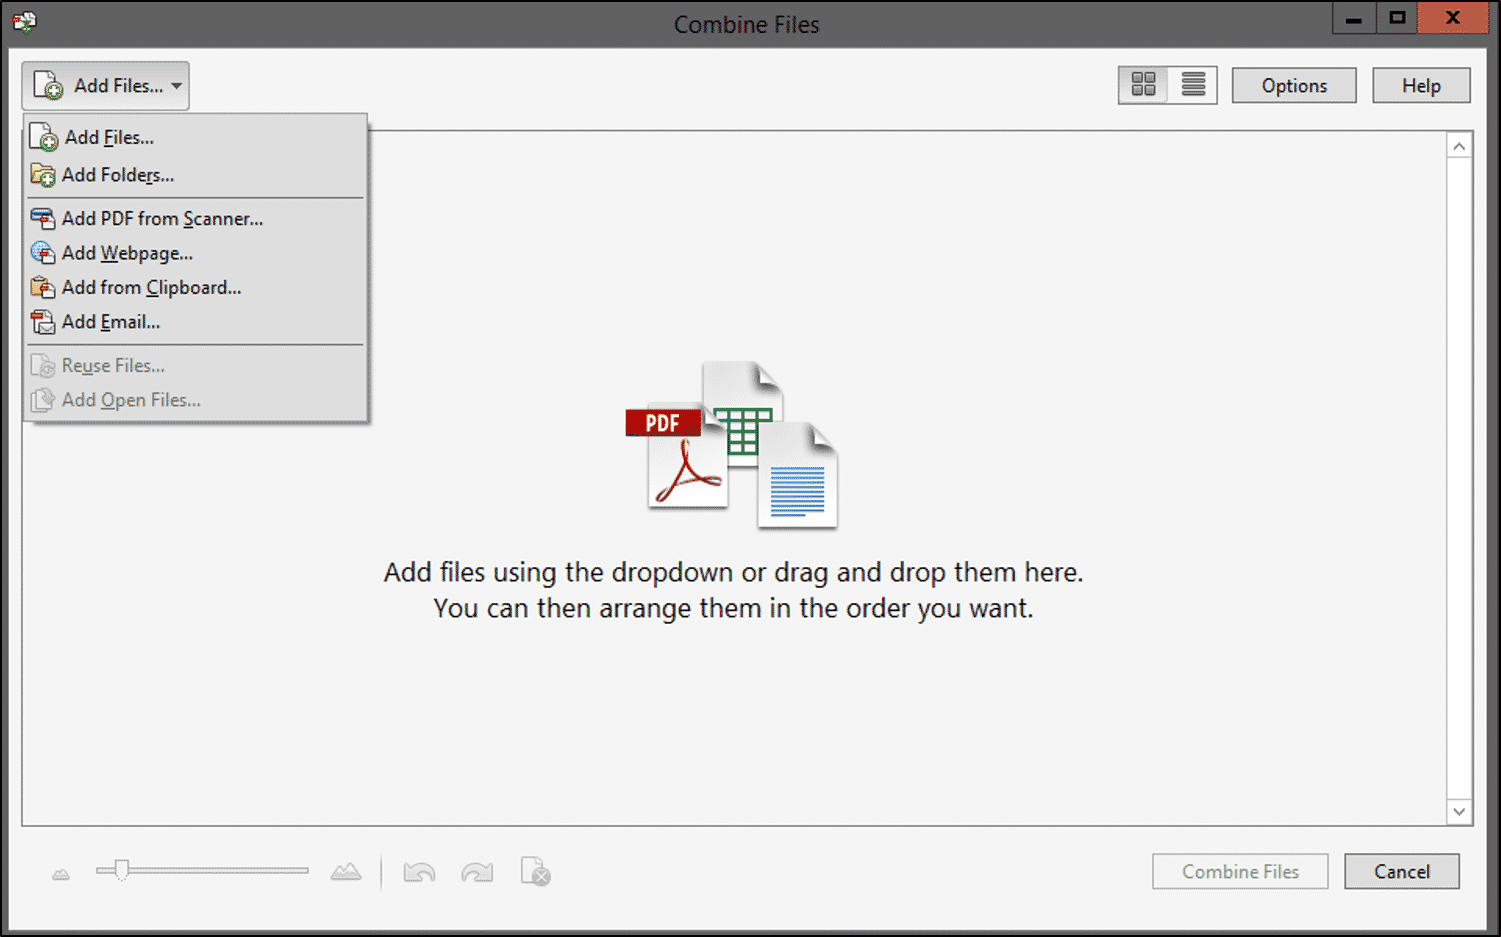
Combine PDFs in Acrobat XI: A picture of the “Combine Files” dialog box after clicking the “Add Files…” drop-down button to see a drop-down menu that shows the many ways you can add files to this dialog box to combine PDFs in Acrobat XI.
To add individually selected files, select the “Add Files…” command to open the “Add Files” dialog box. Navigate to the files to add, select them, and then click the “Open” button to add them to the “Combine Files” dialog box. To add all files within a folder that contain a file type that can be converted into a PDF, select the “Add Folder…” button to open the “Browse for Folder” dialog box. Select the folder that contains the files and then click the “OK” button to add all files within the selected folder that can be converted into a PDF format into the “Combine Files” dialog box. To add a file from a scanner, select the “Add PDF from Scanner…” command to open the “Acrobat Scan” dialog box. Select the scanner to use from the “Scanner” drop-down and then click a preset button to complete the scan and add it to the “Combine Files” dialog box. To add a webpage, select the “Add Webpage…” command to open the “Add Webpage” dialog box. Enter the URL of the webpage to convert to a PDF and then click the “Add” button to add the webpage to the “Combine Files” dialog box. You can select the “Add from Clipboard…” command to immediately add the content of your clipboard to the dialog box. You can select the “Add Email…” command to display a prompt that tells you that you can drag and drop email from Outlook or Lotus Notes directly into the “Combine Files” dialog box. To add files that you have previously combined in other sessions, select the “Reuse Files…” command to open the “Reuse Files” dialog box. Select a recently combined file in the left list and then select a component of that combined file to add in the right list. Then click the “Add Files” button to add the reused file content to the “Combine Files” dialog box. To add currently opened PDF files, select the “Add Open Files…” command to open the “Open PDF Files” dialog box. Select the names of the open PDF files to add and then click the “Add Files” button to add them to the “Combine Files” dialog box
As you add files to the “Combine Files” dialog box, note that you can also click the “Undo,” “Redo,” and “Remove Selected Items” buttons at the bottom of the dialog box to correct mistakes and remove selected PDFs from the dialog box.
You can also change the view of the files shown in this dialog box. To display the files as thumbnails, click the “Switch to Thumbnail View” button in the upper-right corner of the dialog box. To switch to a list view, instead, click the “Switch to List View” button to its right. This can assist you in placing the selected files into the correct order within the larger PDF.
To rearrange the files within the “Combine Files” dialog box so that the new PDF is ordered the way you want, click and drag any file’s thumbnail image within the dialog box to the position where you want it and then release the mouse button.
To set the options to combine PDFs in Acrobat, click the “Options” button in the upper-right corner of this dialog box to open the “Options” dialog box. If you want to set a target file size, click a button for the desired choice in the “File Size” section. You can choose the type of combined file to create by selecting either “Single PDF” or “Portfolio” in the “File Type” section. You can then check or uncheck the checkboxes in the “Other options” section to enable or disable those settings, if desired. Then click the “OK” button to apply your options.
When you are ready to combine PDFs in Acrobat XI, click the “Combine Files” button. Depending on the size and number of PDFs you are combining, a progress bar will show you where Acrobat is within the combine operation. When the operation to combine PDFs in Acrobat is finished, the new PDF is created and opened in Acrobat’s main document window. You can then save the new combined PDF file.
Combine PDFs in Acrobat XI: Step-By-Step Instructions
- To combine PDFs in Acrobat XI together to create one larger PDF, select “File| Create| Combine Files into a Single PDF…” from the Menu Bar to open the “Combine Files” dialog box.
- One way to add files to this dialog box to combine PDFs in Acrobat is to use your computer’s file explorer, such as “Windows Explorer” or “Finder” to select the PDF files and then drag them from the file explorer window and drop them into this dialog box.
- Another way to add files is to click the “Add Files…” drop-down button in the upper-left corner of the “Combine Files” dialog box to display a drop-down menu that shows the many ways you can add files to this dialog box.
- Select the desired command from the drop-down menu to add files using that method.
- To add individually selected files, click the “Add Files…” command to open the “Add Files” dialog box.
- Navigate to the files to add, select them, and then click the “Open” button to add them to the “Combine Files” dialog box.
- To add all files within a folder that contain a file type that can be converted into a PDF, select the “Add Folder…” button to open the “Browse for Folder” dialog box.
- Select the folder that contains the files and then click the “OK” button to add all files within the selected folder that can be converted into a PDF format into the “Combine Files” dialog box.
- To add a file from a scanner, select the “Add PDF from Scanner…” command to open the “Acrobat Scan” dialog box.
- Select the scanner to use from the “Scanner” drop-down and then click a preset button to complete the scan and add it to the “Combine Files” dialog box.
- To add a webpage, select the “Add Webpage…” command to open the “Add Webpage” dialog box.
- Enter the URL of the webpage to convert to a PDF and then click the “Add” button to add the webpage to the “Combine Files” dialog box.
- To add copied content from your computer’s clipboard, select the “Add from Clipboard…” command to immediately add the content of your clipboard to the dialog box.
- You can select the “Add Email…” command to display a prompt that tells you that you can drag and drop email from Outlook or Lotus Notes directly into the “Combine Files” dialog box.
- To add files that you have previously combined in other sessions, select the “Reuse Files…” command to open the “Reuse Files” dialog box.
- Select a recently combined file in the left list and then select a component of that combined file to add in the right list.
- Then click the “Add Files” button to add the reused file content to the “Combine Files” dialog box.
- To add currently opened PDF files, select the “Add Open Files…” command to open the “Open PDF Files” dialog box.
- Select the names of the open PDF files to add and then click the “Add Files” button to add them to the “Combine Files” dialog box
- As you add files to the “Combine Files” dialog box, note that you can also click the “Undo,” “Redo,” and “Remove Selected Items” buttons at the bottom of the dialog box to correct mistakes and remove selected PDFs from the dialog box.
- To change the view of the files shown in this dialog box, click either the “Switch to Thumbnail View” or “Switch to List View” button in the upper-right corner of the dialog box.
- To rearrange the files within the “Combine Files” dialog box so that the new PDF is ordered the way you want, click and drag any file’s thumbnail image within the dialog box to the position where you want it and then release the mouse button.
- To set the options to combine PDFs in Acrobat, click the “Options” button in the upper-right corner of this dialog box to open the “Options” dialog box.
- If you want to set a target file size, click a button for the desired choice in the “File Size” section.
- You can choose the type of combined file to create by selecting either “Single PDF” or “Portfolio” in the “File Type” section.
- You can then check or uncheck the checkboxes in the “Other options” section to enable or disable those settings, if desired.
- Then click the “OK” button to apply your options.
- When you are ready to combine PDFs in Acrobat XI, click the “Combine Files” button.
- Depending on the size and number of PDFs you are combining, a progress bar will show you where Acrobat is within the combine operation. After combining the PDFs in Acrobat, the new PDF opens in Acrobat’s main document window.
- After you combine PDFs in Acrobat XI, you can then save the new, combined PDF file.