Compare Documents in Word – Instructions
Video Lesson on How to Compare Documents in Word:
This video lesson, titled “Using the Compare Feature,” shows you how to compare documents in Word. This video lesson is from our complete Word for lawyers tutorial, titled “Mastering Word Made Easy for Lawyers v.2019 and 365.”
Compare Documents in Word: Overview
You can easily compare documents in Word to note changes between them. One of the most commonly performed tasks in the legal profession is creating a legal blackline document. The terms “redlining” or “comparing documents” are two other ways to refer to this. When you compare documents in Word, you can show only the changed content between the two copies in a third, separate document.
Many legal professionals use this feature when reviewing contracts to note the revisions between two copies of a contract. This lets you create and compare multiple copies of a legal document, noting changes between the original, the first draft, the second draft, and so on. This helps you keep all copies of the drafts for historical purposes. It also shows the changes made and who requested the changes. This lesson shows how to compare documents in Word to create a legal blackline document.
To compare documents in Word, first open the two documents to compare in Microsoft Word. Then click the “Review” tab in the Ribbon. Then click the “Compare” drop-down button in the “Compare” button group. Then select the “Compare…” command from the button’s drop-down menu to open the “Compare Documents” dialog box.
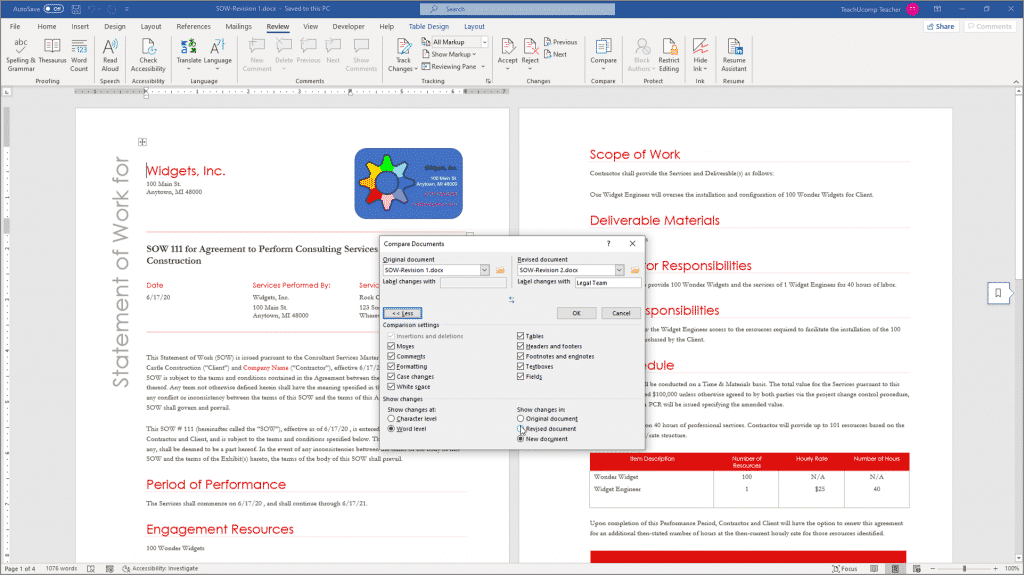
In the “Compare Documents” dialog box, then select the name of the original document from the “Original document” drop-down menu. If you didn’t open the original document before opening the “Compare Documents” dialog box, you can select the document to use by either clicking the “Open” button that appears as a folder icon at the right end of the drop-down menu or by selecting the “Browse…” command from the drop-down menu’s listing of document choices. Microsoft Word then displays the “Open” dialog box, which you can use to find and open the original document.
Compare Documents in Word- Instructions: A picture of a user comparing two documents in Word within the “Compare Documents” dialog box.
Next, use the “Revised document” drop-down to select the name of the revised copy of the document from the drop-down menu. You can also use the “Open” button or the “Browse…” command with the “Revised document” drop-down, just as with the “Original document” drop-down if you did not open the revised document before opening the “Compare Documents” dialog box.
Next, underneath the “Revised document” drop-down, enter the name with which to label changes in the resultant legal blackline document into the “Label changes with” text box, if needed.
Then click the “More >>” button to display all of the options for creating the legal blackline document at the bottom of the dialog box. Any changes you make here are saved as the new default settings for creating a legal blackline document in the future. By default, Word shows changes on a “Word level” in a “New document.” These are the recommended settings. However, you have the flexibility to change them, if needed. After reviewing the settings, click the “<< Less” button to set the options and hide them again.
Then click the “OK” button in the “Compare Documents” dialog box to compare the documents and then create the resultant legal blackline document within Microsoft Word. The original document and the revised document also appear at the right side of the screen. The compared document appears in the center of the screen. Any revisions appear in the “Revisions” pane at the left side of the screen.
Instructions on How to Compare Documents in Word:
- To compare documents in Word, open the two documents to compare.
- Click the “Review” tab in the Ribbon.
- Then click the “Compare” drop-down button in the “Compare” button group.
- Then select the “Compare…” command from the drop-down menu to open the “Compare Documents” dialog box.
- Select the name of the original document from the “Original document” drop-down menu.
- If you forgot to open the original document before opening the “Compare Documents” dialog box, select the document by either clicking the “Open” button at the right end of the drop-down menu or by selecting the “Browse…” command from the drop-down menu.
- Then, in the “Open” dialog box that appears, find and open the original document.
- Use the “Revised document” drop-down to select the name of the revised copy of the document from the drop-down menu.
- You can also use the “Open” button or the “Browse…” command with the “Revised document” drop-down, if you forgot to open the revised document before opening the “Compare Documents” dialog box.
- Under the “Revised document” drop-down, enter the name with which to label changes in the resultant legal blackline document into the “Label changes with” text box, if needed.
- To show all the options for comparing documents at the bottom of the dialog box, click the “More >>” button.
- Any changes you make are saved as the new default settings.
- To set the options and hide them again, click the “<< Less” button.
- When finished, click the “OK” button.
- The original document and revised document appear at the right side of the screen.
- The compared document appears in the center of the screen.
- Any revisions appear in the “Revisions” pane at the left side of the screen.
