Create a Budget in QuickBooks Online – Instructions
Create a Budget in QuickBooks Online: Video Lesson
This video, titled “How to Set Up Budgets in QuickBooks Online,” shows you how to create a budget in QuickBooks Online Plus. This video on how to create a budget in QuickBooks Online is from our complete QuickBooks Online tutorial, titled “Mastering QuickBooks Online Made Easy.”
How to Create a Budget in QuickBooks Online: Instructions
You can create a budget in QuickBooks Online to estimate future income and expenses or account balances. QuickBooks Online Plus now lets you create both “Profit and loss” and “Balance sheet” budgets. Before creating a new budget, you may want to ensure the “Fiscal Year” setting is accurate, as the budget starts at the fiscal year’s first month.
How to Check the Fiscal Year Setting in QuickBooks Online
To check the fiscal year setting in QuickBooks Online, click the “Settings” button in the QuickBooks Online toolbar and then click the “Account and settings” link under the “Your Company” heading in the menu to open the “Settings” window. Click the “Advanced” button in the menu at the left side of the window. Then check the “First month of fiscal year” setting in the “Accounting” section to the right. Change this setting and save it, if necessary.
How to Create a Budget in QuickBooks Online
To create a budget in QuickBooks Online Plus, click the “Settings” button in the QuickBooks Online toolbar and then click the “Budgeting” link under the “Tools” heading in the menu that appears to open the “Budgets” page. If creating a budget for the first time, click the “Create budget” button that appears in this page to create a new budget in the window that opens.
In the “How do you want to set up your budget?” window, select the type of budget to create by selecting the desired option button for the “Budget type” setting. Then use the “Period” drop-down to choose the fiscal year for the budget. If creating a “Balance sheet” budget, then select the default view from the “Default view” drop-down.
Alternatively, if creating a “Profit and loss” budget, select the desired “Budget format” option button. If you select the “Subdivided” budget format, then use the “Subdivide by” and “Subdivide for” drop-downs to select for which customers, classes, or locations to subdivide the budget.
To pre-fill a “Profit and loss” budget with actual data, if available, select the year from which to use the actual data from the “Pre-fill data” drop-down. Alternatively, to remove the “Pre-fill data” choice, click the “Custom budgets” button. Separately, to download a budget template you can fill-in on your PC and then upload back into QuickBooks Online, click the “Import budget” link and follow the onscreen instructions to perform that separate process. When finished, click the “Next” button in the lower-right corner to continue.
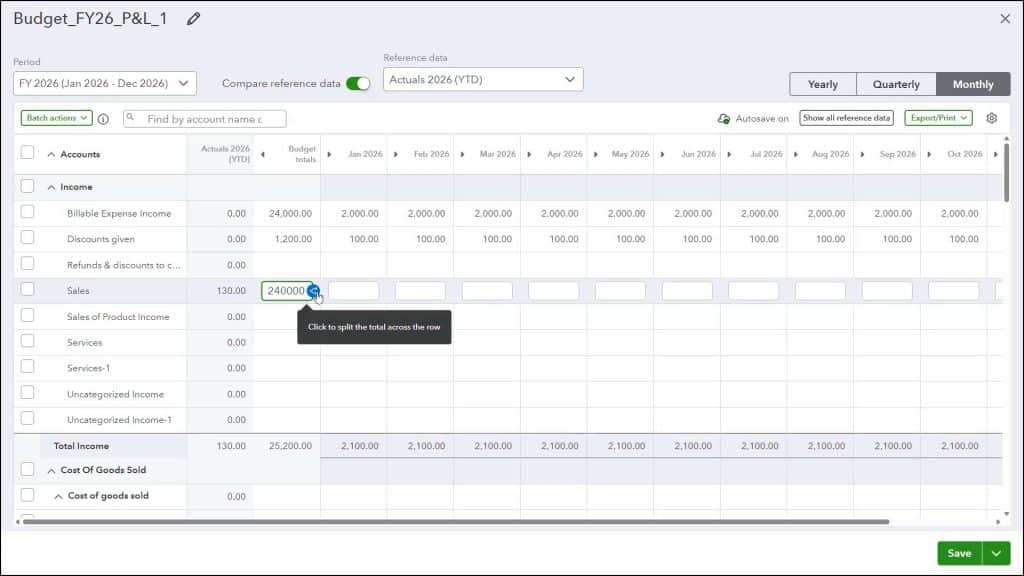
How to Edit the Budget
To edit the budget’s information, click a line in the budget to edit. To split a total column amount across all months if editing a “Profit and loss” budget, click into the desired row’s “Budget totals” column, enter the total value to split, and then click the blue “Click to split the total across the row” button at the right side of the cell. Alternatively, to manually enter amounts for a cell, enter the budget information into the columns within the selected row. To copy the value you type into a cell to all columns to its right, type a value into the desired field and then click the “Click to copy the value across on the row” button, which looks like a right-pointing arrow in a blue circle at the right side of the cell.
To save your changes, click the “Save” choice on the drop-down button in the toolbar in the lower-right corner of the window. Alternatively, to save your changes and close the window, click the drop-down arrow on the drop-down button in the toolbar in the lower-right corner of the window and then select the “Save and close” choice. After closing the window, you then return to the “Budgets” page.
How to Add, Edit, Delete, Copy, and Archive Budgets in QuickBooks Online
The “Budgets” page shows all the budgets you created. To add a new budget after creating a budget, click the “Create budget” button in the page’s upper-right corner. To view and/or edit a budget in the list of budgets in the “Budgets” page, click drop-down under a budget’s “Actions” column and then select the “View/Edit” command. To delete a budget, click the drop-down arrow under its “Actions” column and then select the “Delete” command. Then click “Yes” in the confirmation window that appears.
To copy a budget, click the drop-down arrow under its “Actions” column and then select the “Duplicate” command. Then select the period for which to duplicate the budget in the window that opens and click the “Duplicate” button. To archive a budget, click the drop-down under its “Actions” column and then select the “Archive” command. To unarchive an archived budget, click the “Hide archived budgets” toggle to turn it off. Then click the drop-down under the “Actions” column for the archived budget and choose the “Unarchive” command.
How to Run Budget Reports in QuickBooks Online
To run a “Budgets vs. Actuals” report for a budget in the “Budgets” page, click the “Run Budget vs. Actuals report” link under the desired budget’s “Actions” column. Alternatively, to run a “Budget Overview” report for a budget in the “Budgets” page, click the drop-down arrow under its “Actions” column and then select the “Run Budget Overview report” command.


