Create a Link in WordPress- Tutorial and Instructions
Create a Link in WordPress: Overview
This tutorial will show you how to create a link in WordPress, as of WordPress 4.0. One of the most basic features of web design is the ability to display selectable hyperlinks, also simply called links, which allow the user to navigate from one post or page to another post or page. After clicking a link, the user will view the web page associated with that link in their browser window. Links most often take the form of underlined text, but you can also turn images into links. To create a link in WordPress, you need to know three things: what text or image will be turned into a link; the web address, specified by a URL, where the user will be taken when they click; and whether you want the link to open in a new window or tab or within the same window or tab.
To create a link in WordPress, select the text or image within the WordPress editor you want to turn into a link. Next, click the “Insert/edit link” button in the toolbar. Notice that the button is only active when you have something selected in your post or page. In the “Insert/edit link” dialog box, enter the destination web page URL by either by typing it or by copying and pasting it from the actual link shown in a web browser. The URL must match exactly to work correctly, so copying and pasting a web page URL can save time.
Next, enter a title for the link in the “Title” textbox. A title gives the visitor information about the location of the link and it also assists users who may use text-to-speech technology. The title you assign will be displayed in a pop-up when a user hovers over the link.
To create a link in WordPress to a location within your site, you can click the “Or link to existing content” option at the bottom of the dialog box. This will display all of the content on your site at the bottom of the dialog box. You can scroll down the list or enter terms into the “Search” textbox to locate the content. Then, click the content to use it as the destination URL. WordPress will populate the URL and Title fields based on the selection you make. You can change the “Title,” if you like, but you must keep the URL intact.
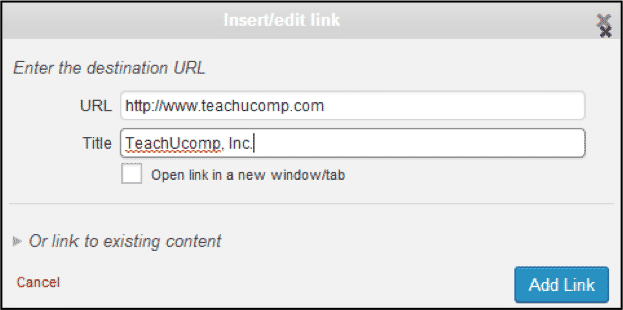
If desired, you can check the “Open link in a new window/tab” checkbox to open the destination URL in a new window or tab of the user’s web browser. If unchecked, the destination URL will open within the same window that displays the link. The option you choose depends on your specific needs. You should consider the user’s experience. If linking to an external web page, will the user be able to easily navigate back to your site or would they become lost and not come back at all? If the link is to content within your own site, it would create a negative user experience to have each page open in a new window or tab. So when making your choice, always take into account your user’s perspective and your website’s goals.
After making your selections, click the “Add Link” button in the “Insert/edit link” dialog box to create a link in WordPress. You should then save your post or page by clicking the “Update” button. Then, click the “View Post” or “View Page” button and test the link to make sure it works the way you intended.
To remove a link in WordPress, first click to select the text or image that has been turned into a link in the WordPress editor. Then, click the “Remove link” button in the toolbar to remove it.
Create a Link in WordPress: Step-by-step Instructions
- To create a link in WordPress, select the text or image within the WordPress editor you want to turn into a link.
- Click the “Insert/edit link” button in the toolbar.
- In the “Insert/edit link” dialog box, enter the destination web page URL by either by typing it or by copying and pasting it from the actual link shown in a web browser. The URL must match exactly to work correctly, so copying and pasting a web page URL can save time.
- Enter a title for the link in the “Title” textbox. A title gives the visitor information about the location of the link and it also assists users who may use text-to-speech technology. The title you assign will be displayed in a pop-up when a user hovers over the link.
- To create a link in WordPress to a location within your site, click the “Or link to existing content” option at the bottom of the dialog box to display all of the content on your site at the bottom of the dialog box.
- You can scroll down the list or enter terms into the “Search” textbox to locate the content.
- Then click the content to use it as the destination URL.
- WordPress will populate the URL and Title fields based on the selection you make. You can change the “Title,” if you like, but you must keep the URL intact.
- You can check the “Open link in a new window/tab” checkbox to open the destination URL in a new window or tab of the user’s web browser.
- If unchecked, the destination URL will open within the same window that displays the link.
- After making your selections, click the “Add Link” button in the “Insert/edit link” dialog box to create a link in WordPress.
- You should then save your post or page by clicking the “Update” button.
- Then click the “View Post” or “View Page” button and test the link to make sure it works the way you intended.
- To remove a link, click to select the text or image that has been turned into a link in the WordPress editor.
- Then click the “Remove link” button in the toolbar to remove
