Create a New Contact in Office 365- Tutorial
Create a New Contact in Office 365: Video Lesson
This video lesson, titled “Creating a New Contact,” shows you how to create a new contact in Office 365. This video lesson on how to create a new contact in Office 365 is from our complete Outlook Web App course, titled “Mastering Outlook on the Web Made Easy v.2016.”
Create a New Contact in Office 365: Overview
To create a new contact in Office 365 from the “People” App, click the App Launcher in the Nav Bar. Click the People icon to open your contact list.
To create a new contact in Office 365, click the “+ New” link below the App Launcher. You will be given three choices after clicking “+ New.” The first choice is “Create contact.” This will allow you to create a single contact to add to your contact list. This is generally the most used option. The second option is to “Create contact list.” This will create a list of people that will all receive an email at the same time. This means you won’t have to add each person individually. The final option is to “Create group.” This will create a “Group.” All the members will be able to share conversations, documents, and a calendar with the others in the group.
Choose “Create contact” to open the creation pane for a single contact. The first section is where you will enter your contact’s name into the “First name,” “Middle name” and “Last name” fields.
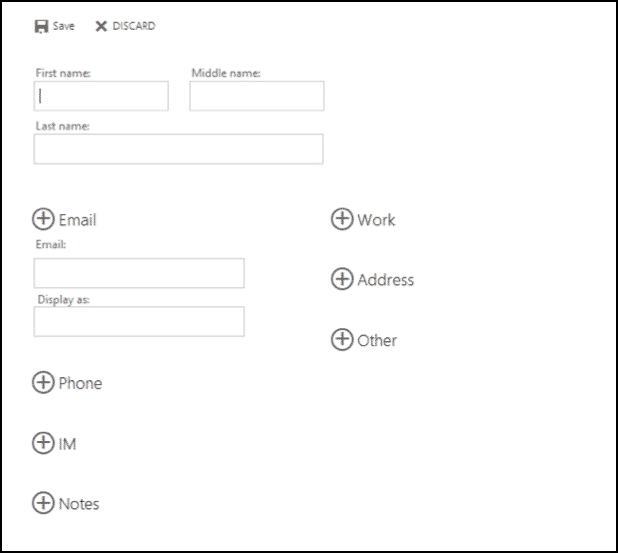
Create a New Contact in Office 365- Tutorial: A picture of the contact information pane in the People app of Office 365.
Enter your contact’s “Email” into the provided field and enter a “Display as” name into the provided field. If your contact has more than one email address that they want you to use, click “+ Email” to open up to two more “Email” and “Display as” fields. You can only add three email addresses maximum for each contact.
The rest of the fields in the pane are optional. If you’d like to add a phone number click “+ Phone,” instant messaging contact “+ IM,” their job title, etc. “+ Work,” mailing address “+ Address,” notes “+ Notes” click any of the links to open fields to enter the information.
Clicking “+ Other” will ask you to choose an option to add information. The options are “Web page,” “School,” “Personal web page,” “Profession,” “Spouse/partner,” “Hobbies,” “Anniversary,” “Birthday” or “Location.” Choosing any of these options will add fields for the respective item allowing you to add that information for your new contact. Click “Save” to add your new contact to your “My contacts” list.
To delete a contact, click their name in your contacts list. Click the “More” dots next to “Edit” and click “Delete.” In the confirmation box, click “Delete” to remove them from your contact list.
Create a New Contact in Office 365: Instructions
- To create a new contact in Office 365, open the People App by clicking the App Launcher and clicking the “People” icon.
- Click “+ New” to open a popup pane.
- To create a new contact in Office 365, click “Create contact.”
- In the creation pane that opens, enter the “First name,” “Middle name” and “Last name” of the contact in the labeled fields.
- In the “Email” field, enter the email address for the contact.
- Enter a “Display as” name in the field. These are the only “required” fields. All other fields in the pane are optional.
- If your contact has more than one email address, click “+ Email” to open up to two more “Email” and “Display as” fields.
- You can add a maximum of three email addresses for a contact.
- To add a phone number, click “+ Phone.”
- To add an instant messaging contact, click “+ IM.”
- To add a job title, etc., click “+ Work.”
- To add a mailing address, click “+ Address.”
- To add notes about the contact, click “+ Notes.”
- You can add additional information by clicking “+ Other.” The options under “+ Other” are; “Web page,” “School,” “Personal web page,” “Profession,” “Spouse/partner,” “Hobbies,” “Anniversary,” “Birthday” or “Location.”
- Click “Save” to add the new contact to your “My Contacts” list.
- To delete a contact, click their name in the contact list to open the contact card.
- Click the “More” dots and choose “Delete.” In the confirmation box, click “Delete” to remove them from your contact list.
