Create a New Document in Photoshop – Instructions
How to Create a New Document in Photoshop: Video
This video lesson, titled “Learn How to Create a New Document in Adobe Photoshop: A Training Tutorial,” shows how to create a new document in Photoshop and create new document presets in Photoshop. This video lesson is from our complete Photoshop tutorial, titled “Mastering Photoshop Made Easy.”
Overview of How to Create a New Document in Photoshop:
To create a new document in Photoshop from the Home screen, click the “New file” button in the Home screen. Alternatively, to create a new document in Photoshop at any time, select “File| New…” from the Menu Bar. Doing either action then opens the “New Document” window in Photoshop. To create a new document from a preset in Photoshop, click the desired tab at the top of the “New Document” window to show its presets in the window. Then click to select the desired preset to use.
Alternatively, to create a custom document preset in Photoshop, enter the desired document details into the “Preset Details” pane at the right side of the “New Document” window. To enter the name of the new document, type its name into the name field at the top of the “Preset Details” pane. To set the width of the document, enter a number into the “Width” field and then select the desired units of measurement for that number from the adjacent drop-down. To set the height of the document, enter a number into the “Height” field. The height uses the same units of measurement you selected for the “Width” field. To change its orientation, click the desired orientation button under the “Orientation” setting. To include artboards, check the “Artboards” checkbox.
To set the document’s pixel resolution, type the desired pixel resolution into the “Resolution” field and then select either “Pixels/Inch” or “Pixels/Centimeter” from its adjacent drop-down to set the number of pixels per inch or per centimeter, as desired. To select the document’s color mode, select a choice from the “Color Mode” drop-down and set its bit depth from the adjacent drop-down.
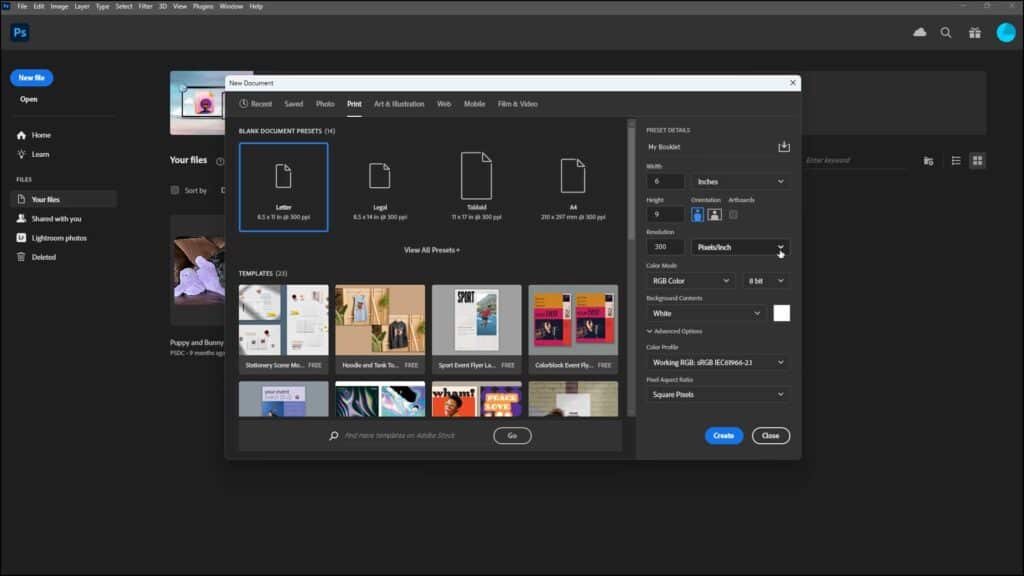
A picture showing how to create a new document in Photoshop by creating a new document preset in the “New Document” window.
To set the background color of the new document, select a choice from the “Background Contents” drop-down. To set a custom background color, select the “Custom” choice in the drop-down menu or click the color swatch to the right of the drop-down to open the “Color Picker” dialog box. Then click and drag in the rainbow-colored strip to set the color shown in the panel to its left. Then click into the panel to set the lightness or darkness of the chosen color. Then click the “OK” button after selecting the desired custom background color to return to the “New Document” window.
To collapse or expand the advanced document options, click the “Advanced Options” link in the “Preset Details” pane. When expanded, to set the color profile if you want to apply color management, select the desired choice from the “Color Profile” drop-down. Optionally, to select a pixel aspect ratio, select the desired choice from the “Pixel Aspect Ratio” drop-down.
To save the new document as a new preset, if desired, click the button to the right of the document’s name towards the top of the “Preset Details” pane to change this section to show the “Save Document Preset” information. Then type the name for the custom document preset into the name field that appears and click the “Save Preset” button. Alternatively, to cancel saving the information as a new preset, click the “Cancel” button to return to the “New Document” window.
To create the new document in Photoshop after selecting a document preset or creating your own document preset, click the “Create” button in the “New Document” window. Alternatively, to cancel creating the new document, click the “Close” button, instead. After you create a new document in Photoshop, it then appears within the Photoshop workspace, where you can begin designing your new digital artwork.
Instructions on How to Create a New Document in Photoshop:
- To create a new document in Photoshop from the Home screen, click the “New file” button in the Home screen.
- Alternatively, to create a new document in Photoshop at any time, select “File| New…” from the Menu Bar.
- Doing either action then opens the “New Document” window in Photoshop.
- To create a new document from a preset in Photoshop, click the desired tab at the top of the “New Document” window to show its presets in the window.
- Then click to select the desired preset to use.
- Alternatively, to create a custom document preset in Photoshop, enter the desired document details into the “Preset Details” pane at the right side of the “New Document” window.
- To enter the name of the new document, type its name into the name field at the top of the “Preset Details” pane.
- To set the width of the document, enter a number into the “Width” field and then select the desired units of measurement for that number from the adjacent drop-down.
- To set the height of the document, enter a number into the “Height” field.
- The height uses the same units of measurement you selected for the “Width” field.
- To change its orientation, click the desired orientation button under the “Orientation” setting.
- To include artboards, check the “Artboards” checkbox.
- To set the document’s pixel resolution, type the desired pixel resolution into the “Resolution” field and then select either “Pixels/Inch” or “Pixels/Centimeter” from its adjacent drop-down to set the number of pixels per inch or per centimeter, as desired.
- To select the document’s color mode, select a choice from the “Color Mode” drop-down and set its bit depth from the adjacent drop-down.
- To set the background color of the new document, select a choice from the “Background Contents” drop-down.
- To set a custom background color, select the “Custom” choice in the drop-down menu or click the color swatch to the right of the drop-down to open the “Color Picker” dialog box.
- Then click and drag in the rainbow-colored strip to set the color shown in the panel to its left.
- Then click into the panel to set the lightness or darkness of the chosen color.
- Then click the “OK” button after selecting the desired custom background color to return to the “New Document” window.
- To collapse or expand the advanced document options, click the “Advanced Options” link in the “Preset Details” pane.
- When expanded, to set the color profile if you want to apply color management, select the desired choice from the “Color Profile” drop-down.
- Optionally, to select a pixel aspect ratio, select the desired choice from the “Pixel Aspect Ratio” drop-down.
- To save the new document as a new preset, if desired, click the button to the right of the document’s name towards the top of the “Preset Details” pane to change this section to show the “Save Document Preset” information.
- Then type the name for the custom document preset into the name field that appears and click the “Save Preset” button.
- Alternatively, to cancel saving the information as a new preset, click the “Cancel” button to return to the “New Document” window.
- To create the new document in Photoshop after selecting a document preset or creating your own document preset, click the “Create” button in the “New Document” window.
- Alternatively, to cancel creating the new document, click the “Close” button, instead.
- After you create a new document in Photoshop, it then appears within the Photoshop workspace, where you can begin designing your new digital artwork.
