Create a New Group in Outlook – Instructions
Create a New Group in Outlook: Video Lesson
This video lesson, titled “Creating a New Group,” shows you how to create a new group in Outlook. This video lesson is from our complete Outlook tutorial, titled “Mastering Outlook Made Easy v.2019 and 365.”
Create a New Group in Outlook: Overview
To create a new Group in Outlook, right-click the word “Groups” in the Folder Pane of Outlook. Then select the “New Group” command from the pop-up menu that appears. Alternatively, click the “New Items” drop-down in the “New” button group on the “Home” tab of the Ribbon and then select the “Group” command from the drop-down menu. Alternatively, if you select any existing group or select any mail folder in the Folder Pane, you can click the “New Group” button in the “Groups” button group that appears on the “Home” tab of the Ribbon.
Doing any of these actions then opens the “Create Group” dialog box. Enter a name for the group into the “Name” field. As you type the group’s name, the group’s email address, called its “Group ID,” is automatically created from the group name and appears in the “Email address” field below the name. The server compares the group email address against existing group emails. If no conflicts are apparent, an “Available” checkmark appears to the right of the group’s email field. If you see a red “Not Available” icon appear at the right end this field, then you must change the email address for the group by editing it, as the email you entered is already assigned to an existing group.
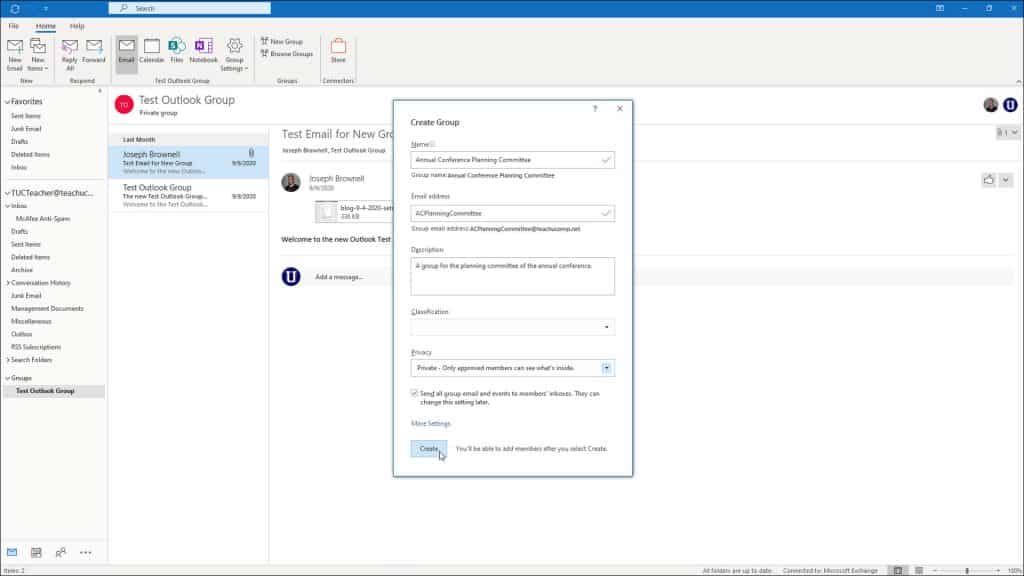
Create a New Group in Outlook – Instructions: A picture of a user creating a new group within the “Create Group” window in Outlook.
You can enter a description of the group into the “Description” field. This group description appears to both members and non-members. Next, based on whatever classifications your organization provides, you can choose a group classification, if needed, from the “Classification” drop-down.
Next, use the “Privacy” drop-down to select either the “Public” or “Private” choice. By default, groups are marked as “Private,” which means only approved group members in the organization can see what is inside the group. Selecting “Public- Anyone in your organization can see group content” creates a group anyone in your organization can access. Selecting “Private- Only approved members can see what’s inside” creates a group only approved members of your organization can access.
The final option is a “Send all group email and events to members’ inboxes. They can change this setting later.” checkbox. Note that a member can stop following the group at any time to receive group messages only in the group’s inbox. However, unchecking this checkbox makes all email and events only go to the group’s inbox, by default.
After applying the desired group settings, click the “Create” button to create your new group in Outlook. Outlook creates your new group, and the “Add Members” dialog box then opens, which lets you add members to the group.
Create a New Group in Outlook: Instructions
- To create a new Group in Outlook, right-click the word “Groups” in the Folder Pane of Outlook.
- Then select the “New Group” command from the pop-up menu that appears.
- Alternatively, click the “New Items” drop-down in the “New” button group on the “Home” tab of the Ribbon and then select the “Group” command from the drop-down menu.
- Alternatively, select any existing group or select any mail folder in the Folder Pane and then click the “New Group” button in the “Groups” button group that appears on the “Home” tab of the Ribbon.
- Doing any of these actions then opens the “Create Group” dialog box.
- Enter a name for the group into the “Name” field.
- As you type the group’s name, the group’s email address, called its “Group ID,” is automatically created from the group name and appears in the “Email address” field below the name.
- The server compares the group email address against existing group emails. If no conflicts are apparent, an “Available” checkmark appears to the right of the group’s email field. If you see a red “Not Available” icon appear at the right end this field, then you must change the email address for the group by editing it, as the email you entered is already assigned to an existing group.
- You can enter a description of the group into the “Description” field. This group description appears to both members and non-members.
- If needed, based on whatever classifications your organization provides, you can choose a group classification from the “Classification” drop-down.
- Next, use the “Privacy” drop-down to select either the “Public” or “Private” choice. By default, groups are marked as “Private,” which means only approved group members in the organization can see what is inside the group. Selecting “Public- Anyone in your organization can see group content” creates a group anyone in your organization can access.
- To have new members default to following the group, check the “Send all group email and events to members’ inboxes. They can change this setting later.” checkbox. Note that a member can stop following the group at any time to receive group messages only in the group’s inbox. However, unchecking this checkbox makes all email and events only go to the group’s inbox, by default.
- After applying the desired group settings, click the “Create” button to create your new group in Outlook.
- Outlook creates your new group, and the “Add Members” dialog box then opens, which lets you add members to the group.