Create a New Notebook in OneNote- Instructions
Create a New Notebook in OneNote: Video Lesson
This video lesson, titled “Creating New Notebooks,” shows you how to create a new notebook in OneNote. This video lesson is from our complete OneNote training, titled “Mastering OneNote Made Easy v.2016-2013.”
Create a New Notebook in OneNote: Overview
You can easily create a new notebook in OneNote. You can have as many notebooks as you want in OneNote. For example, you might have one notebook for work and one for home. To create a new notebook in OneNote, click the “File” tab in the Ribbon to open Backstage View. Then click “New” at the left side of the screen. In the “New Notebook” section that appears to the right, you must first decide where to save the notebook. You must also decide if you want to share it.
To save the notebook to your OneDrive account, click the “OneDrive” choice. To save the notebook to your computer or network, click the “This PC” choice. Enter a name for the notebook into the “Notebook Name” field that appears to the right. When you click the “Create Notebook” button, you create and save the notebook into the default folder within OneDrive or your computer’s “OneNote Notebooks” folder in your “My Documents” folder in Windows.
To save it to another location, instead, click the “Create in a different folder” link to open a “Create New Workbook” dialog box. Use this dialog box to navigate to a new folder location. Then enter a name for the notebook into the “Notebook Name” field. Finally, click the “Create” button to create the notebook.
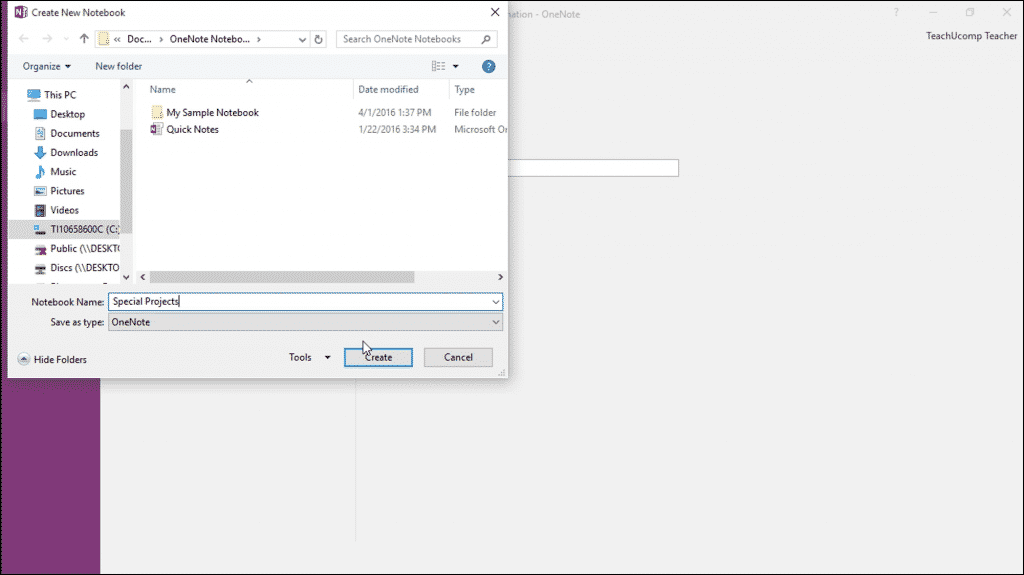
Create a New Notebook in OneNote- Instructions: A picture of a user creating a new notebook in OneNote.
Alternatively, to save the notebook to a specific computer location, you can click the “Browse” command instead of the “OneDrive” or “This PC” command. Then click the “Browse” button that appears to the right to open the same “Create New Notebook” dialog box. Then use this dialog box to select a folder location and enter a name in the “Notebook Name” field. Finally, click the “Create” button to create a new notebook.
You can also click the “Add a Place” command to add a new place to which you frequently save notebooks, like a SharePoint site or OneDrive folder associated with an Office 365 or Microsoft User account. Click or tap to select your choice from the choices shown. Then log in using the desired user credentials to save the new location.
Create a New Notebook in OneNote: Instructions
- To create a new notebook, click the “File” tab in the Ribbon to open the Backstage View.
- Click “New” in the menu on the left side of the screen.
- In the “New Notebook” section to the right, select to save the notebook to “OneDrive” or “This PC.”
- Enter a name for the notebook in the “Name” textbox.
- To create the notebook in the default folder in OneDrive or your computer’s “OneNote Notebooks” folder in “My Documents,” click the “Create Notebook” button.
- To save the notebook to a different location, click the “Create in a different folder” link or click the “Browse” button to the left, instead of “This PC” or “OneDrive.”
- Then click the “Browse” button that appears to the right to open the “Create New Notebook” dialog box.
- To create the notebook, use the dialog box to navigate to a new folder location.
- Then enter a name for the notebook into the “Notebook Name” field.
- Then click the “Create” button
- To create a new location to which you frequently save, click the “Add a Place” button and click or tap to select your choice from the choices shown.
- Then log in using the desired user credentials to save the new location.
