 MY CART
Create a Purchase Order in QuickBooks Online – Instructions
Create a Purchase Order in QuickBooks Online: Video Lesson
This video lesson, titled “How to Create a Purchase Order in QuickBooks Online,” shows you how to create a purchase order in QuickBooks Online. This video lesson on how to create a purchase order in QuickBooks Online is from our complete QuickBooks Online tutorial, titled “Mastering QuickBooks Online Made Easy.”
How to Create a Purchase Order in QuickBooks Online: Instructions
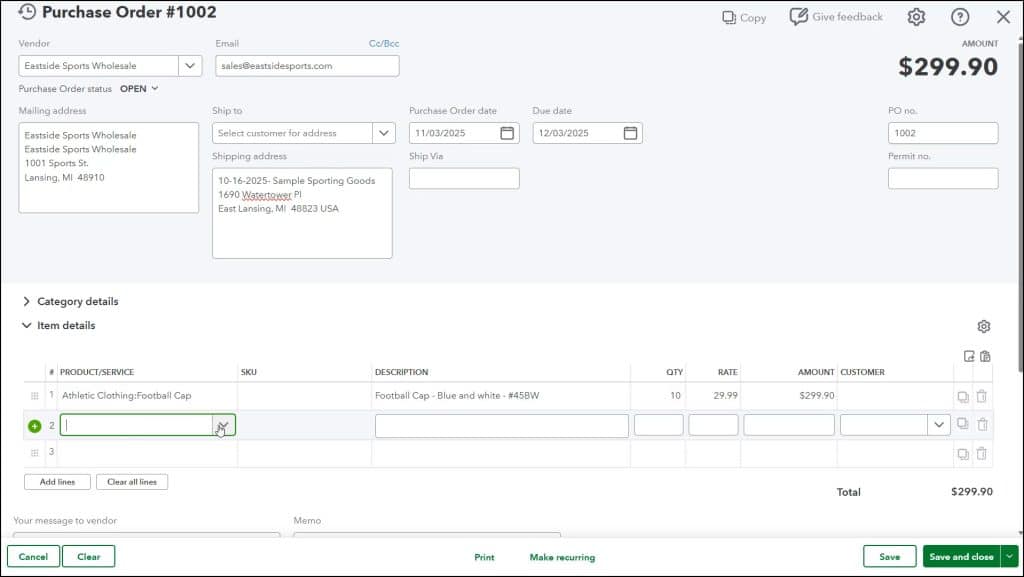
To create a purchase order in QuickBooks Online, hover over the “+ Create” button in the Navigation Bar. Then click the “Purchase order” link under the “Vendors” heading in the drop-down menu to open the “Purchase Order” window.
Select a Vendor for the Purchase Order:
To choose a vendor, select one from the “Vendor” drop-down in the upper-left corner of the window. If selecting an existing vendor’s record, their information then populates the other fields within this form, based on what you entered when you created the vendor’s record. Alternatively, you can type a vendor’s name or select the “Add new” choice from this drop-down to quickly add a new vendor. The purchase order’s status appears in the “Purchase Order status” drop-down below the “Vendor” drop-down.
Confirm Emails for the Purchase Order:
To the right of the “Vendor” drop-down is an “Email” field which is populated with the vendor’s email address, if you entered it when creating the vendor’s record. Alternatively, you can enter an email if you didn’t enter it when creating the vendor or if adding a vendor “on the fly.”
If needed, to send copies of this purchase order to others, click the “Cc/Bcc” link by the “Email” field to show additional “Cc” and “Bcc” fields in a drop-down menu. Then enter the additional email addresses into these fields, as needed, and click the “Done” button.
Confirm Addresses for the Purchase Order:
The “Mailing address” field shows the selected vendor’s address. If you are creating a new vendor, enter their billing address here. To select a customer name for drop shipments, select them from the “Ship to” drop-down. If you select a customer, then their shipping address information appears in the “Shipping address” field if you entered a shipping address for the selected customer. If you don’t use the “Ship to” drop-down, then the “Shipping address” field instead shows your company’s shipping address.
Enter the Purchase Order’s Date, PO number, and Additional Information:
The “Purchase Order date” field shows the current date, by default. To change the date, click this field and select another date from the calendar drop-down that appears. To enter a shipping carrier preference, type it into the “Ship Via” field. If you added custom fields to your purchase orders, they appear below this area.
If you enabled location tracking, a “Location” drop-down appears at the right side of the window. The purchase order’s number appears in the “PO no.” field, and you can change this if you enabled custom transaction numbers for purchase orders in the company file’s “Expenses” settings. If you enabled multiple sales tax agencies, a “Permit no.” field also appears here.
If Needed, Enter Account Information in the Category Details Section:
If you enabled the “Show Items table on expense and purchase forms” toggle switch in the “Bills and expenses” section of the “Expenses” settings in the “Account and Settings” window, then the next section in the purchase order is the “Category details” section. This is also the default section that appears if this switch is not toggled to the “On” position. Note that the “Category details” section is rarely used in purchase orders, as it defeats the purpose of receiving inventory items by using a purchase order.
To collapse and expand this section, click the black arrow to the left of the “Category details” label. If you do not use products and services, you can use this section to instead select the accounts affected by your purchases. To select an account, click into the “Category” column and make a choice. Then enter the purchase description and amount into the “Description” and “Amount” fields in the same row. Rows can also be assigned to a customer/project or class, if enabled, by using the “Customer/Project” and “Class” fields.
If Needed, Select the Products and Services to Order in the Item Details Section:
Next is the more-commonly used “Item details” section, which lets you enter the products and/or services you are purchasing from the vendor. To collapse and expand this section, click the black arrow to the left of the “Item details” label. To select an existing product or service, select a choice from the “Product/Service” drop-down.
If SKUs are enabled, make sure the “SKU” field’s value is correct. Also ensure the value in the “Description” field is accurate. Then enter the quantity and rate into the “Quantity” and “Rate” fields to calculate the amount, shown in the “Amount” field. You can also assign each item to a customer/project or class, if enabled, by using the “Customer/Project” and “Class” drop-down fields.
If Needed, Insert New Rows and Duplicate the Line Items in the Purchase Order:
When you click into the last line in either section, QuickBooks Online adds a new line automatically. Alternatively, to add four new lines to the desired section at once, click the “Add lines” button under either section. To duplicate an existing line and add it as a new line beneath the original line, click the “Duplicate” button at the right end of the line to duplicate. To insert a row above a line, click into the line to select and activate it and then click the “Insert a row above” button, which looks like a plus sign, at its left end.
If Needed, Delete and Rearrange the Line Items in the Purchase Order:
To delete a line, click the “Delete” button, which looks like a trash can, at the right end of the line to delete. To delete all the lines in a section, click the “Clear all lines” button below the desired section to clear. To rearrange lines, first ensure the line to move is not selected or activated. Then hover over the 9-dot grid icon at its left end and click and drag it up or down and release it when it is in the desired location.
Optionally, Enter a Vendor Message and/or Memo:
To enter a message to the vendor that appears on the purchase order, type it into the “Your message to vendor” field below these sections. To enter information for yourself, type it into the “Memo” field, which does not appear in the purchase order. To attach a file, up to 20MB in size, to the purchase order, click the “Attachments” field.
Cancel, Clear, Print, or Save the Purchase Order:
In the toolbar at the bottom of the window are buttons for “Cancel,” “Clear,” “Print,” “Make recurring” “Save,” and a drop-down “Save and send” button. The choices in the “Save and send” button’s drop-down menu are “Save and new” and “Save and close.”
To cancel the purchase order, click the “Cancel” button. To clear all the data from the current purchase order, click the “Clear” button. To save and print the purchase order, click the “Print” button to open a print preview PDF of the purchase order in a new window, which you can then print and close. Clicking the “Make recurring” button opens the “Recurring Purchase Order” window where you can create a new recurring purchase order template, if desired.
To save the purchase order, click the “Save” button. Alternatively, click the corresponding choice from the “Save and Send” drop-down button to save the purchase order and then send it, close the window, or create a new purchase order.