Create a Query in Access – Instructions
How to Create a Query in Access: Video
This video lesson, titled “Designing Queries,” shows how to create a query in Access. This video lesson is from our complete Access tutorial, titled “Mastering Access Made Easy v.2019 and 365.”
Overview of Creating a Query in Access
Creating a New Query in Access
To create a query in Access in query design view, click the “Create” tab in the Ribbon. Then click the “Query Design” button in the “Queries” button group. Doing this then creates a new query in query design view in Access.
In query design view in Access, you add the tables from which to extract data to the top section of the query design view. You then add the fields from these tables to view in your query results into the bottom grid section, which is called the QBE grid or “Query By Example” grid. Once the fields are in place, you then add any “Criteria” and “Sorting” options, as needed, to the QBE grid. Doing this lets you filter and sort only the data you want to see.
Adding Tables to a Query in Access
The query design view in Access then shows the “Add Tables” pane at the right side of the window. This pane lets you add the table or tables needed for the query to the query design view. To add tables to a query in Access, click the names of the table or tables in this pane to add. To select multiple tables at once, hold down the “Ctrl” key on your keyboard while you click the table names to select them.
After selecting the table or tables, then click the “Add Selected Tables” button at the bottom of the “Add Tables” pane to add the selected tables to the query design view window. To close the “Add Tables” pane, when finished, click the “X” button in its upper-right corner.
Ensure you only add tables you absolutely need to run the query to the query design view. Adding additional tables you don’t use forces the query to access those tables whenever it runs, slowing it down pointlessly. It can also produce unexpected and sometimes erroneous results. As you add the necessary tables to the query, the joins you created between the tables also appear at the top of the query.
Also, ensure you add all the necessary tables for your query. For example, assume you have two tables from which to extract data- the “Customers” table and the “Employees” table. Also assume those two tables do not share a direct join between them. For the query results to make any sense, you must also add the table used to associate those two tables, as well. Assume the “Employees” table is related to the “Customers” table through the “Sales” table.
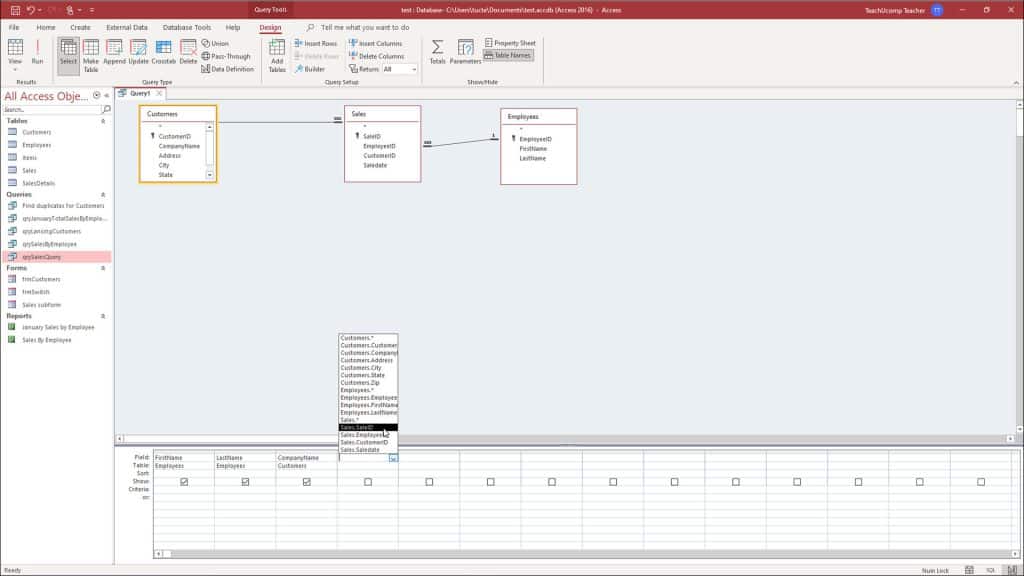
Create a Query in Access- Instructions and Video: A picture of a user creating a new query in Access in query design view.
In this case, you must also add the “Sales” table to the query, even if you don’t intend to show any data from that table. In this case, it is needed to relate the two tables from which you want to show data. If you add two tables not joined to each other in any way, the query result often produces a Cartesian product, where every value in every row of one table is multiplied by the value in every row of the second table. You will usually notice when this happens, as you will probably have several hundred, if not thousand, more records in your query result set than data records in either table.
After adding the necessary tables to the query, you should see the tables you added appear as small table diagrams at the top of the query design view. To reopen the “Add Tables” pane if you forgot a table and need to add it into the query, click the “Add Tables” button in the “Query Setup” button group on the “Design” tab of the “Query Tools” contextual tab in the Ribbon. To remove a table if you accidentally added a table you do not need, right-click the table diagram of the table to remove at the top of the query design view. Then select the “Remove Table” choice from the pop-up menu that appears.
Adding Fields to a Query in Access
To then add the fields to show in the query result set from the tables at the top of the query design view into the grid at the bottom of the query design view, click and drag the name of the fields to add from the table diagrams at the top of the view and drop them into the columns in the design grid at the bottom of the view.
Alternatively, double-click the name of a field in the table diagram to add it to the next available column in the design grid. Alternatively, select the name of a field from the drop-down that appears at the right end of the “Field” row when you click into it within a column in the design grid. Note that the order in which the fields appear in the design grid is the order those fields appear in the query result set.
Alternatively, to add all the fields from a query table into your query’s result set, click and drag the first field in the table diagram, which shows an asterisk, down into the QBE grid and release it. Doing that shows all the fields in that table in the result set of the query.
Deleting and Reordering Fields in a Query in Access
To remove a field you accidentally added to the query design grid or reorganize the order of the fields in the query design grid, first select the field’s column to delete or move in the query design grid. To select a field in the query design grid in Access, place your mouse pointer slightly above the column in the grid area to select, until you see a downward-pointing black arrow appear. Then click once to select the field.
To delete it at that point, press the “Delete” key on your keyboard. To move it, place your white mouse arrow into the thin bar at very top of the selected column, and then click and drag the selected column to the left or right. As you drag it, you will see a thick, black line appear between the columns over which you drag your mouse. This line represents where the column will insert itself when you release your mouse.
Most often, after adding the fields you want to the QBE grid, you then add sorting and filtering criteria to the query. However, if you don’t want to restrict the data that appears, you can run the query at this point.
Running a Query in Access in Query Design View
To run a query in Access and view its result set when in query design view, click the “Design” tab of the “Query Tools” contextual tab in the Ribbon. Then click the “Run” button in the “Results” button group. The result set looks like a table does when viewed in datasheet view. However, a query result set is not, by default, a “base” table in the same way your other database tables are.
The “table” produced when you run a query disappears as soon as you close the query. A query is only a definition of what data should be retrieved and displayed from the tables. Therefore, a query always shows the most “up-to-date” data every time you run it.
To switch the query back to query design view after running it, click the “View” drop-down button in the “View” button group on the “Home” tab of the Ribbon. If you click the “View” drop-down arrow, instead, then select the “Design View” choice from the drop-down menu to return to query design view.
Saving a Query in Access
To save your query in Access, click the “Save” button in the Quick Access toolbar. Then type a name for your query into the dialog box which appears. Then click the “OK” button. You can then close the query without losing your query design work.
Instructions on How to Create a Query in Access
- To create a query in Access in query design view, click the “Query Design” button in the “Queries” button group on the “Create” tab of the Ribbon.
How to Add Tables to a Query in Access
- To add tables to a query in Access, click the names of the table or tables to add to the query by clicking them in the “Add Tables” pane that appears at the right side of the window.
- To select multiple tables at once, hold down the “Ctrl” key on your keyboard while you click the table names to select them.
- After selecting the table or tables, then click the “Add Selected Tables” button at the bottom of the “Add Tables” pane to add the selected tables to the query design view window.
- To close the “Add Tables” pane, when finished, click the “X” button in its upper-right corner.
- When using query design view in Access, the tables from which you extract data appear in the top section of the query design view.
- To reopen the “Add Tables” pane in Access if you forgot a table and need to add it into the query, click the “Add Tables” button in the “Query Setup” button group on the “Design” tab of the “Query Tools” contextual tab in the Ribbon.
- To remove a table from a query in Access if you accidentally added a table you do not need, right-click the table diagram of the table to remove at the top of the query design view.
- Then select the “Remove Table” choice from the pop-up menu that appears.
How to Add Fields to a Query in Access
- To then add the fields to show in the query result set from the tables at the top of the query design view into the grid at the bottom of the query design view, click and drag the name of the fields to add from the table diagrams at the top of the view and drop them into the columns in the design grid at the bottom of the view.
- Alternatively, double-click the name of a field in the table diagram to add it to the next available column in the design grid.
- Alternatively, select the name of a field from the drop-down that appears at the right end of the “Field” row when you click into it within a column in the design grid.
- Note that the order in which the fields appear in the design grid is the order those fields appear in the query result set.
- Alternatively, to add all the fields from a query table into your query’s result set, click and drag the first field in the table diagram, which shows an asterisk, down into the QBE grid and release it.
How to Delete or Reorder Fields in a Query in Access
- To remove a field you accidentally added to the query design grid or reorganize the order of the fields in the query design grid, first select the field’s column to delete or move in the query design grid.
- To select a field in the query design grid in Access, place your mouse pointer slightly above the column in the grid area to select, until you see a downward-pointing black arrow appear.
- Then click once to select the field.
- To delete it at that point, press the “Delete” key on your keyboard.
- To move it, place your white mouse arrow into the thin bar at very top of the selected column, and then click and drag the selected column to the left or right.
- As you drag it, you will see a thick, black line appear between the columns over which you drag your mouse.
- This line represents where the column will insert itself when you release your mouse.
- Most often, after adding the fields you want to the QBE grid, you then add sorting and filtering criteria to the query. However, if you don’t want to restrict the data that appears, you can run the query at this point.
How to Run a Query in Access in Query Design View
- To run a query in Access and view its result set, click the “Run” button in the “Results” button group on the “Design” tab of the “Query Tools” contextual tab in the Ribbon.
- The result set looks like a table does when viewed in datasheet view.
- To switch the query back to query design view after running it, click the “View” drop-down button in the “View” button group on the “Home” tab of the Ribbon.
- If you click the “View” drop-down arrow, instead, then select the “Design View” choice from the drop-down menu to return to query design view.
How to Save a Query in Access
- To save a query in Access, click the “Save” button in the Quick Access toolbar.
- Then type a name for your query into the dialog box which appears and click the “OK” button.