Create Building Blocks in Word – Instructions
Create Building Blocks in Word: Video Lesson
This video lesson, titled “Creating Building Blocks,” shows you how to create building blocks in Word. This video lesson is from our complete Word tutorial, titled “Mastering Word Made Easy v.2019 and 365.”
Create Building Blocks in Word: Overview
You can create building blocks in Word to make reusable content you can insert into your future documents, when needed. For example, you could save your company’s logo and name as a custom building block. Doing this then lets you insert it into future documents without recreating all its content and formatting. The content you can save as a building block can include simple items, like text entries. However, it can also include more complex logos and watermarks, too, if desired. The building block content is saved into and organized by galleries. Also, note that you can save building blocks with your document templates for easy distribution.
To create building blocks in Word, you must first create the content to save and reuse. To do this, create the text, pictures, or whatever it is you want to save as a building block. Then select all the content to save as a building block. Note that if you want to save the formatting associated with a text selection, you must also include the paragraph mark that follows the selection as part of the building block. To do this, you may need to enable the display of non-printing characters by clicking the “Show/Hide Non-printing characters” button in the “Paragraph” button group on the “Home” tab of the Ribbon to see the paragraph marks.
After selecting the content to save, then click the “Insert” tab in the Ribbon. Then click the “Quick Parts” button in the “Text” button group. From the drop-down menu of choices, choose the “Save Selection to Quick Part Gallery…” command. Doing this then opens the “Create New Building Block” dialog box. Here is where you give Word the information it needs to store and organize the content for later use.
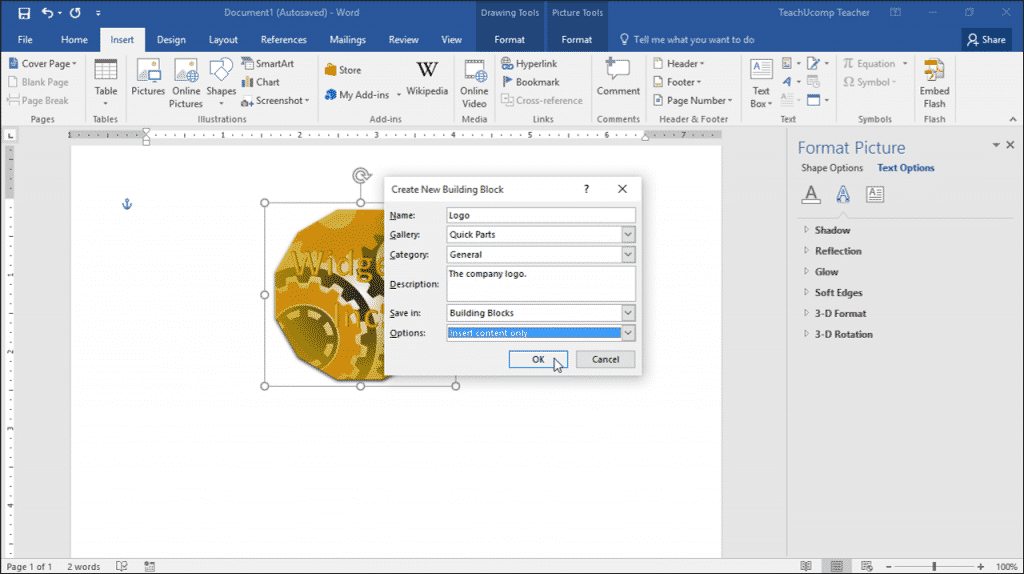
Create Building Blocks in Word – Instructions: A picture of a user creating a building block in Microsoft Word.
Enter a name for the building block into the “Name:” field. Then use the “Gallery:” drop-down to choose the type of gallery into which to save the content. Then use the “Category:” drop-down to either choose an existing classification category or create a new category. Next, enter a brief description of the content into the “Description:” field.
Then use the “Save in:” drop-down to choose the document template into which to save the content. Any document later created from the selected template will have the building block available for use. The default template for new, blank documents is called the “Normal” template. To make this building block available to all new, blank documents on the computer, choose the “Normal” choice from the “Save in:” drop-down. Otherwise, select the name of the custom template to which to save the building block. Note that to save it into a custom template, you must first open the template in Word before it can appear in the “Save in:” drop-down list in this dialog box.
After selecting a template, then use the “Options:” drop-down to choose how Word inserts the content into a document when used in the future. Your choices are “Insert content in its own page,” which inserts the building block content into its own page, with page breaks placed before and after the insertion point; “Insert in own paragraph,” which inserts the content into its own paragraph within the page; or “Insert content only,” which only inserts the building block content. After entering the information, click the “OK” button to save the selected content as a building block into the selected template.
Create Building Blocks in Word: Instructions
- To create building blocks in Word, first create and select the content to include in the building block.
- If you want to include the formatting for the content you select for a custom building block, you must include the paragraph mark that follows the selection as part of the building block.
- To save the selected content as a new building block, click the “Insert” tab in the Ribbon.
- Then click the “Quick Parts” button in the “Text” button group.
- From the drop-down menu of choices, choose the “Save Selection to Quick Part Gallery…” command to open the “Create New Building Block” dialog box.
- Then enter a name for the building block into the “Name:” field.
- Then use the “Gallery:” drop-down to choose the type of gallery into which to save the content.
- Use the “Category:” drop-down to either choose an existing classification category or create a new category.
- Then enter a brief text description of the saved content into the “Description:” field.
- Then use the “Save in:” drop-down to choose the document template into which to save the content. Any future document created from the selected template will contain the building block. Choose the “Normal” template to make the building block available to all new, blank Word documents. If you wish to save it into a custom template, you must first open the template in Word before it will appear in the “Save in:” drop-down list within this dialog box.
- Then use the “Options:” drop-down to choose how Word inserts the content into a document when used in the future. Choose “Insert content in its own page,” “Insert in own paragraph” or “Insert content only.”
- Finally, click the “OK” button.
