Create Discount Items in QuickBooks Desktop Pro – Instructions
Create Discount Items in QuickBooks Desktop Pro: Video
This video lesson, titled “How to Create Discount Items in Intuit QuickBooks Desktop Pro 2024,” shows you how to create discount items in QuickBooks Desktop Pro. This video lesson is from our complete QuickBooks tutorial, titled “Mastering QuickBooks Desktop Pro Made Easy v.2024.”
Overview:
This lesson shows you how to create Discount items in QuickBooks Desktop Pro in the Item List. When added to a sales form, a Discount item applies its discount to the line item amount directly above it. However, it is not applied to any other line items previously entered. Therefore, this item is often used in conjunction with the “Subtotal” item in sales forms.
For example, you can place the subtotal item underneath a list of line items in an invoice to get a subtotal amount. Then place the discount item under the subtotal item to remove the discount’s amount or percentage from the subtotal.
To create Discount items in QuickBooks Desktop Pro, open the “Item List.” Then click the “Item” button in the lower-left corner of the list window. Then select the “New” command from the pop-up menu to open a “New Item” window. In the “New Item” window, select “Discount” from the “Type” drop-down. Then enter a name for the discount into the “Item Name/Number” box. If the discount is a subitem of another discount item you created, check the “Subitem of” checkbox. Then select its main discount item from the adjacent drop-down.
Then enter a description of the discount to show in sales forms into the “Description” field. Enter either the percentage or amount of the discount into the “Amount or %” field. You must include the percent symbol if the number you enter is a percentage discount. Otherwise, QuickBooks assumes the number you enter is a dollar amount.
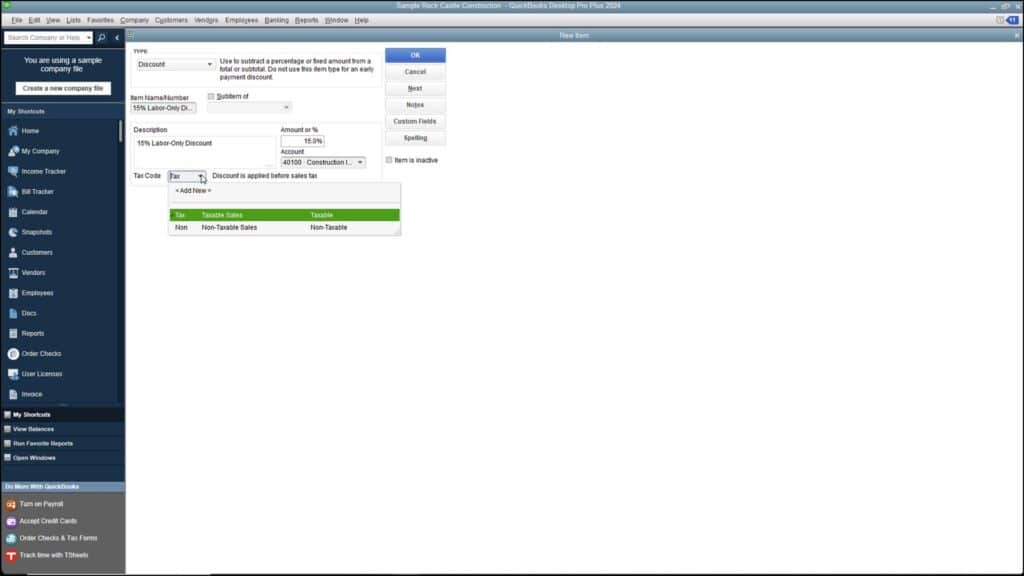
A picture showing how to create discount items in QuickBooks Desktop Pro.
Then select the account you use to track discount amounts from the “Account” drop-down. Finally, use the “Tax Code” drop-down to choose whether to take the discount before or after calculating sales tax. Select “Tax” to apply the discount before calculating sales tax. Alternatively, select “Non” to apply the discount after calculating sales tax. After creating the “Discount” item, click the “OK” button to save the item into the “Item List.”
Instructions on How to Create Discount Items in QuickBooks Desktop Pro:
- To create Discount items in QuickBooks Desktop Pro, select “Lists| Item list” from the Menu Bar.
- In the “Item List” window that opens, click the “Item” button in the lower-left corner.
- Then select the “New” command from the pop-up menu to open a “New Item” window.
- In the “New Item” window, select “Discount” from the “Type” drop-down.
- Then enter a name for the discount into the “Item Name/Number” field.
- To make the discount a subitem of another discount item, check the “Subitem of” checkbox.
- Then select the main discount item under which to categorize this item from the adjacent drop-down.
- Enter a description of the discount to show in sales forms into the “Description” field.
- Then enter either the percentage or amount of the discount into the “Amount or %” field. You must include the percent symbol if the number you enter is a percentage discount. Otherwise, QuickBooks assumes the number you enter is a dollar amount.
- Select the account you use to track discount amounts from the “Account” drop-down.
- To apply the discount before calculating sales tax, select “Tax” from the “Tax Code” drop-down.
- Alternatively, to apply the discount after calculating sales tax, select “Non” from the “Tax Code” drop-down
- To save the item into the “Item List” after creating the “Discount” item, click the “OK” button.