Create a Form in Word- Instructions and Video Lesson
Create a Form in Word: Video Lesson
This video lesson, titled “Creating a Form,” shows you how to create a form in Word. This video lesson about how to create a form in Word is from our complete Word tutorial, titled “Mastering Word Made Easy v.2019 and 365.”
Create a Form in Word: Overview
You can easily create a form in Word based on existing documents or templates. To create a form in Word, first create a normal document or template to use as the basis for your form. Then enter information into that document you want to remain unchanging. This unchanging information is also called “static” information. When finished, then insert controls and fields into the form where you want the form’s users to enter data.
Before you create a form in Word, you must show the “Developer” tab in the Ribbon. To do this, if needed, click the “File” tab in the Ribbon. Then choose the “Options” command to open the “Word Options” dialog box. In the “Word Options” dialog box, click the “Customize Ribbon” category. Then use the “Customize the Ribbon:” drop-down at the right side of the screen to select the “Main Tabs” category, if needed. Then check the checkbox next to the “Developer” tab category to enable it. Finally, click the “OK” button in the lower-right corner of this dialog box. You can also read this blog post about how to show the Developer tab in Word for detailed instructions.
Next, open the document or template to use as the basis for your form. Then click the “Developer” tab in the Ribbon. This tab lets you use the controls in the “Controls” button group to insert many types of form fields and controls. These controls let users enter information into the form.
Before inserting form controls, first create the “static,” or unchanging, document content. For example, if creating a survey form, you may create a table into which you type the questions the respondents answer. Also, leave space in the form where you plan to insert the form controls you want respondents to use when taking the survey.
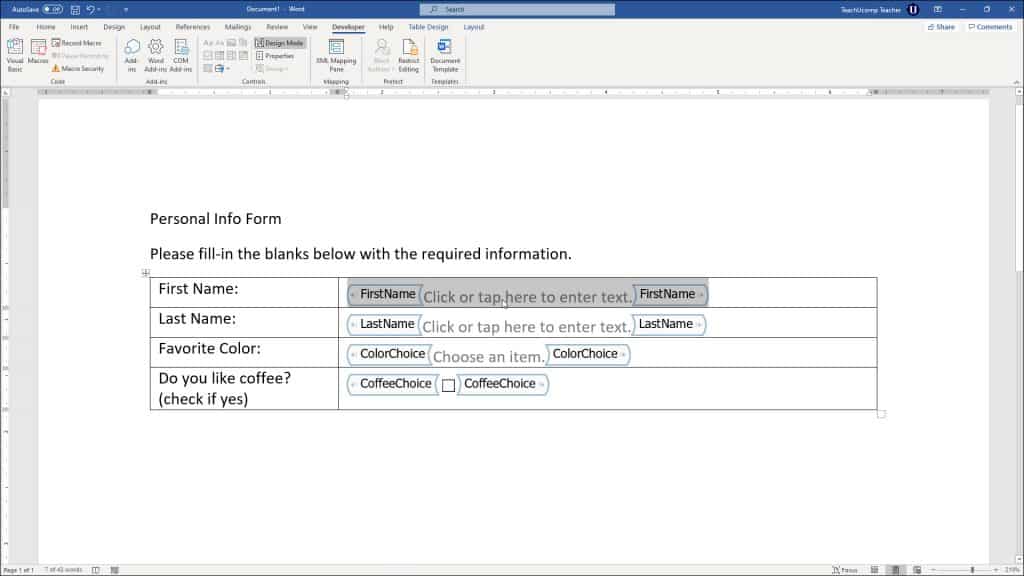
Create a Form in Word- Instructions and Video Lesson: A picture of a user creating a form in Word by using the “Developer” tab in the Ribbon.
To insert a form control, click into the position in the document where you want to insert the control. Then click the type of control to insert from the listing in the “Controls” button group on the “Developer” tab in the Ribbon.
Then select the control in the document and set its properties, as desired, by clicking the “Properties” button in the “Controls” button group on the “Developer” tab in the Ribbon. Each type of control has different properties you can change. You can also add text that helps the users complete the form.
After adding all the controls to the form, you can then optionally protect selected form elements from being changed. You can also apply protection to the entire form, if you prefer. To do this, click the “Restrict Editing” button in the “Protect” button group on the “Developer” tab of the Ribbon to open the “Restrict Editing” task pane at the right side of the document window. Then set your options in this task pane, as desired. After applying any desired form protection, the only step left is to save the form as a template to give to other Word users.
To save the form as a template, click the “File” tab in the Ribbon. Then choose the “Save As” command. In the section to the right, select the “This PC” choice and then click the “Browse” button to open the “Save As” dialog box.
Within the “Save As” dialog box, select either “Word Template” or “Word Macro-Enabled Template” from the “Save as type:” drop-down. Then type a name for the template into the “File name:” text box. After setting the desired form template options, click the “Save” button in the lower-right corner of this dialog box to save it.
Create a Form in Word: Instructions
- To create a form in Word, open the document or template to use as the basis for your form.
- Enter the information you want to remain unchanging, or “static.”
- Then insert controls and fields into the form where you want the form’s users enter information.
- To insert a form control, place your cursor at the insertion point in your document for the control.
- Then click the “Developer” tab in the Ribbon.
- Then click the control to insert in the “Controls” button group.
- To set a form control’s properties, select the control in the document.
- Then click the “Properties” button in the “Controls” button group of the “Developer” tab.
- Then set the control’s properties, as desired.
- To apply form protection, click the “Restrict Editing” button in the “Protect” button group on the “Developer” tab in the Ribbon to open the “Restrict Editing” task pane at the right side of the document window.
- Then set your form protection options in this task pane, as desired
- To save the form as a document template, click the “File” tab in the Ribbon.
- Then choose the “Save As” command.
- Then select “This PC” and click the “Browse” button to open the “Save As” dialog box.
- In the “Save as type:” drop-down, choose either “Word Template” or “Word Macro-Enabled Template.”
- Then type a name into the “File name:” text box.
- Then click “Save” to save the form template and close the dialog box.

