Create Headers and Footers in Excel – Instructions
Create Headers and Footers in Excel: Video Lesson
This video lesson, titled “Creating Headers and Footers,” shows how to create headers and footers in Excel. This video lesson is from our complete Excel tutorial, titled “Mastering Excel Made Easy v.2019 and 365.”
Create Headers and Footers in Excel: Overview
How to Create Headers and Footers in Excel
To create headers and footers in Excel, open the “Page Setup” dialog box. To do this, click the “Page Layout” tab in the Ribbon. Then click the “Page Setup” dialog box button in the lower-right corner of the “Page Setup” button group. Then click the “Header/Footer” tab within the dialog box.
The current worksheet’s header and footer appear on the “Header/Footer” tab. To apply preset header or footer information in Excel, use the “Header” and/or “Footer” drop-downs on this tab to select a set of data to show.
How to Create Custom Headers and Footers in Excel
Alternatively, to create a custom header or footer in Excel into which you can type your own data, click the “Custom Header…” or “Custom Footer…” buttons to open either a “Header” or “Footer” dialog box. Then, in either the “Header” or “Footer” dialog box, click into either the “Left section,” “Center section,” or “Right section” fields.
Then type the header or footer information to show into those spaces. In addition, Excel also gives you buttons that let you add preset fields of information into those sections of your custom headers and footers. The buttons are “Format Text,” “Insert Page Number,” “Insert Number of Pages,” “Insert Date,” “Insert Time,” “Insert File Path,” “Insert File Name,” “Insert Sheet Name,” “Insert Picture” and “Format Picture.” Click any of these buttons to insert that type of information into the currently selected area in your custom header or footer.
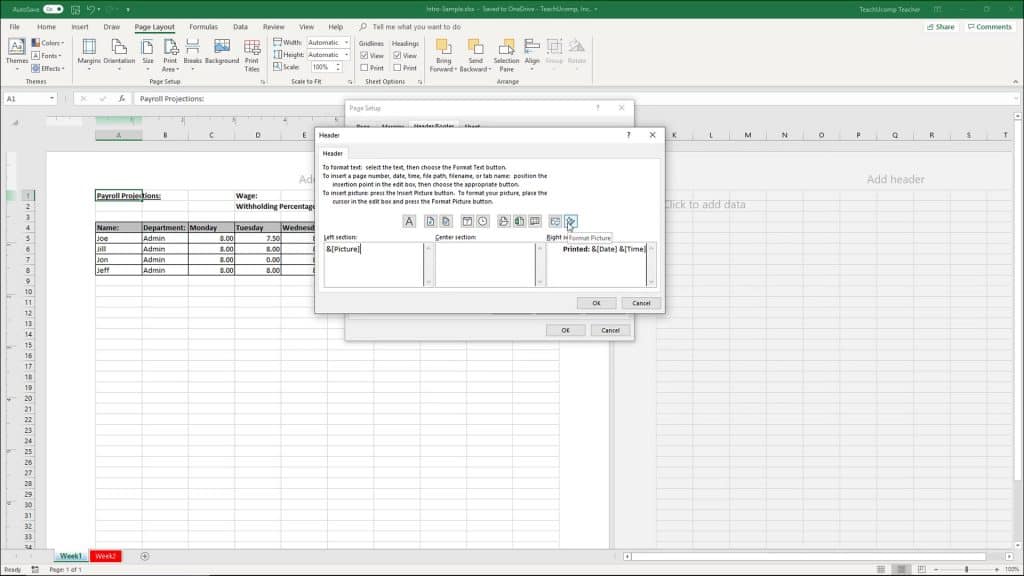
Create Headers and Footers in Excel – Instructions: A picture of the “Header” dialog box you can open from the “Page Setup” dialog box in Excel.
How to Format the Font in Headers and Footers in Excel
To format the font in headers and footers in Excel, select text typed into a custom header or footer. Then click the “Format Text” button. Then make any changes to the font you want within the “Font” dialog box that appears and click the “OK” button within it to finish.
How to Insert Pictures into Headers and Footers in Excel
To insert pictures into the header and footer in Excel, click the “Insert Picture” button. Then use the “Insert Picture” window that appears to select the image to insert. To edit the selected picture, if needed, then click the “Format Picture” button to edit the picture’s settings on the tabs of the “Format Picture” dialog box that appears. Then click the “OK” button, when finished. After setting the appearance of your custom header or custom footer in either the “Header” or “Footer” dialog boxes, click the “OK” button within it to return to the “Page Setup” dialog box.
How to Create Multiple Headers and Footers in Excel
Four checkboxes appear at the bottom of the “Header/Footer” tab. They are the “Different odd and even pages,” “Different first page,” “Scale with document,” and “Align with page margins” checkboxes.
To create different headers or footers in Excel for odd and even pages, the first page, or both, check either or both the “Different odd and even pages” and/or the “Different first page” checkboxes, as needed.
Then click either the “Custom Header…” or the “Custom Footer…” button to open the “Header” or “Footer” dialog box. Two or three tabs then appear, depending on your checkbox selections, for each unique header or footer you must create in your workbook. Click the tab of the custom header or footer to modify before adding the desired header or footer content. Then create the content the same way as you created a single custom header or footer. Once again, when finished, click the “OK” button to return to the “Header/Footer” tab in the “Page Setup” dialog box.
Checking the “Scale with document” checkbox on this tab lets you to scale the headers and footers along with the worksheet content, if needed. Checking the “Align with page margins” checkbox lets you align the headers and footers with the page margins set on the “Margins” tab. To apply your changes, when finished, click the “OK” button within the “Page Setup” dialog box.
Create Headers and Footers in Excel: Instructions
Instructions on How to Create Headers and Footers in Excel
- To create headers and footers in Excel, click the “Page Setup” dialog box button in the lower-right corner of the “Page Setup” button group on the “Page Layout” tab of the Ribbon.
- To see the current workbook’s header and footer, click the “Header/Footer” tab within the “Page Setup” dialog box.
- To select a preset header or footer, use the “Header” and/or “Footer” drop-downs on this tab.
Instructions on How to Create Custom Headers and Footers in Excel
- Alternatively, to create a custom header or footer in Excel, click either the “Custom Header…” or “Custom Footer…” button to open either a “Header” or “Footer” dialog box.
- In either dialog box, click into either the “Left section,” “Center section,” or “Right section” fields.
- Then type the header or footer information to show into those spaces.
- Additionally, to insert preset fields of information into headers and footers in either the “Header” or “Footer” dialog boxes, click the “Format Text,” “Insert Page Number,” “Insert Number of Pages,” “Insert Date,” “Insert Time,” “Insert File Path,” “Insert File Name,” “Insert Sheet Name,” “Insert Picture” and/or “Format Picture” buttons to insert that type of information into the currently selected area in your custom header or footer or to format selected header and/or footer text and/or pictures.
Instructions on How to Format the Font in Headers and Footers in Excel
- To format the font in headers and footers in Excel, select text typed into a custom header or footer.
- Then click the “Format Text” button.
- Then make any changes to the font in the “Font” dialog box that appears and click the “OK” button to apply it.
Instructions on How to Insert Pictures into Headers and Footers in Excel
- To insert pictures into the header and footer in Excel, click the “Insert Picture” button and then use the “Insert Picture” window that appears to select the image to insert.
- To edit the selected picture, if needed, then click the “Format Picture” button to edit the picture’s settings on the tabs of the “Format Picture” dialog box that appears.
- To return to the “Page Setup” dialog box after creating your custom header or custom footer in either the “Header” or “Footer” dialog boxes, click the “OK” button.
Instructions on How to Create Multiple Headers and Footers in Excel
- To create different headers or footers in Excel for odd and even pages, the first page, or both, check either or both the “Different odd and even pages” and/or “Different first page” checkboxes at the bottom of the “Header/Footer” tab, as needed.
- Then click either the “Custom Header…” or the “Custom Footer…” buttons to open the “Header” or “Footer” dialog boxes.
- Two or three tabs then appear, depending on your checkbox selections, for each unique header or footer you must create in your workbook.
- Then click the tab of the custom header or footer to create.
- Create the headers and/or footers the same way as when creating a single custom header or footer.
- When finished, click the “OK” button to return to the “Header/Footer” tab in the “Page Setup” dialog box.
- To scale the headers and footer along with the worksheet content, check the “Scale with document” checkbox on the “Header/Footer” tab.
- To align the headers and footers with the page margins specified in the “Margins” tab, check the “Align with page margins” checkbox on the “Header/Footer” tab.
- To apply your changes, click the “OK” button within the “Page Setup” dialog box.

