Create Input Masks in Access – Instructions
Create Input Masks in Access: Video
This video lesson, titled “Setting Input Masks,” shows you how to create input masks in Access. This video lesson on how to create input masks in Access is from our complete Access tutorial, titled “Mastering Access Made Easy v.2019 and 365.”
Overview of Creating Input Masks in Access
You can create input masks in Access for table fields to dictate a pattern to use for data entry in the fields. You can manually create input masks for most text, date, and number data type fields in Access, except the “Long Text” data type. Access also provides an easy, step-by-step routine called the “Input Mask Wizard” that helps you to apply input masks to selected “Short Text” and “Date/Time” data type fields.
To create input masks in Access, select the table containing the field to which to apply an input mask in the Navigation Pane. Then press the “Ctrl” + “Enter” keys on your keyboard or right-click it in the Navigation Pane and then select the “Design View” command from the pop-up menu to open the table in design view. Then select the field to which to apply an input mask in the design grid at the top of the table’s design view. In the “Field Properties” section at the bottom of the table design view’s tabbed window, select the “General” tab. Then click into the “Input Mask” field property.
Applying an Input Mask Using the Input Mask Wizard in Access
To apply an input mask to a selected “Short Text” or “Date/Time” data type field in Access by using the Input Mask Wizard, click the “Expression Builder” button. This button looks like an ellipsis symbol (…) and appears at the far-right end of the “Input Mask” property box. You must then save the table.
After saving, the “Input Mask Wizard” dialog box then opens. The wizard shows some of the most common input masks for a field. Select whichever input mask you need. Answer each question posed in each screen of the wizard and click “Next” to continue. When finished, click the “Finish” button to apply the input mask.
After saving the table, the “Input Mask Wizard” dialog box appears. The wizard shows some of the most common input masks for a field. You can select whichever input mask you need. Answer each question posed in each screen of the wizard, and click “Next” to continue through the screens. When you are done, click the “Finish” button to apply your selected input mask.
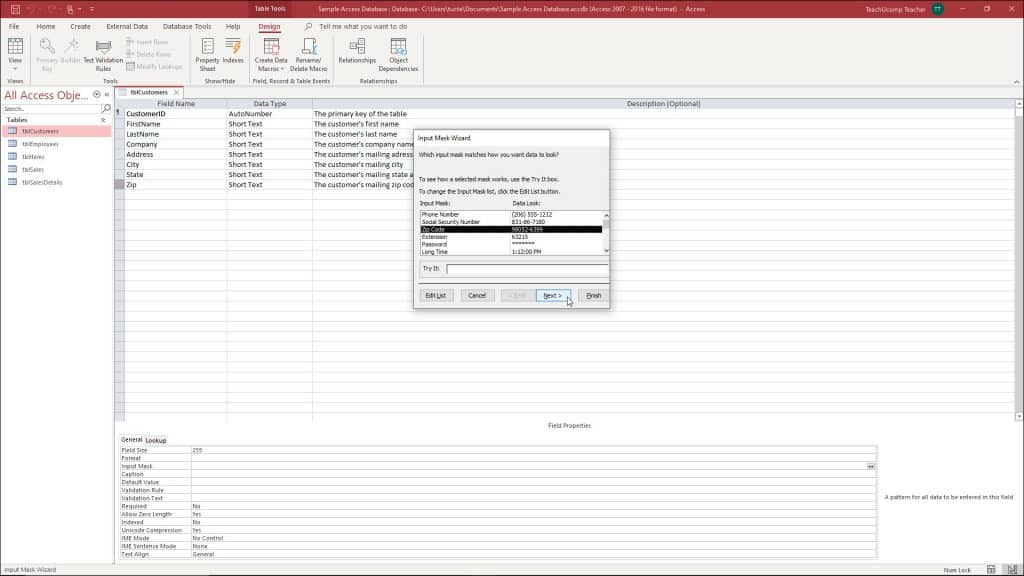
A picture of the “Input Mask Wizard” in Access you use to create input masks in Access.
Manually Applying an Input Mask in Access.
Alternatively, to manually enter the input mask in Access, type your desired input mask and, if needed, its other optional input mask arguments for its other optional sections, directly into the “Input Mask” property field. To view the special character information and optional additional argument and section information needed to manually create an input mask of your choosing, click into the “Input Mask” property field, and then press the “F1” key on your keyboard. Then click the “TextBox.InputMask property (Access)” link in the web page that opens to view this information.
If applying an input mask to a “Date/Time” field, remember that the “Format” property will conflict with the “Input Mask” property if they are different from one another, which can happen with “Date/Time” fields, so you may want to edit or remove your “Format” property, first, if applying an input mask to a date/time field. When you are done, save your changes by clicking the “Save” button in the Quick Access toolbar.
Instructions on How to Create Input Masks in Access
- To create input masks in Access, select the table containing the field to which to apply an input mask in the Navigation Pane.
- Then press the “Ctrl” + “Enter” keys on your keyboard or right-click it in the Navigation Pane and then select the “Design View” command from the pop-up menu to open the table in design view.
- Then select the field to which to apply an input mask in the design grid at the top of the table’s design view.
- In the “Field Properties” section at the bottom of the table design view’s tabbed window, select the “General” tab.
- Then click into the “Input Mask” field property.
- To apply an input mask to a selected “Short Text” or “Date/Time” data type field by using the Input Mask Wizard, click the “Expression Builder” button, which looks like an ellipsis symbol (…) and which appears at the far-right end of the “Input Mask” property box to open the Input Mask Wizard.
- You must then save the table.
- After saving, the “Input Mask Wizard” dialog box opens.
- The wizard shows some of the most common input masks for a field.
- Select whichever input mask you need.
- Answer each question posed in each screen of the wizard and click “Next” to continue.
- When finished, click the “Finish” button to apply the input mask.
- Alternatively, to manually enter the input mask, type your desired input mask and, if needed, its other optional input mask arguments for its other optional sections, directly into the “Input Mask” property field.
- To view the special character information and optional additional argument and section information needed to manually create an input mask of your choosing, click into the “Input Mask” property field, and then press the “F1” key on your keyboard.
- Then click the “TextBox.InputMask property (Access)” link in the web page that opens to view this information.
- If applying an input mask to a “Date/Time” field, remember that the “Format” property will conflict with the “Input Mask” property if they are different from one another, which can happen with “Date/Time” fields, so you may want to edit or remove your “Format” property, first, if applying an input mask to a date/time field.
- To save your changes, click the “Save” button in the Quick Access toolbar.