Create Keyword Tags in Photoshop Elements – Instructions
How to Create Keyword Tags in Photoshop Elements: Video
This video lesson, titled “Learn How to Create Keyword Tags in Adobe Photoshop Elements 2023: A Training Tutorial,” shows you how to create keyword tags in Photoshop Elements. This video lesson is from our complete Photoshop Elements tutorial, titled “Mastering Photoshop Elements Made Easy v.2023.”
Overview of How to Create Keyword Tags in Photoshop Elements:
You can create keyword tags in Photoshop Elements within the Organizer. Keyword tags are identifiers you can assign to selected images to help you organize the images. Tags categorize photos within an album. Tags are categorized in the form of people, places, events, or any other custom tag category you want to create.
You can create keyword tags in Photoshop Elements using the “New” drop-down menu within the “Tags” panel in the Organizer. After assigning tags to catalog images, you can then filter the catalog to show only photos with a selected tag. You do this by clicking the checkbox to the left of the desired tag name in the “Tags” panel. Photoshop Elements also automatically creates tags from the people, places, and events you assign to images. You can also see these tags within the “Tags” panel.
Before you create keyword tags in Photoshop Elements, ensure the “Tags” panel is displayed in the Organizer by clicking the “Keyword/Info” button in the Taskbar. Then click the “Tags” button at the top of the “Keyword/Info” panel at the right side of the screen. If needed, expand the “Keywords” section in the panel by clicking the black arrow to the left of the word “Keywords” in the panel. Doing this then displays any existing keywords you have created. You can click this black arrow to both expand and collapse the “Keywords” section in the panel.
To create keyword tags in Photoshop Elements, click the “New” button, which looks like a green plus sign, to the right of the “Keywords” label in the panel. Alternatively, you can click the drop-down arrow at the right side of the button. Then choose the “New Keyword Tag…” command from the drop-down menu that appears. Either way, the “Create Keyword Tag” dialog box then appears onscreen.
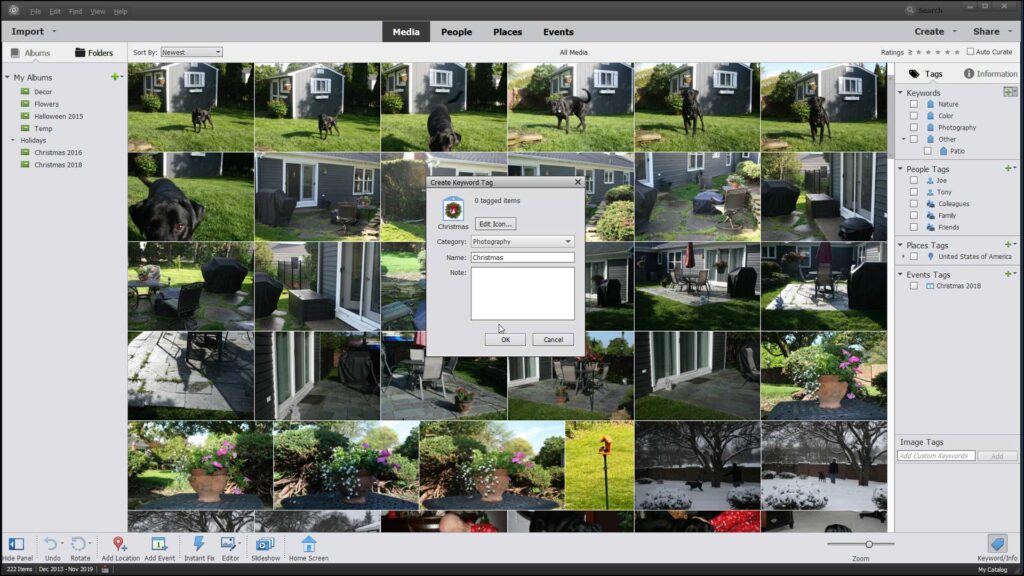
A picture showing how to create keyword tags in Photoshop Elements by using the “Create Keyword Tag” dialog box.
To use an image saved as a .jpg, .bmp, .png or .gif as a custom icon for your new tag, click the “Edit Icon…” button in this dialog box to open the “Edit Keyword Tag Icon” dialog box. Click the “Import…” button in the dialog box. Then navigate to the image to use as your icon. Then select the image and click the “Open” button return to the “Edit Keyword Tag Icon” dialog box. You can then click the “OK” button to add the selected photo as the icon for the new tag.
Then you must select a tag category into which to place the new tag from the “Category” drop-down. Type a name for the new tag into the “Name” field. Then add any notes about the tag into the “Notes” field. When finished, click the “OK” button to create your new tag.
Instructions on How to Create Keyword Tags in Photoshop Elements:
- Open the Organizer window in Photoshop Elements.
- Show the “Tags” panel by clicking the “Keyword/Info” button in the Taskbar.
- Then click the “Tags” button at the top of the “Keyword/Info” panel at the right side of the screen.
- If needed, expand the “Keywords” section in the panel by clicking the black arrow to the left of the word “Keywords” in the panel. You can click this black arrow to both expand and collapse the “Keywords” section.
- To create keyword tags in Photoshop Elements, click the “New” button, which looks like a green plus sign, to the right of the “Keywords” label in the panel.
- Alternatively, click the drop-down arrow at the right side of the button.
- Then choose the “New Keyword Tag…” command from the drop-down menu that appears.
- After performing either action, the “Create Keyword Tag” dialog box then appears.
- To use an image saved as a.jpg, .bmp, .png or .gif as a custom icon for your new tag, click the “Edit Icon…” button in this dialog box to then open the “Edit Keyword Tag Icon” dialog box.
- Click the “Import…” button in the dialog box and then navigate to the image to use as your icon.
- Then select the image and click the “Open” button return to the “Edit Keyword Tag Icon” dialog box.
- Then click the “OK” button to add the selected photo as the icon for the new tag.
- Next, you must select a tag category into which to place the new tag from the “Category” drop-down.
- Type a name for the new tag into the “Name” field.
- Then add any notes about the tag into the “Notes” field.
- When finished, click the “OK” button to create your new tag.
- To filter the catalog to show only images associated with a tag, after assigning tags to catalog photos, click the checkbox to the left of the desired tag name in the “Tags” panel.

