Create Tables in Word – Instructions
Create Tables in Word: Video Lesson
This video lesson, titled “Creating Tables,” shows how to create tables in Word. This video lesson is from our complete Word tutorial, titled “Mastering Word Made Easy v.2019 and 365.”
The next video lesson, also titled “Creating Tables,” shows the same information about how to create tables in Word. However, this video shows how to do it within Word 2010. The instructions for both versions are the same.
Create Tables in Word: Overview
About Creating Tables in Word:
You can create tables in Word for many reasons. It is possible to create tables in Word that manipulate data, like a spreadsheet program. You can also create tables in Word to simply store data. Alternatively, you can use them to help you structure the layout of document content.
The cells within a table can hold more than text and numbers. You can place any content you want into table cells, like pictures. You can also edit individual table cells or create and delete entire columns and rows of cells. However, before you can manipulate tables, you must first learn how to create tables in Word. This lesson starts by showing you how to create a basic structured table layout. These types of tables, which resemble grids, have a consistent structure. These tables are often used for data storage.
After creating structured tables, you will then learn how to create tables in Word that have an irregular cell structure. You often use these types of tables for document layout. For example, if you wanted to create a coupon cutout in a document, you could place the coupon information into cells in a table to enhance its appearance.
How to Create Tables in Word that Have a Consistent Structure:
To create a basic structured table in Word, click the “Insert” tab in the Ribbon. Then click the “Table” button in the “Tables” button group to display a drop-down menu. Then roll your mouse pointer out and over the grid in the drop-down menu by the number of columns and rows to insert into the table. When you roll your mouse pointer over the grid, the table’s dimensions appear above the grid as the number of columns by the number of rows. Click your mouse when you have the desired number of columns and rows highlighted. Doing this then inserts a table of the displayed dimensions into your document.
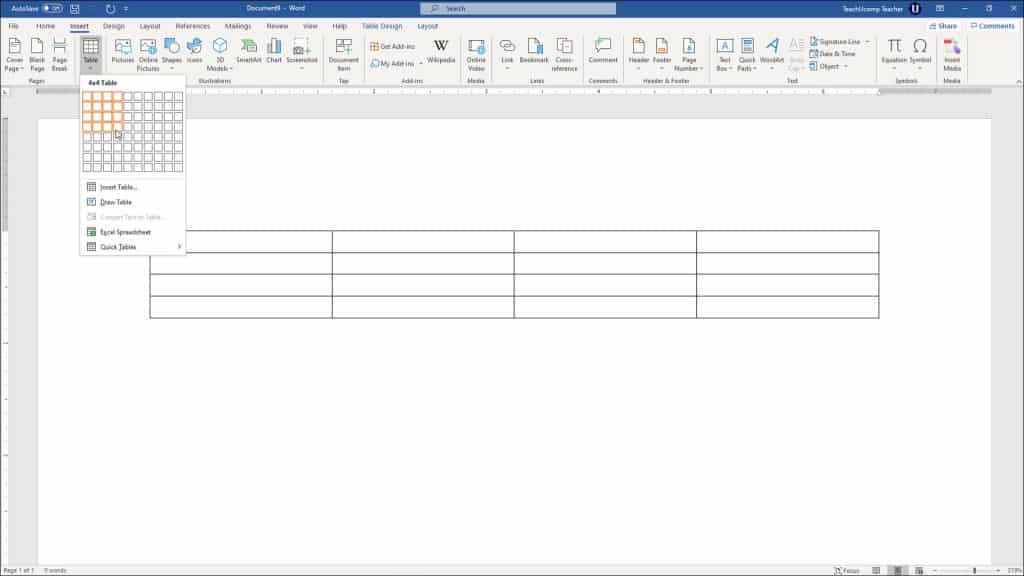
Create Tables in Word – Instructions: A picture of a user creating tables in Word by using the grid in the “Table” button’s drop-down menu.
How to Enter Data into Tables in Word:
To perform data entry after creating the table in Word, you can either click into the table cells into which to enter the data or press the “Tab” key on your keyboard to move from cell to cell, from left to right and top to bottom. If you press the “Tab” key when in the last table cell in the lower-right corner, Word then inserts a new row at the bottom of the table, so you can continue entering data.
Cells can also contain multiple lines of text, if needed. Entering text into a cell is the same as when entering text into a document. When the text reaches the cell’s border, it automatically wraps down to the next line in the cell. You only need to press the “Enter” key on your keyboard to create a new paragraph in a cell.
An Alternative Way to Create Structured Tables in Word:
Another way to create a structured table is to click the “Insert” tab of the Ribbon. Then click the “Table” button in the “Tables” button group. Then select the “Insert Table…” command to open the “Insert Table” dialog box. In this dialog box, enter the number of columns and the number of rows for the new table into the two boxes in the “Table size” section.
The “AutoFit behavior” section lets you choose how Word determines the size to make the table’s columns. You can select “Fixed column width” to make the columns a set size. Then use the adjacent spinner to set the width yourself. You can select the “AutoFit to contents” option to let Word adjust the width of the columns based on the content you enter into them. You can select “AutoFit to window” to let Word adjust the column to fit the window width. Then click the “OK” button to insert a table of the specified dimensions into your document.
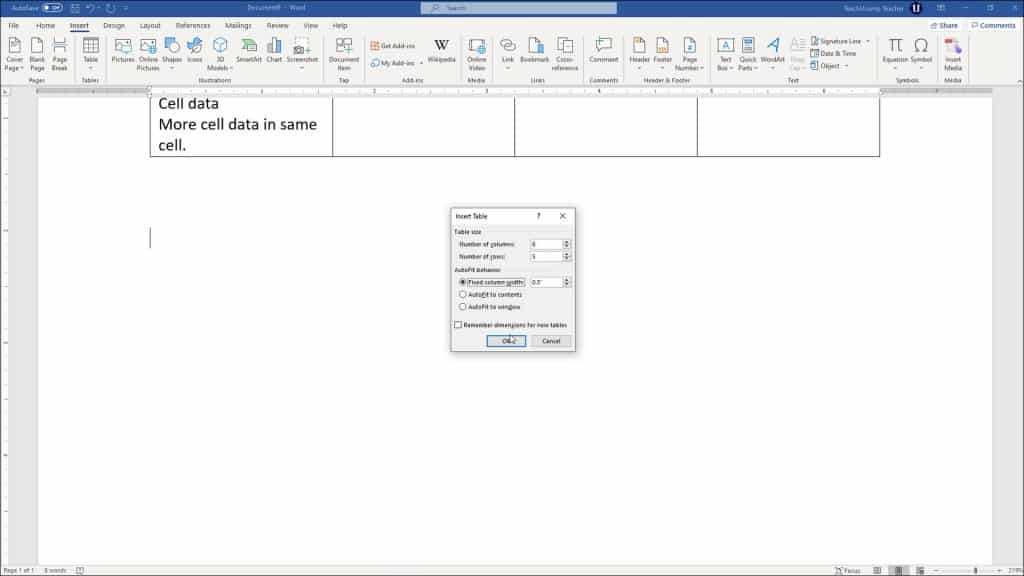
Create Tables in Word – Instructions: A picture of a user creating tables in Word by using the “Insert Table” dialog box.
How to Manually Create Tables in Word:
You will now learn how to create tables in Word by drawing individual table cells by hand. While you can use this method to create an organized, structured table, it is more often used to create a document layout. You can also use it to make minor adjustments to a structured table.
To draw a table in Word, click the “Insert” tab in the Ribbon. Then click the “Table” button in the “Tables” button group. Then select the “Draw Table” command from the drop-down menu. Your mouse pointer then turns into a pencil icon when you hold it over the document. At that point, click and drag to draw the table cells you want. You can also click and drag within a cell from one side to another to split the cell into additional columns and rows of cells.
Note that this tool remains enabled after you finish drawing the table cells. To turn this feature off, click the “Insert” tab in the Ribbon. Then click the “Table” button in the “Tables” button group. Then select the “Draw Table” command again. Alternatively, you can press the “Esc” key on your keyboard to turn it off.
Formatting Table Lines When You Manually Create Tables in Word:
After you first select the “Draw Table” command and then start drawing table cells, then either the “Table Design” and “Layout” contextual tabs or the “Design” and “Layout” tabs of the “Table Tools” contextual tab appear in the Ribbon, depending on your Office version. The “Table Design” contextual tab lets you use the buttons in the “Borders” button group to change the line style, line thickness, and line color of the lines you draw using the “Draw Table” button.
The “Line Style” drop-down lets you select a different line style to apply. Likewise, the “Line Weight” drop-down lets you select a thickness of line to draw. The “Pen Color” drop-down button lets you select the line color. You can then use the “Draw Table” button to draw lines that match the settings you selected. You can also click and drag over table lines you have already drawn to re-draw the lines using the new formatting.
Erasing Table Lines When You Manually Create Tables in Word:
When you are learning to draw table cells, you will inevitably make a few errant lines. You can erase table lines by using the “Eraser” button. To erase table lines in Word, click the table’s “Layout” contextual tab in the Ribbon. Then click the “Eraser” button in the “Draw” button group. After clicking this button, your mouse pointer turns into an eraser when you hold it over the document.
Place the eraser over the table line to remove. Then click and drag the mouse over the line to erase. It can be a bit tricky at first. The line you will delete should appear highlighted before you release the mouse button. The “Eraser” button, like the “Draw Table” button, remains enabled until you turn it off. To turn it off, click the “Eraser” button again or press the “Esc” key on your keyboard.
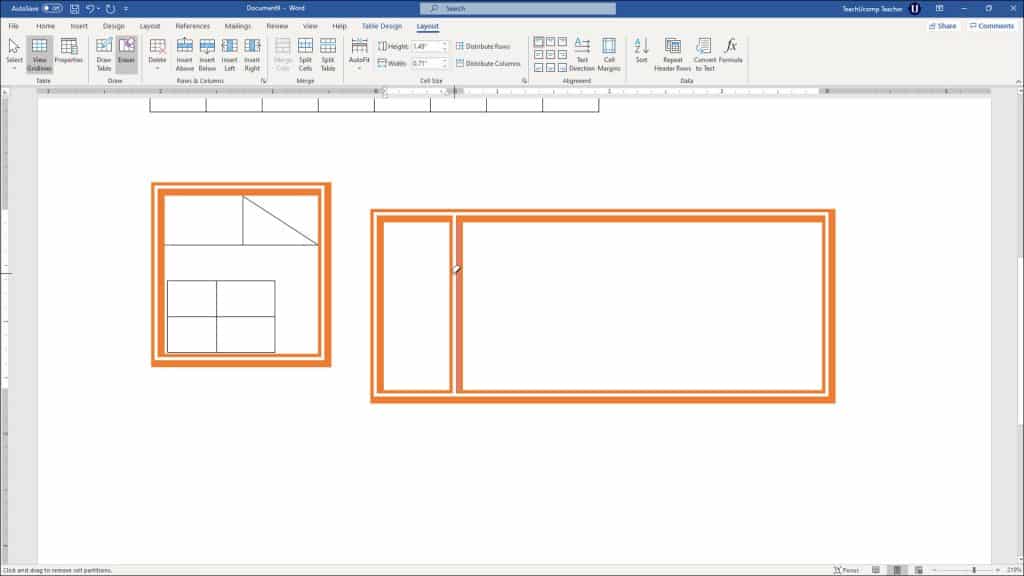
Create Tables in Word – Instructions: A picture of a user erasing existing table lines in Word by using the “Eraser” button.
Create Tables in Word: Instructions
How to Create Tables in Word That Have a Consistent Structure
- To create a basic structured table, click the “Insert” tab in the Ribbon.
- Then click the “Table” button in the “Tables” button group to display a drop-down menu.
- Roll your mouse pointer over the grid by the number of columns and rows to insert into a new table in your document.
- The table’s dimensions appear above the grid as the number of columns by the number of rows.
- Click your mouse after you have the desired number of columns and rows highlighted in the grid to insert the table.
How to Perform Data Entry After You Create Tables in Word
- To select a table cell into which to enter data, click into the cell with your mouse.
- To move to a new table cell, press the “Tab” key after clicking into a cell to move to the next cell in the row, from left to right and top to bottom.
- If you want to insert a new row to continue data entry, press the “Tab” key when your cursor is in the last cell in the last row of your table (lower-right corner).
- If you want to enter multiple lines of text in a cell, type the text into the cell and it automatically wraps in the cell when it reaches the cell’s border.
- To create a new paragraph in a cell, press the “Enter” key on your keyboard.
An Alternative Way to Create Tables in Word That Have a Consistent Structure
- To create a structured table using the “Insert Table” dialog box, click the “Insert” tab in the Ribbon.
- Then click the “Table” button in the “Tables” button group.
- Then select the “Insert Table…” command to open the “Insert Table” dialog box.
- Enter the number of columns and rows in the two boxes in the “Table size” section.
- To set how Word determines the size of the table’s columns, select an option in the “AutoFit behavior” section.
- Select “Fixed column width” to make the columns a fixed size and then use the adjacent spinner box to set the width.
- Select “AutoFit to contents” to let Word adjust the width of the columns based on their contents.
- You can select “AutoFit to window” to let Word adjust the column width to fit the window width.
- Then click the “OK” button to create the table.
How to Manually Create Tables in Word
- To draw a table in Word, click the “Insert” tab in the Ribbon.
- Then click the “Table” button in the “Tables” button group.
- Then choose the “Draw Table” command from the drop-down menu.
- Your mouse pointer then turns into a pencil icon when you hold it over the document area.
- Click and drag your mouse in the document to draw the table cells you want.
- Click and drag from side to side within a cell to split the cell into additional rows and columns of cells.
- To turn off the “Draw Table” function, click the “Insert” tab in the Ribbon.
- Then click the “Table” drop-down in the “Tables” button group.
- Click the “Draw Table” command in the drop-down menu again.
- Alternatively, press the “Esc” key on your keyboard to exit the “Draw Table” function.
How to Format Tables You Manually Draw in Word
- When you create tables in Word, then either the “Table Design” and “Layout” contextual tabs or the “Design” and “Layout” tabs of the “Table Tools” contextual tab appear in the Ribbon, depending on your Office version.
- The “Table Design” contextual tab lets you use the buttons in the “Borders” button group to change the line style, line thickness, and line color of the lines you draw using the “Draw Table” button.
- To change the line style, line thickness and line color of table lines if using the “Draw Table” function, use the “Line Style,” “Line Weight” and “Pen Color” drop-downs on this contextual tab.
- Then use the “Draw Table” command again to create table cells that have lines that match the settings you just created.
- Alternatively, click and drag over existing table lines to change their formatting.
How to Erase Table Lines in Word
- To erase table lines in Word, click the table’s “Layout” contextual tab in the Ribbon.
- Then click the “Eraser” button in the “Draw” button group.
- Your mouse pointer then turns into an eraser.
- Place the mouse pointer over the table line to remove
- Then click and drag the mouse over the line to erase.
- The line will appear highlighted before you release the mouse button.
- Release the mouse button to erase the highlighted line.
- To turn the “Eraser” off, click the “Layout” tab of the “Table Tools” contextual tab.
- Then click the “Eraser” button in the “Draw” button group.
- Alternatively, press the “Esc” key on your keyboard.

